Author: flowlabowner

  • Without RFP Bloat: Software Vendor Selection for Procurement Teams

    Without RFP Bloat: Software Vendor Selection for Procurement Teams

    The right approach is disciplined, not clever: build a longlist, cut it to a shortlist through a Rapid RFI, score demos and a proof of concept against weighted criteria, then negotiate a contract that protects your exit. Follow that order and most bad purchases never happen. An app development company may run this same logic for SME app decisions, including a free app fit review before any commitment is made. The rest of this guide walks through each step with the checklists you need.


    TL;DR:

    • Most vendors should be evaluated through a rapid RFI followed by scoring demos and proofs of concept on real data for accurate technical fit.
    • Must-have criteria include core functionality, integration ability, security certifications, and clear exit and cost terms, with should-haves informing weighted scores.
    • Limit your shortlist to three to five vendors and develop a weighted scorecard that involves stakeholders from finance, IT, and operations to ensure comprehensive evaluation.
    • Conduct demos with identical scenarios using your own data and set measurable success criteria, updating the scorecard before making a final decision.
    • Final negotiations should focus on clear data export rights, fixed pricing, termination terms, SLA remedies, and avoiding proprietary data lock-in.

    Flowlab
    Find the Right App Fit
    FlowLab helps SMEs clarify operational challenges and compare practical app options before development, with costs made clearer upfront.

    Table of Contents

    What are the core criteria for software vendor selection?

    Most procurement teams fail before they even see a demo, because their requirements list has forty items and nobody agreed which ones actually matter. Keep your must-haves to a moderate number of genuine deal-breakers. Saaskart’s buyer’s guide recommends MoSCoW prioritisation (Must have, Should have, Could have, Won’t have) specifically to stop feature creep from turning a simple decision into a six-month debate.

    Sort your criteria into three tiers before you contact a single vendor:

    • Must-haves (pass/fail): core functional fit, data export and portability, required security certifications, and any legal or compliance gate specific to your sector.
    • Should-haves (weighted): integration depth with existing systems, vendor roadmap and financial viability, support responsiveness, and local service capability.
    • Nice-to-haves (tiebreakers only): advanced reporting, white-labelling, or features you might grow into in two years.

    Functional fit and integrations deserve the most scrutiny. Ivalua’s vendor selection guidance points out that software decisions differ from general procurement precisely because technical integration and API depth determine whether a tool actually works with what you already run, not just whether the sales deck looks impressive. A vendor that scores brilliantly on features but can’t connect to your accounting system or point-of-sale is not a finalist, no matter how the demo went.

    Pro Tip: Write your must-have list before you look at a single vendor website. If you draft criteria after seeing a product you like, you’ll unconsciously write requirements that only that product satisfies.

    Total cost of ownership, scalability under real load, and exit terms belong on this list too. They rarely decide who gets shortlisted, but they decide who you regret choosing eighteen months later.

    How do you run the vendor evaluation process step by step?

    The whole exercise runs faster than most teams expect when it’s structured properly. Here is the sequence:

    1. Build the longlist. Pull 8 to 15 vendors from analyst reports, peer referrals, and category directories. Viewpoint Analysis’s selection playbook treats this range as the sweet spot: wide enough to avoid missing a strong option, narrow enough that nobody drowns in spreadsheets.
    2. Run a Rapid RFI. Instead of a lengthy written questionnaire, ask each vendor for a short, presentation-based response to your actual problem. This surfaces real working approaches faster than a document exchange ever does.
    3. Cut to a shortlist of 3 to 5. Viewpoint Analysis suggests narrowing to several vendors for deep evaluation; Saaskart’s guide recommends a small number of finalists for the scored round. Either approach works, provided you avoid expanding the list unnecessarily.
    4. Issue a structured RFP. State the problem plainly and ask every shortlisted vendor to respond in the same format, so responses are genuinely comparable side by side.
    5. Score demos and POCs, then negotiate. This is where the scorecard in the next section earns its keep.

    Stakeholder roles matter more here than most teams admit. Finance should own TCO scrutiny, IT should own integration and security, and operations should own the workflow-fit questions, because a vendor that thrills the IT team can still be unusable for the people typing into it every day.

    Timelines vary by stakes. A small departmental tool might move from longlist to signature in three to four weeks. A platform touching finance, HR, or customer data across the business can reasonably take two to three months, and rushing that timeline is how expensive mistakes happen.

    How do you build a weighted scorecard for vendor decisions?

    A scorecard turns “we liked them best” into a defensible decision, and it stops the loudest voice in the room from winning by default. The mechanism is simple: assign a weight to each evaluation dimension, score every finalist from 1 to 5 on each one, then multiply weight by score and total the results.

    Treat security certifications and legal compliance as binary gates rather than scored dimensions. A vendor either meets your non-negotiable requirement or it doesn’t; scoring it on a sliding scale invites you to talk yourself into a risk you shouldn’t take.

    A few practices separate a useful scorecard from a box-ticking exercise:

    • Split scoring across stakeholder types (finance, IT, operations) rather than letting one person fill it in alone, which spreads the risk of blind spots.
    • Score immediately after each demo, not at the end of the week, because recency bias quietly favours whichever vendor presented last.
    • Keep the scoring scale identical across every dimension (1 to 5 everywhere) so weighted totals stay comparable.

    How should you structure demos and a proof of concept?

    Vendors are professional presenters, and a generic demo tells you almost nothing about how their product handles your actual work. Insist on this instead:

    1. Set identical scenarios. Give every shortlisted vendor the same two or three real workflows drawn from your own operation, and require them to demonstrate those specific scenarios rather than their standard pitch.
    2. Use your own data where possible. A proof of concept run on sample data proves very little; a POC run on your invoices, your customer records, or your queue volumes proves a lot.
    3. Time-box the POC. Two to four weeks is usually enough to expose real friction without letting the exercise drag into a free implementation.
    4. Capture measurable outcomes. Track task completion time, error rates, and whether the success criteria you set beforehand were actually met, not just whether the team “liked using it.”
    5. Feed results straight into the scorecard. POC scores should update the technical fit and functional fit rows before the final decision, not sit in a separate report nobody reopens.

    The Saaskart buyer’s guide treats a scorecard-plus-POC combination on real data as the single strongest predictor of a successful deployment, ahead of almost any other selection step.

    What security and compliance checks actually matter?

    Certification badges tell you a vendor passed an audit once. They don’t tell you what the audit found. Request SOC 2 Type II and ISO 27001 documentation as a starting point, then go further:

    • Ask for the full SOC 2 report, not just the summary letter, and read the exceptions section.
    • Request the vendor’s written management response to any exception noted.
    • Confirm data residency, meaning which country or region actually stores your data.
    • Get the current subprocessor list and a signed Data Processing Agreement.
    • Request the incident response plan and the security-related terms inside the SLA.

    A SOC 2 report is not a pass or fail stamp. Drata’s guidance on audit exceptions explains that a vendor can hold a perfectly valid SOC 2 certificate while the report itself lists exceptions covering access controls, patching cadence, or monitoring gaps that matter enormously to your specific implementation. Reading only the certification badge and skipping the exceptions page is one of the most common blind spots in vendor due diligence software processes, and it’s an easy one to fix simply by asking for the full document.

    How do you calculate total cost of ownership and negotiate terms?

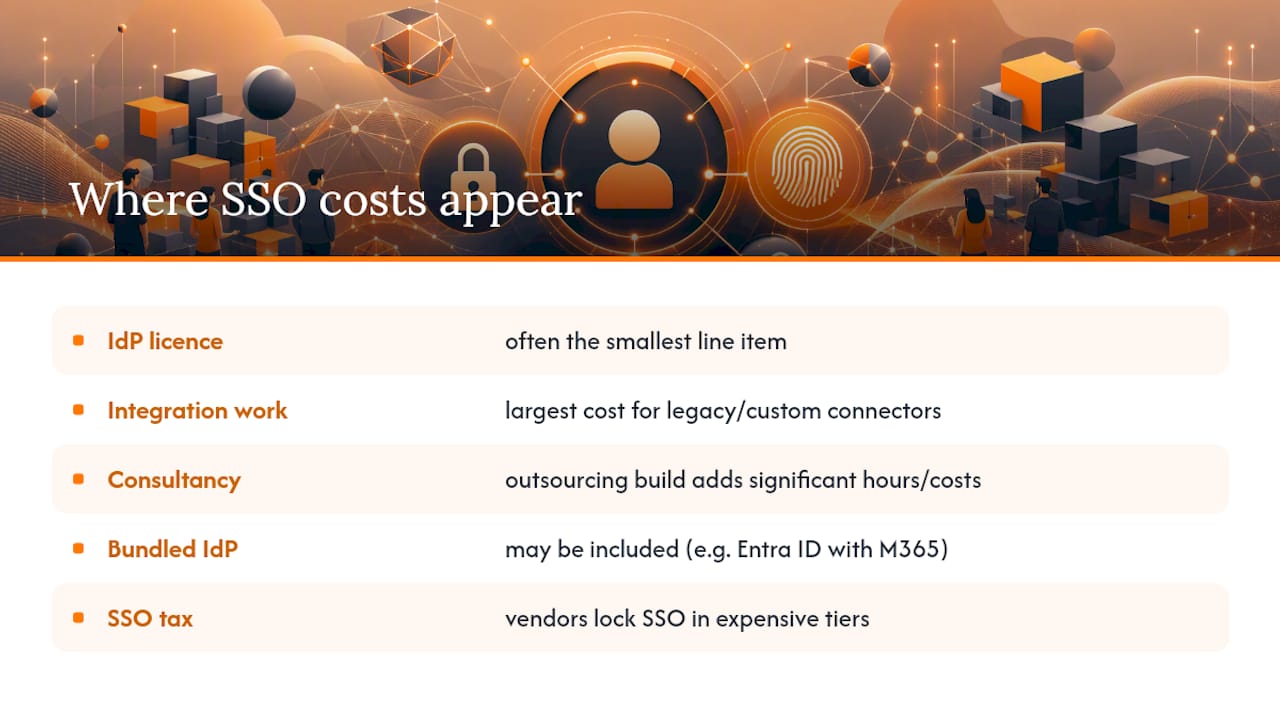
    The subscription price on a vendor’s website is rarely the number you’ll actually pay. A realistic total cost of ownership model includes implementation and data migration, staff training, ongoing administration time, add-on modules you’ll likely need within a year, usage-based fees, and the cost of exiting if things don’t work out; tools like the App intelligence & revenue tracker can help benchmark pricing and total cost models effectively. Saaskart’s TCO guidance warns that skipping migration and exit costs is exactly how a “cheap” tool ends up the most expensive one in the stack.

    Before signing, prioritise these contract terms:

    • Data export rights, spelled out in plain language, not left to a vague “reasonable assistance” clause.
    • Price-increase caps, ideally capped at a fixed percentage per renewal.
    • Clear termination and exit terms, including notice periods and data return timelines.
    • SLA remedies, meaning what you actually get (service credits, refunds) when uptime targets are missed.
    • Indemnities covering data breaches and IP disputes.

    On tactics, ask for pilot-to-scale pricing so a small initial rollout doesn’t lock you into enterprise-tier fees, push for a price lock across the contract’s full term, and tie milestone payments to delivery rather than paying everything upfront. BusiStack’s procurement guidance also flags proprietary data formats as a lock-in risk worth negotiating away before signature, not after.

    How do you manage implementation and adoption after signing?

    Selection is only half the job. What happens in the first 90 days determines whether the vendor you picked actually delivers the outcome you built the business case around.

    1. Name an implementation owner on day one, someone accountable for the rollout rather than a committee.
    2. Set 30/60/90-day success criteria tied directly to the business case that justified the purchase.
    3. Plan training and change management before go-live, not as an afterthought once staff are already confused.
    4. Agree a support handover point, so everyone knows when the vendor’s implementation team steps back and ongoing support takes over.
    5. Set a review cadence and an exit trigger, a defined point at which persistent failure to hit success criteria means walking away rather than sinking further budget into a bad fit.

    Pro Tip: Write the exit trigger into your internal plan before implementation starts, not after problems appear. Deciding “we’ll cut losses if X isn’t working by month three” is far easier before anyone has an emotional stake in defending the choice.

    Applying this framework to SME app decisions

    Most of the failure Flowlab sees in SME software choices happens before a single vendor is contacted: the business hasn’t separated what it genuinely needs from what sounds useful. An app development process often starts by understanding the operational problem first, whether that’s a queue that backs up at lunch or leads that go cold in a spreadsheet, and only then maps that problem against must-have versus should-have requirements.

    That diagnosis usually points to one of three answers: an existing product adapted to the workflow, a ready-made tool used as-is, or a custom build when nothing off the shelf fits the process. The mistake most SMEs make is assuming custom is always better, when an adapted product frequently hits the same must-haves at a fraction of the cost and timeline. Vendor-neutral evaluation, applied honestly, sometimes points away from a bespoke build even when a bespoke build is the more exciting pitch.

    — Ronald

    How Flowlab helps you skip the guesswork

    If your shortlist keeps coming back to “build something custom for our workflow,” Flowlab offers a more direct route than running a full RFP cycle for a single internal tool. A complimentary app fit review looks at your actual operational problem first, then tells you honestly whether a ready-made product, an adapted foundation, or a custom build is the cheapest suitable answer, with clear cost expectations before anything is scoped. This mirrors the same must-have discipline covered above, applied specifically to SME app decisions rather than enterprise platforms.

    How Flowlab helps you skip the guesswork — overview diagram

    For teams managing walk-in customers or bookings, it’s worth seeing this in practice: try the complete queue journey through Flowlab’s QueueFlow demo to see how a ready-built workflow can replace a custom project entirely. If your operation is retail or F&B specific, Flowlab’s SME operations guidance covers the sector questions worth asking before you commit to any vendor. Book a free app fit review through Flowlab’s app development page to get a scoped answer before you spend a single dollar on development.

    Sources

    FAQ

    What does “vendor selection” mean?

    Vendor selection is the structured process of identifying, evaluating, and choosing a supplier, in this case a software provider, based on defined criteria such as functional fit, cost, security, and support before signing a contract.

    What are the typical steps in the vendor selection process?

    The usual sequence runs: define business needs, build a longlist, run an RFI to shortlist, issue an RFP, score demos and a proof of concept against a weighted scorecard, then negotiate contract terms and finalise governance.

    What is a software vendor?

    A software vendor is a company that develops, sells, or supports software products or services, ranging from off-the-shelf tools to custom-built platforms for a specific business.

    How do you evaluate vendor management software or tools?

    Evaluate vendor management tools the same way you’d evaluate any vendor: check functional fit against your must-haves, confirm integration with existing systems, review security certifications and their exceptions, and model total cost of ownership before comparing shortlisted options head to head.

    How many vendors should be on a shortlist?

    Most procurement guidance settles on three to six vendors for deep evaluation, wide enough to keep genuine competition but narrow enough that demos and proof-of-concept testing stay manageable within a few weeks.

  • SMEs: 5 tests to decide build vs buy in internal tool development

    SMEs: 5 tests to decide build vs buy in internal tool development

    Most SMEs should buy or configure an existing tool rather than build one from scratch. Custom internal tool development only earns its cost when the workflow is genuinely unique to your business, will still matter in three years, and nothing on the market does the job well enough. Before you commit either way, map your current spreadsheet process and run the two tests in the next section.


    TL;DR:

    • Most SMEs should prioritize buying or configuring existing tools unless their workflow is highly unique, lasting three years, and not well-supported by the market.
    • Building internal tools for internal use is only justified if the development is cheaper over five years than buying, and the workflow truly differs from common processes.
    • Choosing between no-code, low-code, custom, or hybrid approaches depends on team size, integration needs, and the importance of security and control.
    • The smallest viable version of a tool should replace one manual step with a clear scope, user roles, essential data fields, and minimal integrations.
    • Long-term costs are heavily influenced by the number of integrations, auditability, automation complexity, and licensing models, not just initial development expenses.

    Flowlab
    Find the right app approach
    FlowLab helps SMEs assess operational challenges and compare ready-made, adapted, or custom app solutions for their workflow needs.

    Explore app solutions

    Table of Contents

    What is internal tool development, and how do you decide whether to build?

    Internal tool development means creating software used only inside your business, such as an approval workflow, a lead tracker, or a booking system, rather than software you sell to customers. It sits apart from customer-facing product development because the only users are your own staff, which changes what “good enough” looks like. A clunky interface that a trained employee tolerates is a completely different problem to a clunky interface that costs you sales.

    The decision hinges on two tests before anything else. The OpsAutomators build-vs-buy framework calls these the money test and the uniqueness test, and they work well as a first filter for any SME.

    The money test: would building this tool cost less over three to five years than paying for a ready-made or configurable alternative, once you include your own team’s time? Custom software development almost always looks cheaper on day one and more expensive by year two, because nobody budgets for the maintenance tail.

    The uniqueness test: does this workflow genuinely differ from what thousands of other businesses do, or does it just feel different because nobody has looked at how competitors solve it? A queue management process, a lead pipeline, or an event registration flow is rarely as bespoke as it feels from the inside.

    Once a workflow passes both tests, five strategic filters help you score the decision properly rather than going on gut feel:

    1. Uniqueness — is this process genuinely specific to your operation, or a common workflow wearing your branding?
    2. Strategic importance — does this tool touch revenue, compliance, or customer experience directly, or is it purely administrative?
    3. Expected lifetime — will this workflow still exist in its current form in three years, or is it likely to change with the business?
    4. Maintenance capacity — do you have someone, internal or contracted, who can own bug fixes and updates indefinitely?
    5. Integration needs — does this tool need to talk to your accounting system, your POS, or your CRM in ways off-the-shelf products won’t support?

    A simple scoring workshop works better than endless debate. Gather the people who actually use the workflow, score each filter from one to five, and total the result. Anything scoring high on uniqueness and strategic importance, but low on available off-the-shelf options, is a genuine build candidate. Anything else usually points towards configuring an existing product.

    Skipping this exercise is how businesses end up with expensive internal software nobody asked for. The failure modes are predictable enough to name in advance:

    • Scope creep, where “just add one more field” turns a two-week build into a two-month one.
    • The maintenance tail, where the tool works fine at launch but nobody has budgeted the ongoing hours to patch it as your other systems change.
    • Bus factor risk, where only one person understands how the tool works, and they leave.

    Budgeting for these three risks up front, rather than discovering them mid-project, is the single biggest difference between internal tool development that pays off and internal tool development that quietly drains time for years.

    No-code, low-code, custom, or hybrid: which approach actually fits?

    Once a workflow has passed the build tests, the next decision is how to build it, and this is where most SMEs get the trade-offs wrong. Each approach solves a different problem, and picking the wrong one is often more costly than picking build over buy in the first place.

    No-code tools let non-technical staff assemble forms, workflows, and simple dashboards without writing code. They’re fast, often live within days, but they hit a ceiling quickly on anything with complex logic, high transaction volumes, or non-standard data structures.

    Low-code platforms, such as Microsoft’s Power Apps, extend that speed with connectors, more flexible data models, and enough scripting for moderately complex logic. You trade some of the “anyone can build it” simplicity for real integration capability, but you also inherit the platform’s licensing model, its update cycles, and its limits on custom logic.

    Custom development gives you full control over architecture, auditability, and data ownership, which matters enormously if you operate in a regulated sector or need airtight audit logs. It also means you own every bug, every server, and every future migration, with no vendor to lean on when something breaks.

    Hybrid approaches, configuring a platform for eighty percent of the workflow and writing bespoke extensions for the rest, often deliver the best risk-adjusted outcome for SMEs. Practitioner guidance from Airful points to this pattern repeatedly: teams get the platform’s speed for standard functionality and custom code only where the business genuinely differs from the norm.

    Three practical constraints should shape your choice regardless of approach:

    • Scaling — no-code tools that work fine for ten users can slow to a crawl at a hundred.
    • Version control and audit logs — genuinely essential in finance, healthcare, or any regulated workflow, and often missing or bolted-on in no-code platforms.
    • Vendor lock-in — check how easily your data exports before you commit, not after.

    A rough decision map: small teams with standard workflows and low integration needs should lean no-code or low-code. Mid-sized teams with moderate integration needs and some non-standard logic often do best with a hybrid build. Larger teams, or anyone in a security-sensitive sector such as healthcare or finance, should weight custom development more heavily, even if it costs more upfront.

    Pro Tip: Before choosing a platform, ask for a working demo with your actual data structure, not the vendor’s sample data. Edge cases in your real workflow are where no-code tools usually reveal their limits.

    How do you scope the smallest useful version of an internal tool?

    The smallest useful version of an internal tool replaces one manual step, usually a spreadsheet or an email chain, not the entire department’s workflow. This is the single most common mistake in internal software development: teams try to build the whole platform in version one, and the project either stalls or ships eighteen months late with features nobody wanted.

    NextPage’s build guidance puts it plainly: start by replacing a single spreadsheet or handoff, not by trying to reimagine the whole process. That single sentence saves more internal tool development projects than any amount of architecture planning.

    Your MVP checklist should cover exactly these elements, and nothing more:

    1. One primary workflow — pick the process that causes the most friction today, not the one that sounds most impressive.
    2. User roles — define who submits, who approves, and who views, even if it’s just three simple permission levels.
    3. A data model — the fields you actually need, not every field you might one day want.
    4. Required fields only — every optional field is a decision someone has to make later; cut them ruthlessly at launch.
    5. Basic reporting — a simple status view or count, not a full analytics dashboard.
    6. One or two integrations — connect to the system people already use daily, and stop there for version one.

    Write a visible “won’t do” list alongside your MVP spec, and share it with everyone who’ll use the tool. This does more to control scope creep than any project management process, because it gives you something concrete to point to when someone asks for “just one more feature.” NextPage’s own guidance on MVP scope treats this list as a core discipline, not an afterthought.

    Consider a typical example: an approval queue that replaces an email chain for expense sign-off. The MVP needs a submission form with four fields (amount, category, description, receipt upload), one approval step with a single approver role, a status view showing pending, approved and rejected items, and an email notification when status changes. That’s it. No multi-level approval chains, no custom reporting, no mobile app. Those come in version two, if the data shows they’re needed.

    Expense approval MVP workflow components

    Pro Tip: Ship the MVP to a small pilot group of five to ten people before rolling it out company-wide. Real usage surfaces missing fields and confusing steps faster than any amount of internal review.

    The test for “smallest useful” is simple: does this version fully replace the spreadsheet or manual step it’s meant to kill? If staff still need to check the old spreadsheet for anything, you haven’t shipped a replacement. You’ve shipped a second system to maintain alongside the first, which is worse than doing nothing.

    What does internal tool development actually cost over three to five years?

    Cost bands for internal tools vary enormously depending on complexity, but three rough categories help set expectations. Custom internal tools vary in cost depending on complexity, from simpler dashboards to workflow MVPs with approvals and integrations, up to full operations platforms with multiple processes, which generally require ongoing development as well as maintenance.

    Four factors drive most of the cost variance between projects of similar scope:

    • Number and complexity of integrations — each new system you connect to adds development time and ongoing failure risk.
    • Auditability requirements — regulated workflows needing full audit trails cost more to build and more to maintain than simple internal tools.
    • Automation depth — a tool that just displays data costs far less than one that triggers actions automatically based on business rules.
    • AI features — document extraction, chatbots, or predictive fields add real value in the right workflow, but they add ongoing cost too, since models and prompts need monitoring and occasional retraining.

    Low-code platforms shift the cost shape rather than eliminating cost: instead of a large upfront build fee, you pay recurring per-user or per-app licensing indefinitely, which Microsoft’s own Power Apps pricing illustrates clearly with its tiered plans.

    That distinction matters more than most SMEs realise when they compare quotes. A custom build with a £15,000 upfront cost and minimal licensing fees can be cheaper over five years than a low-code platform with a smaller setup fee but ongoing per-seat charges that scale with headcount. Model both scenarios out to year three and year five before deciding, not just year one.

    137Foundry’s analysis of build-vs-buy modelling recommends running this long-horizon comparison explicitly, including a switching cost estimate: what would it cost to migrate off this tool if the vendor doubles prices or shuts down in three years? That number should factor into your decision even before you sign anything.

    Here’s a worked example for a workflow MVP replacing an expense approval spreadsheet. Custom build: moderate upfront development cost, low ongoing hosting cost, occasional maintenance hours as the business changes. Low-code platform: lower upfront setup cost, but recurring per-user licensing that grows as headcount grows, plus connector fees for accounting system integration. At ten users, the platform route often looks cheaper. At fifty users, the custom route frequently wins, because licensing scales with people while a custom build’s running cost stays largely flat.

    Document three assumptions behind whichever decision you make, along with a trigger to revisit it. 137Foundry’s framework suggests this discipline specifically: if headcount doubles, if the vendor changes pricing, or if the workflow changes shape, that’s your signal to reopen the build-versus-buy question rather than assume the original decision still holds.

    What technical checklist should you use before building or buying?

    Any internal tool, whether you build it or buy it, needs to pass the same technical bar, and skipping this checklist is how businesses end up with tools that work in the demo and fail in production.

    Integration capability comes first. Check for a documented API, support for webhooks so other systems can react to changes in real time, sensible retry logic when a connected service is briefly unavailable, and typed data boundaries so a field renamed in one system doesn’t silently break another. Power Apps documents its connector ecosystem as a core part of its low-code offering, which is worth reviewing as a benchmark even if you ultimately build custom.

    Security fundamentals are non-negotiable regardless of tool size:

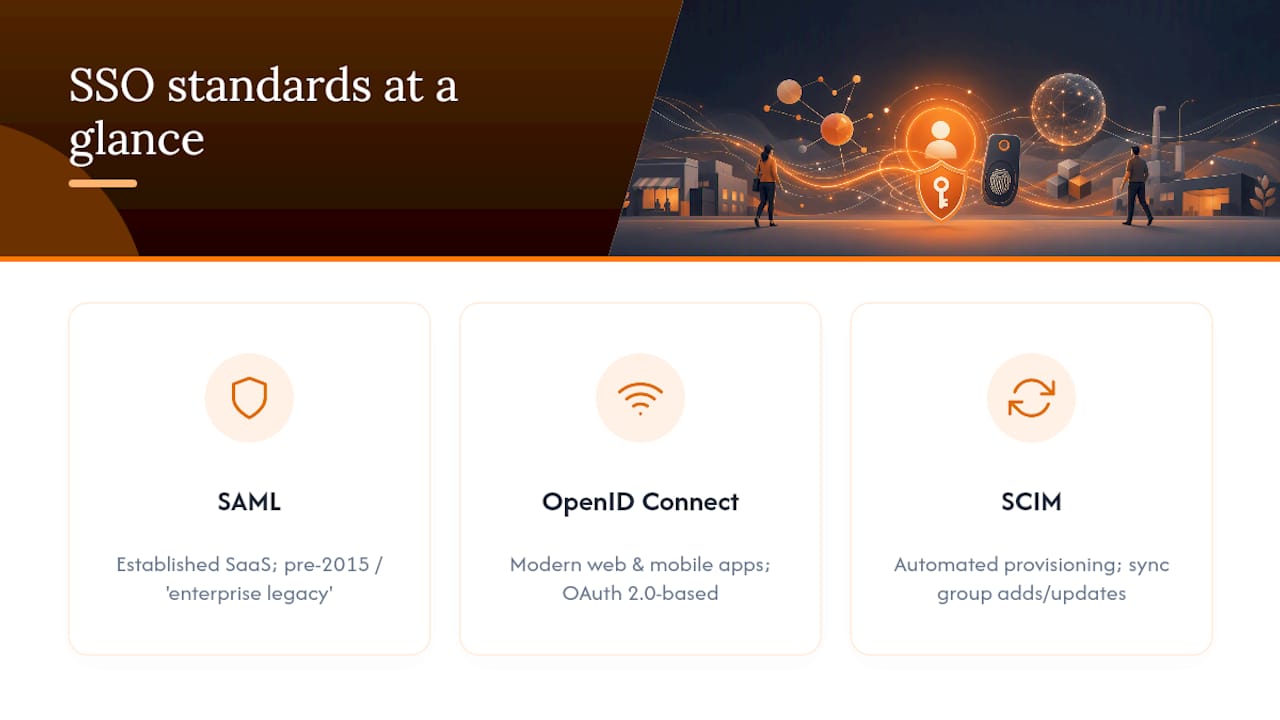
    • Single sign-on (SSO) so staff access the tool with existing company credentials, not a separate password to forget.
    • Least-privilege role-based access control (RBAC), so a junior staff member can submit requests but can’t approve their own expenses.
    • Full audit trails recording who changed what and when.
    • A clear data retention and backup policy, agreed before launch, not improvised after the first data loss scare.

    Open-source projects such as Casbin offer a useful reference point for what proper RBAC implementation looks like, even if you never touch the library directly. It’s a good benchmark to hand a developer: “can you support permission granularity like this?”

    Operational practices separate tools that last from tools that quietly rot. Automated tests catch regressions before they reach users. Documentation, even brief, means the next developer doesn’t have to reverse-engineer your logic from scratch. Deployment automation reduces the risk of a manual release breaking something on a Friday afternoon. And every tool needs a named owner, someone whose job includes maintaining it, plus a modest ongoing maintenance budget rather than an assumption that it’ll just keep running.

    Pro Tip: Ask any vendor or developer directly: “What happens to our data if we want to leave in two years?” A vague answer is itself useful information.

    How do you roll out an internal tool so people actually use it?

    A tool nobody uses has cost you money and delivered nothing, and adoption failure is far more common than technical failure in internal software development. The rollout process matters as much as the build itself.

    A practical deployment checklist runs in this order:

    1. Assign an owner before launch day, someone accountable for fixing issues and answering questions.
    2. Migrate the first batch of real records into the tool before anyone starts using it live, so day one isn’t an empty screen.
    3. Train the people who’ll use it daily, not just managers, in a short session focused on their actual tasks.
    4. Set a hard stop date for the old process, whether that’s a spreadsheet or an email chain, and communicate it clearly.

    Without that fourth step, most teams run both systems in parallel indefinitely, which doubles the admin burden and guarantees the new tool never gets a fair test.

    Track a small set of metrics from week one rather than guessing whether adoption is working:

    • Request volume through the new tool versus the old process.
    • Cycle time from request to resolution, which should visibly shrink if the tool is doing its job.
    • Overdue items sitting in the queue, a good early warning sign of a broken approval step.
    • Manual rework, where someone still has to fix data or chase people outside the tool.
    • Support queries, which should taper off within a few weeks if the tool is intuitive.

    Post-launch governance keeps the tool useful rather than letting it calcify. Set aside a fixed number of maintenance hours per month, even if they go unused some months. Establish a lightweight process for reviewing feature requests, so the “won’t do” list from your MVP stage has somewhere to go when a genuine need arises later. And revisit the original build-versus-buy decision if headcount changes significantly, if the underlying workflow changes shape, or if a much better off-the-shelf option appears.

    The most effective adoption tactic is often the simplest: remove access to the old spreadsheet or shared inbox on the agreed cut-off date. People default to the path of least resistance, and if the old workaround still exists, some will keep using it indefinitely.

    FlowLab’s approach and what to expect from an app-fit review

    Some app developers start conversations with understanding the operational problem before recommending a solution. That order matters. A business that leads with “we need custom software” often discovers, once the workflow is properly mapped, that an existing product configured correctly would have done the job for a fraction of the cost and time.

    The complimentary app-fit review walks through exactly the decision points covered in this guide: what the current process looks like, where the friction actually sits, and which of three routes fits best, a ready-made product, an adapted existing foundation, or a custom build. Nothing about the review commits you to anything.

    To get the most from an app-fit review, it helps to arrive with a few things ready:

    • A rough sketch or description of the current workflow, even a messy spreadsheet screenshot works.
    • A sense of who’s involved: how many people, which roles, which departments touch the process.
    • Any systems the new tool would need to talk to, such as accounting software or a POS.
    • A rough sense of what success would look like, whether that’s faster turnaround, fewer errors, or less manual chasing.

    Some developers’ decision process mirrors the uniqueness and money tests covered earlier: if a workflow is common enough that an adapted product foundation, such as a queue management or lead tracking base, can be configured to fit, that’s often the faster and cheaper route. Custom development gets recommended only when the workflow genuinely doesn’t map onto anything that already exists.

    Details on Ronald’s background and FlowLab’s working style are on the FlowLab team page, for readers who want to understand who they’d actually be working with before booking a review.

    Why most build-versus-buy advice misses the real risk

    The conventional advice on internal tool development spends most of its energy on the build decision and almost none on what happens after launch. That’s backwards. The research is consistent on this point: the maintenance tail, not the initial build cost, is where most internal tools quietly fail. A business that builds a technically excellent tool with no named owner and no maintenance budget has made the same mistake as one that bought the wrong platform. Both end up with software nobody trusts within eighteen months.

    What gets underrated is the discipline of the “won’t do” list. It sounds almost too simple to matter, yet it’s the single cheapest control against scope creep available to any team. Most projects don’t fail because the initial scope was wrong. They fail because nobody had a mechanism to say no to the fifteenth reasonable-sounding addition.

    If you take one thing from this guide, make it this: score the decision before you fall in love with a solution, then budget the ongoing hours as seriously as the build itself.

    — Ronald

    Ready to scope your internal tool? Here’s the next step

    Reading a framework is useful. Getting a straight answer for your own workflow is faster. FlowLab’s complimentary app-fit review exists precisely for the moment after this guide, when you know roughly what you need but aren’t sure whether to buy, adapt, or build.

    Flowlab

    If your business runs on a queue, a lead pipeline, or an event sign-up process that feels close to standard but not quite, FlowLab’s ready-made product range is worth checking before committing to a custom quote. It’s often the fastest route from “we have a spreadsheet problem” to “this is solved,” without the months a full build usually takes. For workflows that genuinely don’t fit an existing pattern, the app development service covers everything from scoping through to delivery, with the same fit review as the starting point either way.

    Before booking, gather a sample of the current workflow, whatever spreadsheet or process document you’re using today, a rough list of stakeholders involved, and the one metric you’d want to see improve. That is generally sufficient to get a clearer, no-pressure answer on cost and approach. Book a complimentary app-fit review and get a straight recommendation before you spend a cent on development.

    Sources

  • Stop Vague Quotes: Copy and Paste a 1–3 Page Software Brief for SMEs

    Stop Vague Quotes: Copy and Paste a 1–3 Page Software Brief for SMEs

    A good software brief states your goal, names your primary users, ranks your top features, sets measurable acceptance criteria, and gives a rough budget and timeline. Put that on one to three pages with a couple of simple wireframes, and any competent developer can return a realistic estimate. Skip the measurable criteria and you’ll get vague quotes back, because nobody can price vague goals like “make it fast” or “make it easy to use.”


    TL;DR:

    • Clearly define measurable acceptance criteria for each feature, as vague goals like “fast” or “easy to use” lead to inaccurate quotes.
    • Include detailed information about existing systems, APIs, and platform constraints early to avoid costly rework during the development process.
    • State your budget range, fixed milestones, and decision-makers upfront to help vendors provide realistic estimates and prevent scope disputes.
    • Involve stakeholders and end users in writing requirements to ensure clarity and reduce misinterpretation by the development team.
    • Regular communication, such as weekly updates and designated points of contact, is essential for staying aligned and avoiding project delays.

    Flowlab
    Clarify Your App Requirements
    FlowLab helps SMEs assess workflow needs and identify the most economical path, from ready-made products to tailored applications.

    Explore app fit reviews

    Table of Contents

    What a software brief is and when to write one

    A software brief is a short document that states what you want built, who it’s for, and what success looks like. It’s the client’s side of the conversation, distinct from two related documents you’ll hear vendors mention:

    • Lastenheft: the client’s requirements document, focused on what is needed rather than how it gets built.
    • Pflichtenheft: the vendor’s technical response, explaining how they’ll implement those requirements.
    • Product backlog: a living, prioritised list of features used in agile delivery, refined sprint by sprint rather than fixed upfront.

    A short brief is enough for initial quotes and early discovery conversations. You need a fuller specification only when you’re locking a vendor into a strict fixed-price contract before any design work starts. If you’re planning agile delivery, don’t over-specify. HERMES guidance, notes that solution requirements in agile projects start as an initial backlog and get refined during execution, so a detailed upfront document is often wasted effort. notes that solution requirements in agile projects start as an initial backlog and get refined during execution, so a detailed upfront document is often wasted effort.

    The essential sections every software brief must include

    Copy this structure directly into an email or document. Each heading below should carry two or three lines of specifics, not paragraphs.

    1. Project overview and problem statement. What’s broken or missing today, and how you’ll know it’s fixed (your success measures).
    2. Primary users and roles. Name each user type: “warehouse staff”, “shop manager”, “customer booking online”. Note how many people, and what device they’ll typically use.
    3. Core features, prioritised. Use MoSCoW (Must, Should, Could, Won’t) or a simple ranked list of user stories. Don’t submit a flat list of 40 equally weighted “requirements”.
    4. Non-functional requirements. Performance expectations, security needs, and which platforms or browsers must be supported.
    5. Integrations and dependencies. Any existing systems, APIs, ERPs or payment gateways the new tool must talk to.
    6. Exclusions. What you explicitly don’t want built, to stop scope creep before it starts.
    7. Acceptance criteria. The measurable tests that prove each feature works as intended.

    Pro Tip: Write your exclusions section before you send the brief anywhere. Most scope disputes come from things nobody said “no” to early enough.

    Stakeholder input matters here too: requirements are clearer and estimated more accurately when the people who’ll actually use the system help write them, not just the person paying the invoice.

    How to prioritise features and write measurable acceptance criteria

    MoSCoW works well when you have multiple features and need a vendor to understand what’s negotiable. For a smaller project, a simple ranked top three is often faster and just as effective. Either way, the goal is the same: force a decision on what matters most before a developer has to guess.

    Vague requirements are the biggest source of misestimation. “Fast” and “easy to use” mean nothing to a developer pricing your project. Measurable criteria fix that:

    • “Order overview loads quickly under typical usage conditions.”
    • “Checkout completes successfully under typical load conditions.”
    • “New staff member can complete the booking flow unassisted within a reasonable timeframe.”

    This approach, recommended for turning wishes into testable statements, gives both sides an objective definition of “done” rather than a subjective argument once the build is delivered. If you can’t measure it, a developer can’t price it with any confidence, and you’ll end up negotiating scope mid-project instead of before it starts.

    Integrations, dependencies and technical constraints to declare early

    These details move quotes more than almost anything else in a brief, because they determine how much of the build is genuinely new work versus wiring two systems together.

    • Existing systems: name each one (ERP, POS, accounting software), including version and who manages it.
    • Authentication: single sign-on, existing user database, or a fresh login system.
    • Payment or third-party APIs: which provider, and whether you already have credentials or a developer contact.
    • Hosting and data residency: cloud provider preference, or any requirement to keep data within a specific country.
    • Devices and concurrency: which browsers or phones must be supported, and roughly how many people will use the system at once.

    Leaving any of these out doesn’t remove the cost. It just moves the discovery to a later, more expensive stage.

    Budget, timeline and scope: how to state them to get realistic estimates

    Give a budget range rather than a single figure or nothing at all. A budget range lets a vendor tell you honestly whether your scope fits, rather than quietly trimming features to meet an unspecified number.

    • State your preferred release date, and flag any milestone that’s genuinely fixed (a trade show, a licence renewal, a contract deadline).
    • If your budget is uncertain or the scope might shift, ask for time-and-materials or phased pricing rather than insisting on a fixed price too early.
    • Understand the trade-off: the more detail and measurable criteria you provide, the more confidently a vendor can offer a fixed price. A three-page brief usually gets you a realistic rough estimate; a fixed-price contract for complex work usually needs a paid discovery phase first, which protects both sides from a badly-guessed number.

    A ready-to-use example brief with two sample answers

    Paste this template directly into an email or document. Fill each field in two or three lines.

    1. Project name and one-line goal
    2. Problem statement (what’s broken today)
    3. Primary users (roles, approximate numbers, devices used)
    4. Top 3 to 5 features, ranked
    5. Acceptance criteria for each top feature
    6. Integrations/dependencies (systems, APIs, contacts)
    7. Non-functional requirements (performance, security, platforms)
    8. Exclusions (what’s out of scope)
    9. Budget range and timeline
    10. Attachments (wireframes, sample CSVs, process maps)

    Sample A: Internal workflow automation tool
    Goal: replace a paper attendance log with a digital check-in system for warehouse staff. Top features: QR badge scan check-in, manager dashboard, weekly export to payroll CSV. Acceptance criteria: scan-to-confirmation fast; export matches existing payroll CSV format exactly. Integration: existing payroll system (Excel-based, no API). Budget: a moderate range. Timeline: a few weeks.

    Sample B: Customer-facing mobile booking app
    Goal: let customers book salon appointments without phoning in. Top features: service selection, calendar booking, SMS confirmation. Acceptance criteria: booking flow completes quickly; SMS sends promptly after confirmation. Integration: existing calendar system, SMS gateway. Budget: a moderate range. Timeline: a few weeks.

    Attach wireframes even if they’re hand-drawn, plus any spreadsheet or process map that shows your current workflow. A rough sketch removes more ambiguity than another paragraph of description.

    Common mistakes and a pre-send checklist

    The same errors turn up in nearly every underpriced or delayed project:

    • Goals stated as feelings (“make it better”) rather than outcomes.
    • No acceptance criteria, so “done” is a matter of opinion.
    • Integrations mentioned late, after a quote has already been given.
    • Scope left open-ended, inviting endless “could we also add” requests.

    Before sending, check you’ve named your top features, attached at least one wireframe or sketch, confirmed who has authority to approve the final quote, and stated your budget range. A brief with no named decision-maker is the single most common reason a project stalls after the quote stage.

    FlowLab: how we review briefs and what we request in a discovery

    A complimentary app fit review starts from your brief, not a sales script. This review checks whether your problem needs a custom build, an adapted existing product, or something closer to off-the-shelf.

    • We ask who uses the tool daily and what device they’re on, since that alone rules out half the wrong solutions.
    • We ask what system it needs to talk to, because an undisclosed integration is the most common cause of a quote changing later.
    • We ask what “success” looks like in numbers, not adjectives.

    Pro Tip: If you can’t yet answer the integration question, say so in the brief rather than guessing. “Unknown, to be confirmed” is a more useful answer than a wrong one.

    From there, we typically propose a scoping proposal, a short paid discovery phase, or a live demo, depending on how settled your requirements already are.

    Who needs to sign off on a software brief?

    A brief written by one person and never shown to anyone else is a common way projects go wrong. Before it goes to a developer, identify who actually holds decision authority over budget, scope, and final acceptance. That’s rarely the same person who drafted the document.

    Typical roles worth naming explicitly:

    • Sponsor or budget holder: approves spend and signs off the final quote.
    • Operational lead: the manager who understands the day-to-day process the software will change.
    • End users: the staff or customers who’ll actually use it, whose feedback on the wireframes catches problems no manager would spot.
    • Technical contact: whoever manages your existing systems, needed to answer integration questions accurately.

    Involving the people who’ll use the system in writing requirements, not just approving them afterwards, tends to produce a brief that different implementers would interpret the same way. That consistency matters more than it sounds. A developer reading an ambiguous requirement will make a reasonable assumption, and that assumption may not match what your operational lead actually needed.

    State each stakeholder’s role directly in the brief: “Sarah, operations manager, final sign-off on scope. James, IT, integration contact.” It takes one line and prevents a vendor from chasing three different people for three different answers to the same question.

    What risks should you flag in the brief itself?

    Every software project carries risk, and naming it upfront is far cheaper than discovering it mid-build. A short risk section, even three or four lines, changes how a vendor plans the work.

    Common risks worth stating explicitly:

    • Data migration uncertainty: if you’re moving records from an old system, note whether the data is clean or likely to need cleanup work.
    • Dependency on a third party: if a feature relies on an external API or another vendor’s timeline, say so, since that’s outside anyone’s direct control.
    • Staff availability: if key stakeholders are seasonal, part-time, or hard to schedule for feedback sessions, flag it, since it affects how fast decisions can be made.
    • Undefined edge cases: if you’re not sure how the system should behave in an unusual scenario, say that rather than letting a developer guess.

    Mitigation doesn’t need to be elaborate. For a data migration risk, the mitigation might simply be “a data audit will happen before development starts.” For a third-party dependency, it might be “we’ll confirm API access before the sprint that needs it.” The point of writing this down isn’t to solve every risk in the brief. It’s to make sure nobody discovers the risk for the first time three weeks into the build, when it’s expensive to address and everyone’s frustrated.

    What assumptions and constraints belong in a software brief?

    Every brief rests on assumptions, and the ones left unstated are the ones that cause disputes later. If you’re assuming the vendor will use your existing hosting account, say so. If you’re assuming staff will need no training, say that too, because it’s a claim a vendor might reasonably disagree with.

    Constraints are different from assumptions: they’re the hard boundaries you already know about. A fixed budget ceiling, a legal requirement to keep data within a specific jurisdiction, an existing contract with a hosting provider you can’t change. State constraints plainly rather than letting a vendor discover them by asking the wrong question and getting a “no” three weeks in.

    Assumptions versus constraints in a software brief

    A short paragraph covering both does the job:

    “We’re assuming existing staff will need no more than one hour of training. We’re assuming the current payroll export format won’t change during the build. Constraints: data must stay on servers within Singapore; budget cannot exceed the stated range without a change request; the current accounting software cannot be replaced this year.”

    This kind of statement does something subtle but useful: it separates what you believe to be true (and are willing to be corrected on) from what genuinely cannot move. A vendor reading a brief without this distinction has to guess which parts are flexible, and guessing in the vendor’s favour usually costs you money, while guessing in your favour usually gets your project underquoted and then delayed.

    How should you communicate with your development team during the build?

    A brief isn’t a document you hand over and then wait three months to hear back on. State upfront how often you expect updates, and through what channel, because assuming a vendor will proactively over-communicate is usually wrong, and assuming they’ll go silent for weeks is often just as wrong.

    A workable pattern for most SME-scale projects looks like this: a short written update weekly (even three lines), a call or video check-in at each milestone, and a single named point of contact on each side so questions don’t get lost between people. If you’re running an agile engagement with a product backlog, this matters even more, since the backlog gets refined throughout the project rather than fixed at the start, which means ongoing input from you is part of how the project stays on track, not an occasional check-in.

    State this plainly in the brief: “Weekly written update by email, milestone call at each phase, single point of contact: [name].” It costs one sentence and removes an entire category of frustration, the kind that comes from wondering whether the project is still moving or has quietly stalled.

    How should you communicate with your development team during the build? — overview diagram

    Ronald’s practitioner note: two short lessons from client engagements

    The briefs that lead to accurate quotes are rarely the longest ones. They’re the ones where someone made a decision about priority before sending it, rather than asking a developer to guess. The second lesson is blunter: undisclosed integrations cost more goodwill than they cost money, because they make a client look less prepared than they are.

    — Ronald

    How FlowLab can help: complimentary app fit review and next steps

    Flowlab is the alternative to guessing your way through a custom software build brief alone. Instead of pricing you off a vague description, our complimentary app fit review reads your goals, users, and top features, then tells you honestly whether a ready-made product, an adapted existing tool, or a custom build fits your budget and timeline best, before you commit to anything.

    Flowlab

    If you’re running a queue-heavy operation, try the complete queue journey demo to see how a ready-built product might already solve what you’re briefing from scratch. If your team needs the right product answer, right when staff need it, that’s worth a look before you spec a custom pricing tool. And if your brief points toward something genuinely bespoke, our Singapore app development team will scope it properly.

    Send us your brief using the template above, or book a discovery call if you’re still working out your top three features. Either route gets you a clearer answer than guessing alone.

    Sources

    For readers formalising a brief further: HERMES’s solution requirements guidance covers agile backlog handling. IgniTech’s Lastenheft and Pflichtenheft guide explains SME-scale sizing. Erivan Ramos’s piece on measurable requirements is worth ten minutes for the acceptance-criteria examples alone.

  • Sales Leaders: Make Sales Pipeline Stages Verifiable in CRM

    Sales Leaders: Make Sales Pipeline Stages Verifiable in CRM

    Most sales pipelines use several stages such as prospecting, qualification, discovery, proposal, negotiation, close and post‑sale. The single design rule that makes them work is this: define every stage by a verifiable buyer milestone, not a rep task, and attach explicit entry and exit criteria you can check with a calendar invite, an email, or a signature rather than a gut feeling.


    TL;DR:

    • Verifiable buyer milestones should define each sales pipeline stage, with clear entry and exit criteria based on tangible actions like signatures or documented discussions.
    • CRM fields must enforce these criteria, requiring documentation or buyer confirmation before progressing stages, which reduces subjective judgments and improves accuracy.
    • Keep pipeline stages aligned with typical deal length, using fewer stages for quick cycles and more for complex enterprise deals, but avoid overcomplicating or merging stages without clear buyer decision points.
    • Focus on pipeline metrics like velocity, stage conversion rate, and average deal size, calculated from verified opportunities, to achieve reliable revenue forecasting.
    • Testing pipeline design against real deals and using automation tied to buyer actions ensures accuracy and prevents stage misclassification or stalled processes.

    Flowlab
    Make Your CRM Fit Your Workflow
    FlowLab helps SMEs assess practical app options for operational challenges, from ready-made products to adapted or custom solutions.

    Explore FlowLab’s solutions

    Table of Contents

    What are the canonical sales pipeline stages?

    Each stage should describe something the buyer has done, not something a rep has attempted. That distinction sounds small. It changes how honestly your CRM reflects reality.

    • Prospecting. A target account has been identified and a first outbound or inbound touch has happened. Exit criterion: the prospect responds and agrees to a conversation, evidenced by a calendar invite or a reply thread.
    • Qualification. The buyer has confirmed a real problem, budget authority exists somewhere in the account, and timing is roughly known. Exit criterion: a named economic buyer or budget holder has been identified, not just a champion who “thinks” there’s money.
    • Discovery. The buyer has walked you through their current process, constraints and success criteria in enough detail that you could brief a colleague on it without them. Exit criterion: a written summary of requirements has been shared back to the buyer and they haven’t corrected it.
    • Proposal. A specific solution and price have been presented to the actual decision‑maker, not just the champion. Exit criterion: written acknowledgement of scope and cost, even an informal email saying “this looks right.”
    • Negotiation. Terms, price, or contract language are actively being worked, with the buyer engaged in redlines or counter‑offers. Exit criterion: a legal or procurement contact has entered the thread.
    • Close. Signature obtained, payment terms agreed. Exit criterion: signed agreement on file.
    • Post‑sale / retention. Onboarding has started and the account is being tracked for renewal or expansion.

    For a short B2B cycle, such as a $2,000 monthly tool, discovery and proposal often collapse into a single call. For an enterprise deal with a six‑figure contract, negotiation alone might span three internal stages, since buyers now perform the majority of their research without a rep in the room, which means the stages you can actually observe happen later and faster than they used to.

    Sales pipeline versus sales funnel: what each measures

    A pipeline tracks individual deals moving through buyer milestones towards a close. A funnel tracks aggregate volume dropping off at each awareness or conversion point, usually before a deal exists at all. Confuse the two and your forecasting breaks, because you’ll be averaging pre‑sales marketing metrics with post‑qualification sales metrics as though they measure the same thing.

    Funnel metrics include visitor‑to‑lead conversion rate, cost per lead, and marketing‑qualified‑lead volume. Pipeline metrics include stage conversion rate, pipeline velocity, and average deal size, each tied to an identified, named opportunity. A multi‑channel funnel analysis sits upstream of your pipeline, feeding it qualified opportunities rather than raw traffic.

    The practical fix: report funnel metrics up to the point a lead becomes a qualified opportunity, then switch entirely to pipeline metrics from qualification onward. Never blend a funnel conversion rate with a pipeline conversion rate in the same chart. They answer different questions for different audiences.

    How do you write entry and exit criteria that actually hold up?

    Vague stage names invite vague judgement calls. “Discovery” means something different to every rep unless you write down exactly what has to be true before a deal enters it and exactly what has to be true before it leaves.

    Run the two‑rep test: hand your stage definitions to two different reps with the same deal file and ask them independently which stage it’s in. If they disagree, your criteria are too subjective. This single exercise catches more pipeline design flaws than any amount of manager review, because it exposes the words doing quiet interpretive work, like “engaged” or “interested.”

    Three example checklists:

    1. Qualification exit criteria. Named budget holder identified; problem statement confirmed in writing; timeline within the next two quarters. All three, not two out of three.
    2. Proposal exit criteria. Pricing document sent to the decision‑maker directly (cc doesn’t count); a follow‑up meeting booked to discuss it; no outstanding “who else needs to see this” questions.
    3. Contract review exit criteria. Legal or procurement contact named in the CRM; redlines received at least once; internal signature authority confirmed on your side.

    Enforce these with CRM fields rather than memory. A required field for “economic buyer name” that blocks stage progression until filled does more to keep a pipeline honest than any training session. Fields like “next scheduled action” and “last buyer‑initiated contact date” also flag stalled deals automatically, since designing stages around buyer commitments makes a pipeline far harder to game than one built around what a rep claims to have done.

    Pro Tip: Make at least one exit criterion per stage something the buyer has to produce, such as a document, a reply, or a signature. Anything the rep alone can tick off will eventually get ticked off regardless of reality.

    Sales stages linked to buyer evidence

    How many stages should your pipeline actually have?

    There’s no universal number, but there is a workable rule of thumb tied to how long deals typically take to close.

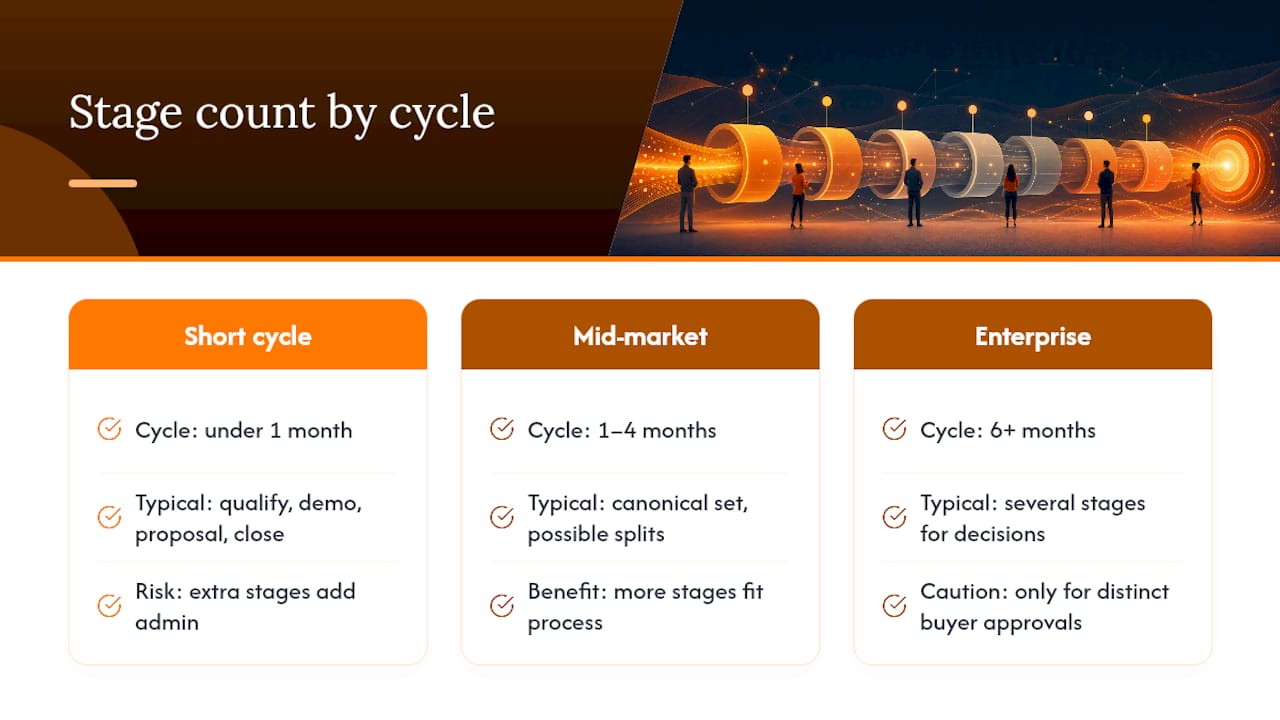
    For short cycles, roughly under a month, a few stages like qualify, demo or discovery, proposal, and close are usually sufficient. Adding more than that for a $500 monthly subscription just creates admin without adding forecasting precision. For mid‑market cycles running one to four months, multiple stages tend to fit, covering the canonical set outlined earlier with possible added splits.

    Enterprise cycles of six months or more can justify several stages, but only if each additional stage represents a genuinely distinct buyer decision, such as security review or procurement sign‑off, rather than an internal rep milestone dressed up as a pipeline stage. The right stage count is calibrated to your average sales cycle length; too many stages for a short cycle causes reps to skip updating the CRM altogether, which is worse for forecasting than having too few.

    Start smaller than you think you need. Split a stage later once you have real deal data showing it hides two distinct buyer behaviours, rather than guessing upfront.

    How many stages should your pipeline actually have? — overview diagram

    Which metrics actually predict revenue?

    Three numbers do most of the forecasting work once your stages are defined by verifiable milestones rather than rep activity.

    Pipeline velocity measures how fast deals move through the whole pipeline and is calculated as (number of qualified opportunities × average deal value × win rate) ÷ average sales cycle length in days. A rising velocity number with a flat headcount usually means your qualification criteria have tightened, which is a good sign, not a red flag to investigate.

    Stage conversion rate is the percentage of deals that exit one stage and enter the next. Track it stage by stage rather than as a single top‑to‑bottom figure, because a healthy overall conversion rate can hide one stage quietly leaking 60% of deals.

    Average deal size should be tracked by segment, not blended across your whole book, since a single enterprise deal can distort the mean for an entire quarter.

    Recommended reports to build in your CRM:

    • Stage conversion rate by rep and by stage, refreshed weekly.
    • Time‑in‑stage distribution, flagging deals sitting past twice the median.
    • Win probability derived from your own historical close rates by stage, not CRM defaults.

    Managing a pipeline without stage‑based entry and exit criteria leaves managers relying on optimism rather than evidence, because none of these three numbers mean anything if “qualified” or “proposal” can mean five different things depending on who logged the deal.

    How do you build and test a custom pipeline?

    Design your pipeline backwards from deals you’ve already won, then check it against deals you’ve already lost.

    1. Pull five to ten closed‑won deals and map, in order, the actual buyer actions that happened before signature: who asked for pricing, who introduced legal, who confirmed budget. This becomes your stage list.
    2. Write entry and exit criteria for each stage using the two‑rep test above, and map each criterion to a specific CRM field, such as “economic buyer name” or “redline received date.”
    3. Configure automation on stage transition, not on a timer. When a deal moves to proposal, trigger a task for the rep and a notification to their manager. Timer‑based automation just adds noise; transition‑based automation tied to actual buyer milestones keeps the noise down.
    4. Run a historical test sample. Take 10 to 20 closed deals, both won and lost, and manually walk them through your new stage definitions. Where criteria don’t fit or feel unrealistic, this test against historical deals is exactly where you’ll find it before it costs you a live quarter of bad data.

    Pro Tip: Test with lost deals as deliberately as won ones. A stage design that only ever gets validated against wins will look fine right up until it fails to explain why deals actually die.

    What pipeline design mistakes should you fix first?

    Activity‑based stage names are the most common flaw, and the easiest to spot in an audit. “Proposal sent” describes a rep action, not a buyer commitment, so rename it to “proposal acknowledged by decision‑maker” and it immediately becomes harder to fake. The same applies to “demo scheduled,” which should become “demo completed with named stakeholders.”

    A few other patterns worth checking in your own pipeline:

    • Too many stages for the cycle length. Teams running five to seven stages tend to see higher CRM update compliance than those running eight or more on short cycles, because reps simply stop logging updates once the admin outweighs the value.
    • No closed‑lost taxonomy. If every lost deal gets tagged “no budget,” you learn nothing. Build a taxonomy that maps to stage failure, such as “lost at proposal, no economic buyer engaged” versus “lost at negotiation, price.”
    • Subjective criteria surviving the two‑rep test failure. If reps still disagree on stage placement after a criteria rewrite, the fix is often a “parking” stage for deals that have gone quiet, rather than forcing them to sit dishonestly in an active stage.
    • Merging too aggressively. Two stages should only merge if no distinct buyer milestone separates them; don’t merge for the sake of a shorter list.

    FlowLab in practice: turning buyer milestones into CRM evidence

    Stage discipline only works if the evidence is actually captured somewhere reps can’t quietly skip. LeadsFlow assigns every enquiry an owner and a next move the moment it lands, which closes the most common gap in pipeline audits: deals sitting in a stage with no recorded action and no accountable person.

    For the commercial stages, particularly proposal and close, running a sample sale from product to payment through POSFlow gives you a concrete, checkable business case rather than a verbal assurance that “the buyer’s keen.” It’s the kind of stage evidence a two‑rep test would actually pass.

    Ronald’s view on rollout governance follows below, alongside where FlowLab’s demos and free app fit review into piloting this.

    Why most pipeline rollouts stall, and how to avoid it

    Get manager sign‑off before you touch the CRM, not after. Reps follow stage discipline when their manager reviews deals against the new criteria weekly, not when it’s announced once in a meeting and left to chance. Train on the two‑rep test itself, not just the finished stage list, so reps understand why each criterion exists.

    Pilot with one team and 20 to 30 live deals before a company‑wide rollout. A small, measurable pilot surfaces criteria that sound sensible on paper but don’t survive contact with a real negotiation. Run a weekly deal review against the exit criteria, not against gut feel on “how it’s going.”

    — Ronald

    Put stage evidence where your CRM can actually see it

    Most pipeline audits fail for the same reason: the criteria look fine on a slide, but nobody captures the evidence that would prove a deal genuinely earned its stage. There are products that plug that gap directly, without asking you to rebuild your CRM from scratch or sign up for a lengthy commitment.

    Flowlab

    LeadsFlow gives every enquiry an owner and a next move from the moment it arrives, so “qualification” stops being a guess and starts being a logged fact. POSFlow lets you run a sample sale from product through to payment, generating the kind of verifiable business case evidence a proposal or close stage actually needs. They are built for SMEs that want stage discipline without a six‑month implementation project.

    If you’re not sure which one fits your current pipeline gaps, Flowlab’s complimentary app fit review will tell you plainly, including where a ready‑made product is enough and where it isn’t. Book a demo and see the sample sale run end to end before committing to anything.

    Sources

    For deeper detail on stage calibration and CRM implementation, see Rework’s guide to pipeline stages and 6sense’s research on B2B buying behaviour.

  • Cut Payroll Errors in 4–6 Weeks: Attendance Tracking Systems for SMEs

    Cut Payroll Errors in 4–6 Weeks: Attendance Tracking Systems for SMEs

    The fastest way for a small or medium business to cut payroll errors and meet record-keeping obligations is a digital attendance system with verified clock-ins and direct payroll integration. Manual timesheets and honour-system logs simply don’t hold up once you’re reconciling overtime or defending a record during an audit. Some providers offer attendance capture systems that plug into payroll without months of setup.


    TL;DR:

    • Use payroll-integrated digital attendance systems with verified clock-ins to significantly reduce reconciliation time and prevent errors in records.
    • Prioritize features like automatic timesheet generation, real-time dashboards, and robust audit logs for accurate and auditable record-keeping.
    • Choose verification methods based on your workforce size and risk profile, with QR codes and PINs being suitable for small offices, and GPS or biometric options for field or high-risk environments.
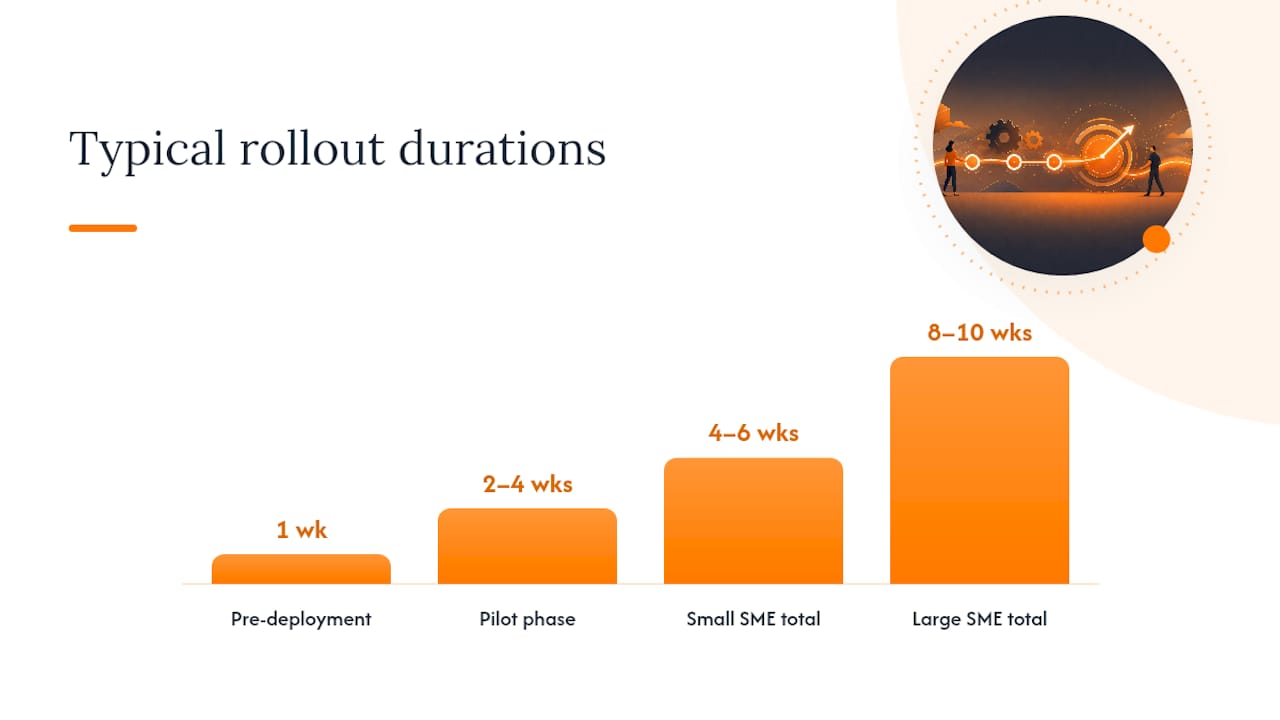
    • Ensure the system supports direct payroll or HRIS integration and can be deployed quickly without extensive IT setup, ideally within a few weeks.
    • Maintain compliance by limiting data collection to necessary information, securing attendance records, and informing staff about data use and retention policies.

    Flowlab
    flowlab.works
    Find the Right Attendance Solution
    FlowLab reviews your operational needs, then helps identify a practical app option without unnecessary technical jargon or commitment pressure.

    Explore FlowLab’s approach

    Table of Contents

    What makes great attendance tracking systems: core features to expect

    A genuinely useful system does four jobs well: it captures the clock-in accurately, it stores the record safely, it exports that record somewhere useful, and it lets a manager see what’s happening without chasing anyone for a spreadsheet. Miss any one of those and you’ve bought a digital version of the same paper problem.

    Start with the basics. Clock-ins and clock-outs need to be timestamped precisely and tied to an identifiable employee, not just a device. From there, the system should generate timesheets automatically, ideally in a format your payroll team or accountant can use without reformatting. A dashboard that shows who’s in, who’s late, and who’s on leave, updated in real time, turns attendance from a monthly headache into something you glance at over coffee.

    Audit logs matter more than most owners realise until they need one. If a dispute arises over hours worked, or an inspector asks how records are kept, a system that timestamps every edit and shows who made it is worth far more than a system that just shows the final numbers. Statutory guidance in some jurisdictions requires employers to keep records of daily start and finish times, including breaks over 30 minutes, and an auditable digital trail satisfies that far more cleanly than a shared Excel file that anyone can quietly edit.

    Here’s what to look for when comparing systems:

    • Clock-in and clock-out capture with a timestamp and identity check, not just a button press.
    • Automatic timesheet generation that totals hours, flags overtime, and reconciles absences without manual tallying.
    • Real-time dashboards showing current attendance status across sites or shifts.
    • Audit logs recording every edit, correction, and manual override with a timestamp and user ID.
    • Payroll and HRIS integration, either through direct connectors or a clean data export.
    • Mobile and offline support for staff who clock in from a phone or work where connectivity drops.
    • Fast onboarding that doesn’t require a week of IT setup before the first employee can use it.

    Integration deserves its own mention because it’s where most attendance tools quietly disappoint. A system that looks polished on the front end but only exports a generic CSV forces someone in your finance team to manually match names, hours, and pay codes every pay cycle. That’s the exact administrative drag digital systems are supposed to remove. Look for direct payroll connectors, an HRIS sync, or at minimum a well-structured export that maps cleanly onto your accounting software. If the vendor can’t answer how their export format lines up with your payroll provider in the first conversation, treat that as a signal, not a formality.

    Mobile support isn’t optional for most Singapore SMEs any more, especially retail, F&B, and field service operations where staff aren’t sitting at a desk. Offline capture, where the app logs the timestamp locally and syncs once connectivity returns, prevents the common failure mode where a spotty WiFi connection at a warehouse or event venue quietly drops half a day’s clock-ins. Onboarding speed matters just as much: a system that needs a consultant on-site for two weeks before your first shift can clock in defeats the purpose of going digital in the first place.

    Verification methods compared: biometric, GPS/geofence, QR and PIN

    Choosing how staff prove they’re actually present is the single decision that shapes cost, privacy exposure, and how much fraud you’ll actually prevent. Each method solves a different version of the same problem, buddy punching, where one employee clocks in for another, and each comes with its own trade-offs.

    Biometric verification (fingerprint or facial recognition) is the hardest to fake, because it ties the clock-in to a physical trait rather than a card or code. It suits fixed locations with a stable workforce, like a factory floor or a single retail counter, where the hardware cost is spread across many daily uses. The downside is upfront cost and heightened privacy sensitivity: biometric data is inherently more sensitive than a PIN, and monitoring systems intended to track employee behaviour are restricted unless proportionate and disclosed in advance, which means biometric rollouts need clear internal communication before day one, not after a complaint.

    GPS and geofencing verify location rather than identity, confirming a clock-in happened within a defined radius of the workplace or job site. This suits field teams, delivery staff, and multi-site businesses where the question isn’t “is this the right person” so much as “were they actually where they said they were.” It’s cheaper to deploy since it usually just needs a smartphone app, but it can’t stop someone borrowing a colleague’s phone, and battery drain or GPS drift near tall buildings can create false negatives that frustrate staff unnecessarily.

    QR codes offer a low-cost middle ground: a static or rotating code posted at the entrance, scanned by an employee’s own phone. Deployment cost is close to zero, and it works well for small offices or single-site retail where the main goal is simply replacing a paper sign-in sheet. The weakness is that a QR code can be photographed and shared, so it’s best paired with a rotating code or a secondary check if fraud risk is a real concern.

    PIN entry is the simplest and cheapest option, usually built into a shared tablet or kiosk. It’s fast to deploy and needs no special hardware, but PINs get shared between colleagues more easily than any other method here, making it the weakest option wherever buddy punching is a genuine risk.

    Here’s how these typically map to SME scenarios:

    • Small office (under 20 staff): QR code scanning at a shared entrance, backed by a lightweight app, usually strikes the right balance of cost and accuracy.
    • Retail counter: PIN or QR at a fixed till point works well when staff numbers are small and turnover is low.
    • Field teams (delivery, trades, sales): GPS/geofencing on a mobile app is close to essential, since there’s no fixed point to check in at.
    • Events and guest-facing venues: QR check-in at the door, scaled for high volume and short bursts of traffic, handles the arrival surge better than any manual list.

    Pro Tip: Don’t default to biometric because it sounds the most “serious.” Start with the least invasive method that actually solves your fraud risk. Most small offices never needed fingerprint scanners; they needed a QR code and a policy that clock-ins must happen on-site.

    Cost scales roughly with hardware complexity: PIN and QR need little beyond a tablet or a printed poster, GPS needs nothing beyond the staff’s own phones, and biometric hardware runs into real capital expense once you’re equipping multiple sites. Guidance on working-time recording confirms that the law doesn’t mandate a specific technology, so long as records are complete and available, meaning the right verification method is a business decision, not a compliance one.

    How to choose an attendance tracking solution: checklist and vendor questions

    Comparing attendance systems side by side gets easier once you stop looking at feature lists and start scoring against five things that actually determine whether the tool fits your business.

    Evaluation criterion What to check
    Best for (use case) Does the vendor’s typical customer look like your business, single site, multi-site, or field-based?
    Verification methods supported Can it do QR, PIN, GPS, and biometric, or does it lock you into one method as you grow?
    Integration readiness Does it connect directly to your payroll or accounting software, or only export a generic file?
    Pricing shape Is it a flat monthly fee, per-seat pricing, or a one-off build cost?
    Ease of deployment Can staff start using it within days, or does it need weeks of configuration?

    Work through this before booking a single demo, and you’ll walk into vendor conversations already knowing what to rule out.

    1. Confirm use-case fit first. A tool built for large enterprise shift rosters will feel overengineered for a 15-person office; a tool built for solo freelancers won’t scale past your third site.
    2. Ask about integrations by name. Don’t accept “we integrate with most payroll systems”, ask specifically whether it connects to the software you already use, and whether that’s a live sync or a manual export.
    3. Clarify data ownership. Can you export your full historical attendance data if you switch providers later, and in what format?
    4. Check reporting depth. Does the system generate payroll-ready reports automatically, or do you still need to build a spreadsheet on top of its output?
    5. Estimate deployment effort honestly. Ask how long a business your size typically takes to go from signup to first live clock-in.
    6. Ask about onboarding support. Is there a real person walking you through setup, or is it a self-serve video?
    7. Test the offline behaviour. If your team works somewhere with patchy connectivity, ask specifically what happens when a clock-in happens offline.
    8. Ask about backups and data retention. How long is attendance data kept, and where is it stored?
    9. Get a straight answer on support SLAs. What’s the response time if the system goes down on payroll day?
    10. Push on pricing transparency. Ask for the full cost at your expected headcount in twelve months, not just the entry price today.

    Watch for a few red flags during these conversations. A vendor who can’t explain their data export format clearly, who quotes pricing only after a sales call rather than up front, or who has no documented data retention policy is asking you to take a lot on faith. None of those are dealbreakers on their own, but two or more together should slow you down before you sign anything.

    Implementation plan and typical timeline for SMEs

    Rolling out an attendance system well has less to do with the software and more to do with sequencing. Rush the pilot and you’ll spend the first month firefighting instead of collecting clean data.

    1. Pre-deployment (week 1). Align stakeholders, HR, finance, and whoever owns payroll, on what the system needs to capture. Issue a written notice to staff explaining what’s being tracked and why, and take stock of what devices are actually available at each site.
    2. Pilot phase (weeks 2 to 5). Configure the system for one team or location and run it for two to four weeks alongside your existing method. This overlap period is where configuration mistakes and awkward edge cases, like staff who work across two sites, surface before they become a full-scale problem.
    3. Full rollout (weeks 6 to 8). Train all staff, switch payroll integration live, and run a reconciliation check against the old method for at least one full pay cycle to confirm the numbers match.
    4. Ongoing checks (monthly). Sample audit logs, review your data retention settings against actual need, and keep a clear support channel open for staff who hit login or device issues.

    For a business with 10 to 30 staff, this whole process typically runs four to six weeks from kickoff to full go-live. Larger SMEs with 50 to 100 staff across multiple sites should budget closer to eight to ten weeks, mostly because payroll reconciliation takes longer to validate across more pay codes and shift patterns.

    Pro Tip: Run your pilot during a normal week, not a holiday-shortened one. A quiet week hides the exact edge cases, split shifts, late arrivals, offline clock-ins, that you actually need to see before rolling out to everyone.

    Implementation plan and typical timeline for SMEs — overview diagram

    Privacy, data security and compliance considerations

    Three principles should sit underneath every attendance deployment: collect only what you need, use it only for the purpose you stated, and don’t keep it longer than that purpose requires. Attendance data is still personal data, and treating it casually creates real exposure.

    Employees should be told in writing what’s being recorded, how, and why, before the system goes live, not after someone asks. Regulatory guidance on workplace monitoring is explicit that systems tracking employee behaviour must be proportionate to a legitimate business purpose and disclosed in advance; an attendance system used purely for payroll accuracy and rostering is easy to justify, but scope creep into behavioural monitoring is not.

    Practical steps that hold up under scrutiny:

    • Document the purpose of data collection in a short internal policy, not just a verbal explanation.
    • Set a defined retention period for attendance records and delete data once it’s no longer needed.
    • Restrict access to attendance records to the managers and payroll staff who actually need it.
    • Log who accesses or edits records, and when.
    • Match verification method to actual risk: biometric data carries higher privacy weight than a QR scan, so reserve it for situations where the fraud risk genuinely justifies it.

    Digital record-keeping isn’t just good practice, it’s frequently a legal requirement. Employers are obliged in some jurisdictions to retain daily start and finish times, including breaks over 30 minutes, and a system with automated audit logs makes that obligation far easier to satisfy than a paper register sitting in a drawer.

    FlowLab perspective and practical examples from deployments

    Most SME owners come to us with the same underlying issue: their attendance data exists, technically, but it’s scattered across a punch clock, a WhatsApp group for shift swaps, and a spreadsheet someone updates on Fridays. The clock-ins aren’t wrong so much as unusable when payroll needs them.

    One retail client with three outlets had staff clocking in on paper at each till. Reconciling hours at month-end took a manager most of a day, and disputes over late arrivals were common because there was no timestamped record to check against. Moving to QR-based clock-ins with a shared dashboard cut that reconciliation to under an hour and gave managers a live view across all three sites without needing to visit any of them.

    A second case involved an events company running weekend registrations for corporate clients. Their guest check-in process was entirely manual, a printed list and a pen, which meant they had no real-time visibility into arrival numbers during the event itself. Switching to QR check-in gave them a live headcount as guests arrived, which mattered far more than they’d expected once a client asked mid-event how many attendees had shown up.

    If either of those situations sounds familiar, Some app development companies offer a complimentary app fit review before any commitment, helping determine whether a ready-made product, an adapted build, or something bespoke fits your operation.

    FlowLab perspective and practical examples from deployments — overview diagram

    What most attendance advice gets backwards

    Most guides on this topic treat attendance tracking as a feature-comparison exercise, listing biometric versus QR versus GPS as if the choice were purely technical. It isn’t. The decision that actually determines whether a rollout succeeds is sequencing: get payroll integration right before you obsess over verification method, because a system with elegant clock-ins and no clean payroll export just moves the manual reconciliation problem one step downstream instead of removing it.

    The other overrated idea is that bigger businesses need more sophisticated systems. In practice, a 15-person office with a QR code and a proper export often runs cleaner payroll than a 200-person operation with biometric scanners but no defined data retention policy. Match the tool to the actual risk, not to what looks impressive in a sales deck.

    Start with your payroll pain point, not the feature list. That’s where the real return sits.

    — Ronald

    Getting attendance right without the guesswork

    Flowlab is the practical route to a working attendance system without hiring a full IT team or committing to a six-month build. PresenceFlow is built to make attendance simple to record and easy to see, covering the clock-in verification, payroll-ready reporting, and audit logging covered throughout this guide, while EventFlow handles the guest-arrival scenario, turning a door check-in into live visibility for event organisers.

    Flowlab

    Every business is different, so FlowLab offers three delivery routes depending on what you actually need: a ready-made product for straightforward attendance needs, an adapted version of PresenceFlow configured to your specific verification method and integrations, or a fully bespoke build if your workflow doesn’t fit either. FlowLab’s approach to SME app development starts with understanding your current process, not pitching a fixed package. Businesses running on other systems can also see how attendance data connects into wider ERP and workflow integrations once the core tracking is in place.

    If you’re ready to see how this looks in practice, book a PresenceFlow demo or request a complimentary app fit review to find out which option, ready-made, adapted, or custom, actually suits your business before spending anything.

    Sources

    For the legal underpinning behind record-keeping obligations, the guidance on recording working hours explains what employers must retain. Practical detail on acceptable recording methods, including electronic systems, sits in the working-time recording guidance. For the privacy side of any monitoring deployment, guidance on workplace monitoring systems sets out when proportionality and disclosure apply. For a wider view on where automation fits into SME operations, this roundup of automation tools is worth a read.

  • Stop Password Chaos: SSO for SMEs with FIDO2 MFA and a Free App Fit Review

    Stop Password Chaos: SSO for SMEs with FIDO2 MFA and a Free App Fit Review

    Yes, most small and medium-sized businesses should adopt single sign-on, provided it comes paired with phishing-resistant multi-factor authentication. SSO cuts password risk and puts access control in one place instead of scattered across dozens of logins. The first move is not buying software. It is spending an afternoon listing which applications your team actually uses, then deciding whether to build that inventory yourselves or book a free app-fit review with a partner who has done it before.


    TL;DR:

    • Many SMEs already have a built-in identity provider in their existing software suite, often at no extra cost, which simplifies initial setup.
    • Costly integration time can stem from legacy applications needing custom connectors, surpassing license fees as the main expense.
    • Phishing-resistant multi-factor authentication, such as FIDO2 security keys, is essential to protect against credential theft when using SSO.
    • Conducting a phased rollout over several weeks or months reduces risk and allows testing of application-specific features like logout functionality.
    • Vendors often enforce an SSO “tax” by charging extra for the feature, so it is crucial to prioritize which applications genuinely require SSO before expanding.

    Flowlab
    Find the Right App Solution
    FlowLab reviews your operational needs and guides you toward a ready-made, adapted, or custom application without unnecessary technical jargon.

    Explore app fit reviews

    Table of Contents

    Key benefits, risks and costs of single sign-on for SMEs

    SSO earns its place in an SME’s toolkit for three reasons. It centralises security so one strong login protects everything behind it, it turns onboarding and offboarding into a single action instead of a checklist of twelve account closures, and it tends to reduce password-reset tickets, which is often the single biggest drain on a small IT team’s week.

    None of that comes free of risk. Here’s what to watch, and how to handle it:

    • Identity provider outage: if your IdP goes down, so does access to everything connected to it. Keep a documented break-glass admin account outside the SSO chain.
    • Compromised credentials: one stolen password now unlocks more than it used to. Phishing-resistant MFA, ideally FIDO2 security keys or passkeys, closes that gap.
    • The “SSO tax”: some SaaS vendors charge extra for the privilege of using SSO at all. Prioritise which apps genuinely need it rather than paying for blanket coverage.

    For a business with 20 to 50 staff, a well-scoped rollout typically runs a few weeks to a few months using a phased approach rather than a single cutover weekend. Cost bands vary widely depending on how many applications need custom connectors, but the biggest costs usually come from integration time rather than licence fees.

    What is single sign-on and how does the login flow work?

    Single sign-on lets someone log in once and gain access to every connected application without re-entering credentials, which is different from a password manager that simply stores and autofills separate passwords for each site. A password manager still asks for a login every time; SSO removes that repetition entirely by trusting one verified identity across the whole system.

    The mechanics follow a consistent pattern regardless of which vendor sits behind it:

    1. A user tries to open an application (the “service provider”, or SP).
    2. The SP redirects them to the identity provider (IdP), which is where their organisational identity actually lives.
    3. The user authenticates at the IdP, ideally with MFA enforced at this step.
    4. The IdP issues a signed token or assertion confirming who the user is.
    5. The SP checks that token, trusts the signature, and opens a session.

    That session has a lifetime. When it expires, or when an administrator revokes the token, access disappears without anyone touching the individual application. This is what makes offboarding so much faster with SSO in place: disable one account at the IdP and every connected app closes its doors simultaneously.

    One caveat worth flagging early: single logout, the feature that closes every connected session when a user logs out once, is not universally supported. Some applications keep a session alive even after the IdP session ends, so test this specifically during any pilot rather than assuming it works everywhere.

    Which protocols and identity provider suit your business?

    Three standards do almost all the work in SSO deployments, and picking between them is simpler than it looks. SAML tends to suit older, established SaaS platforms that were built before modern web standards matured. OpenID Connect, built on OAuth 2.0, is the natural choice for modern web and mobile applications. SCIM handles something different again: automated provisioning, so that adding someone to a group in your IdP automatically creates or updates their account in connected applications.

    SAML OIDC and SCIM roles

    As a rule of thumb: if an application predates 2015 or describes itself as “enterprise legacy”, expect SAML. If it is a newer product with a slick onboarding flow, expect OIDC.

    Choosing an identity provider comes down to what you already run. Businesses built around Microsoft 365 often find that Entra ID (formerly Azure AD) is already included in their licence tier and covers most use cases without additional spend. Google Workspace shops have an equivalent built-in option. Businesses with a more mixed device fleet, or ones that need finer-grained conditional access policies, sometimes need a dedicated IdP layered on top. The trade-off is straightforward: a suite-native IdP is cheaper and faster to stand up, while a dedicated identity platform gives you more control at the cost of another vendor relationship and another monthly line item.

    What security and operational benefits should SMEs expect?

    The security case for SSO rests on centralisation. Instead of forty separate passwords scattered across forty applications, each one a potential leak point, you get one login event, one audit log, and one place to enforce multi-factor authentication and conditional access. That single point of control also becomes your single point of failure, so the mitigations matter as much as the benefits.

    • Fewer reused passwords: staff no longer need a dozen logins, which removes the temptation to reuse the same weak one everywhere.
    • Faster onboarding and offboarding: one action at the IdP grants or removes access across every connected app.
    • IdP outage: keep a break-glass account stored securely outside the SSO system for emergencies.
    • Compromised IdP credentials: enforce phishing-resistant MFA, particularly for admin and privileged accounts.
    • Applications that don’t support SSO: fall back to a password manager or a gateway proxy for those specific tools rather than abandoning the whole project.

    Pro Tip: Test single logout during your pilot, not after rollout. Some applications quietly keep sessions alive even after the IdP session ends, and you only find out during an incident if you haven’t checked first.

    SSO is an authentication mechanism, not an authorisation one. It confirms who someone is; it does not decide what they are allowed to do once they are in. That still needs role-based access control configured inside each application.

    How should SMEs implement SSO step by step?

    A phased rollout beats a big-bang migration for almost every SME, mainly because it lets you catch integration surprises on five applications instead of fifty.

    1. Phase 0, preparation: name an owner, define what success looks like (fewer tickets, faster offboarding, cleaner audit logs), and inventory every application in use. Prioritise by user count and how much risk each app carries.
    2. Phase 1, foundation: choose your identity provider, switch on MFA and conditional access, and set up a break-glass admin account that sits outside the SSO chain.
    3. Phase 2, pilot: connect five to ten applications for a small group of five to ten users, and specifically test login, logout, deprovisioning and audit logging before touching anything else.
    4. Phase 3, rollout: extend to the rest of the business in stages, train staff on the new login flow, document the process, and schedule periodic access reviews once everything is live.
    Phase Focus Typical duration
    Phase 0 Ownership, metrics, app inventory 1 to 2 weeks
    Phase 1 IdP setup, MFA, break-glass account 1 to 3 weeks
    Phase 2 Pilot with 5 to 10 apps and users 2 to 4 weeks
    Phase 3 Full rollout, training, access reviews 6 weeks to a few months

    Most SMEs following this structure land somewhere between six weeks and a few months from kickoff to full adoption, depending on how many legacy applications need bespoke connectors.

    What does SSO actually cost and where does the SSO tax appear?

    Costs rarely show up where people expect. Licence fees for the identity provider itself are often the smallest line item; the bigger costs come from integration time, especially where legacy applications need custom connectors, and from consultancy hours if you’re outsourcing the build.

    Check what you already own before buying anything new. Many SMEs already hold an identity provider inside their existing productivity suite licence and simply haven’t switched it on. If your business runs on Microsoft 365, Entra ID typically comes bundled with your existing tier and can cover most use cases without extra spend.

    The “SSO tax” is the second cost trap: some SaaS vendors gate single sign-on behind their most expensive pricing tier, sometimes adding hundreds of dollars a month for a feature that costs them almost nothing to enable. Vendors are under increasing pressure to remove these restrictions for smaller businesses, but until that becomes universal, prioritise which applications genuinely need SSO rather than paying the tax across your entire stack.

    What does SSO actually cost and where does the SSO tax appear? — overview diagram

    What questions should SMEs ask vendors before choosing SSO?

    A short procurement checklist saves you from expensive surprises after the contract is signed:

    • Which protocols does the platform support: SAML, OIDC, both?
    • Does it support SCIM for automated user provisioning and deprovisioning?
    • What MFA methods are available, and do they include FIDO2 or passkeys?
    • Can logs feed into your existing SIEM or monitoring tools?
    • What is the SLA for outages, and what is the documented recovery process?
    • Is there a tested rollback plan if the pilot uncovers a blocking issue?

    Ask for a break-glass account walkthrough during the sales call, not after signing. If a vendor cannot explain their emergency access process clearly, that’s a signal worth noting.

    FlowLab’s view on ready-made versus custom SSO integration

    A good approach to SSO starts with understanding the operational problem before naming a solution. This means conducting an app-fit review first, mapping which applications your team actually uses and how they need to connect, before recommending a ready-made identity provider, an adapted integration, or a fully custom build.

    Off-the-shelf IdPs cover most SMEs well. Custom integration earns its cost when you run specialist software with no native SSO support, unusual device constraints, or workflows that don’t fit a standard connector. Read more about how FlowLab approaches SME app development, or find out more about the team behind FlowLab before booking a review.

    Why most SME security advice on SSO is backwards

    Most guidance on this topic starts with enterprise assumptions: dedicated identity teams, unlimited budget, a security function that reviews access quarterly. None of that describes a 30-person business with one overworked IT generalist, and pretending otherwise is why so many SMEs delay SSO for years longer than they should.

    The judgement the evidence actually supports is smaller and more useful: start with the identity provider you already own, pilot on ten applications, enforce MFA from day one, and stop there until the pilot proves itself. Conventional advice oversells the identity provider choice and undersells the break-glass account, which is the detail that actually determines whether a bad day becomes a minor inconvenience or a genuine outage.

    If you take one thing from this, prioritise phishing-resistant MFA over which vendor logo sits on your login screen. The protocol matters less than whether someone can still get in when the system fails.

    — Ronald

    Get a complimentary app-fit review before you commit to anything

    App development for SMEs ideally starts by understanding the operational problem first, then matching the solution to it rather than the other way round. For businesses juggling queue management, attendance tracking, or point-of-sale systems that all need to sit behind a single login, that often means adapting an existing product rather than starting from a blank page.

    Flowlab

    If you want to see what a connected workflow actually looks like before committing to anything, try the complete queue journey demo and see how access and operations fit together in practice. From there, a complimentary app-fit review will tell you honestly whether a ready-made product, an adapted build, or a custom integration is the most economical route for your specific setup, with costs clarified before any development work begins. Book that review through FlowLab’s app development team and get a straight answer on what your business actually needs.

    Where to read more on SSO standards and implementation

    Sources

  • 90 Day Fix for Your Small Business Tech Stack

    90 Day Fix for Your Small Business Tech Stack

    A small business tech stack is the set of apps and services your team relies on daily to run operations and move data between people. The single best first action isn’t buying another tool. It’s spending an hour auditing what you already have, because most firms are paying for overlap they’ve never noticed. That inventory alone usually saves time, cuts duplicate subscriptions, and gives you cleaner data to make decisions with.


    TL;DR:

    • Most small businesses have overlapping tools and unused licenses, which can be identified through a one-day inventory and data flow mapping.
    • Prioritizing tools based on fixed criteria like data portability, security, and integration helps avoid costly regrets and vendor lock-in.
    • Coordinating integration via native connectors, middleware, or custom builds minimizes manual data re-entry and system fragmentation.
    • Conducting regular license and change reviews prevents lingering access and reduces costs caused by fragmented or unnecessary software.
    • An effective audit often leads to trimming duplicate subscriptions and automating repetitive tasks instead of purchasing new tools.

    Table of Contents

    What counts as a tech stack, and which categories matter

    A tech stack splits into core tools (used by everyone, every day) and specialist tools (used by one team for one job). Categorising this way helps you spot gaps and overlap fast, rather than treating every app as equally important. Ad hoc purchases without this structure are exactly how small firms accumulate what’s often called “tech debt”: a pile of point solutions nobody fully understands, according to Prialto’s small business guide.

    Most small firms need coverage across these areas:

    • Finance and accounting — one system as the single source of invoicing and cash position
    • CRM and sales — a single record of who your customers are and what they’ve bought
    • Operations and order management — stock, scheduling, or job tracking depending on your business
    • Collaboration and productivity — shared documents, messaging, calendars
    • Marketing and website — where leads actually enter the business
    • Analytics and reporting — turning transaction data into something you can act on
    • Payments — how money moves in and out, and how cleanly it reconciles

    The trap is letting two tools fight for the same job, like a CRM contact record and a separate spreadsheet nobody updates.

    Running a practical tech stack audit, step by step

    An audit doesn’t need consultants or weeks of meetings. Structured digital audit frameworks typically cover IT infrastructure, data protection, and business processes, then produce an executive summary and a roadmap, according to IAPM Suisse’s audit guide. You can run a lighter version of that yourself in a day.

    1. Inventory everything. List every active app, who owns it, the licence cost, and the renewal date. A simple spreadsheet with columns for tool, owner, cost, renewal date, and users is enough.
    2. Map the data flows. Trace where customer details and financial records are actually created and stored, not where you assume they live.
    3. Review cost and usage. Cross-check licence seats against actual active users. Unused seats and overlapping subscriptions hide here more often than anywhere else.
    4. Build the integration map. Note which tools connect natively, which need a connector, and which rely on someone manually re-typing data.
    5. Score and prioritise. Rate each fix by impact against effort, then build a 90-day action list from the highest-scoring items first.

    Smaller teams can usually complete this initial inventory and scoring in a short period, according to the IAPM Suisse framework.

    Pro Tip: Before scoring anything, flag the three data flows that touch money or customers directly, sales leads, invoices, stock levels, and audit those first. Polishing a low-value tool while your invoicing is a mess is wasted effort.

    Choosing and prioritising tools without regretting it later

    Pick tools against fixed criteria, not whichever demo looked slickest. Five things matter more than features: pricing model, data portability, integration options, scalability, and security and support quality.

    Ask any vendor these questions before signing anything:

    • Can you export your full data set in a usable format, and how long does that take?
    • Is there an open API, or only a closed, proprietary connector?
    • What’s the realistic onboarding time, not the sales team’s estimate?
    • What’s the total cost of ownership once you add seats, add-ons, and support tiers?
    • What are the exact contract termination terms, including notice period?

    Watch for red flags: opaque pricing that only appears after a sales call, no clear path to export your own data, and security defaults that leave multi-factor authentication switched off by default.

    Software vendor audits are common, and unmanaged licences expose firms to cost and compliance risk, as noted by ARDURA Consulting’s guide to surviving a software audit. A tool like apppricer can help you benchmark what you’re actually paying against market rates before you renew.

    Making the stack work together without breaking it

    Integration choices come down to three patterns. Native connectors are the simplest option when two tools already talk to each other out of the box. Middleware, sometimes called an integration platform, fills the gap when they don’t. Custom integration, built specifically for your workflow, only makes sense once the manual workaround is costing more staff time than the build would.

    Whichever pattern you choose, a few habits keep the stack tidy:

    • Designate one system as the single source of truth for customer records and one for financial data, and stop letting a third spreadsheet quietly compete with both.
    • Apply basic identity and access management, including multi-factor authentication, on anything holding customer or payment data.
    • Schedule backups and actually test that a restore works, not just that the backup ran.

    Pro Tip: Run a quarterly licence review alongside a simple change log, one line per tool change. It takes twenty minutes and stops “who added this app?” from becoming a mystery six months later.

    Assign a named owner to every tool, and build a basic onboarding and offboarding checklist so access doesn’t linger after someone leaves.

    Software ownership and access lifecycle

    Why fragmentation quietly costs more than it looks like

    Why fragmentation quietly costs more than it looks like — overview diagram

    Remote and fragmented tool use has been linked to longer working hours and heavier context switching, according to Bloomberg’s reporting on remote work patterns. Every extra login and manual re-entry point adds friction that rarely shows up on a balance sheet but shows up in staff time.

    Surveys of small and medium enterprises consistently find that most already use cloud tools, yet few have a coherent digital strategy tying them together, per Die Wirtschaft’s decision guide. The fastest returns tend to come from cloud collaboration and cleaning up the digital presence, not from ripping out core systems.

    A short, honest audit rarely ends with “buy more software.” It usually ends with cutting two overlapping subscriptions, fixing one broken data flow, and automating one repetitive task, like invoice chasing, that was quietly eating hours every week.

    That’s consistent with what a complimentary app fit review tends to surface: low-cost wins first, bespoke development only where the workflow genuinely needs it.

    What client work keeps teaching us about tech stacks

    Three mistakes show up again and again. Firms buy a new tool before auditing what they already own. They duplicate licences across teams because nobody checks first. And they adopt software without ever asking how to get their own data back out.

    Three priorities fix most of that. Start with the inventory. Pick one system as the single source of truth for customer records. Then pilot exactly one automation, invoice reminders or lead capture usually pay back fastest, before touching anything else.

    Test cheaply before committing. A demo, a free trial, or a scoped pilot workflow tells you more in a week than any sales pitch will.

    — Ronald

    How Flowlab helps once you know what’s actually broken

    An audit tells you what’s wrong. Flowlab’s complimentary app fit review tells you the cheapest way to fix it, whether that’s a small adjustment to what you already run or something built from scratch.

    Flowlab

    Unlike committing to a big platform overhaul, an app development process that starts by understanding your actual workflow before recommending anything can help avoid paying for capability you’ll never use. The options are straightforward: a ready-made product adapted to your process, an existing app foundation reshaped around your specific workflow, or a fully bespoke build when nothing off the shelf fits. Every review clarifies likely costs before any development starts, and if you’re weighing up the numbers, the app development cost guide gives a realistic shape of what bespoke work involves. If you’d rather see something running first, try a product demo or book a scoping call to talk through what your audit turned up.

    Sources

  • Settle Two Months in Two Days: SME Software Discovery Workshop

    Settle Two Months in Two Days: SME Software Discovery Workshop

    A software discovery workshop is a time-boxed, cross-functional process that produces a build-ready MVP scope, technical feasibility notes, and a roadmap before any coding begins. It brings the people who own the problem together with the people who will solve it, over a few structured sessions, to agree what gets built, in what order, and why. Product owners and SME teams leave with a problem statement, acceptance criteria, and a clear cost picture, not just a slide deck.


    TL;DR:

    • A discovery workshop should produce clear problem statements, workflow maps, MVP scope, technical feasibility notes, and a roadmap to be effective.
    • Essential participants include product decision makers, technical leads, business analysts, and UX designers, with other roles added only as relevant.
    • Documented outputs are vital; each session must end with tangible deliverables such as decision logs, KPIs, and scope boundaries to avoid being just a meeting.
    • A typical ten-day discovery plan involves phases of business framing, workflow mapping, prioritization, and technical validation, often compressed into five to ten days.
    • Avoid common pitfalls like scope creep, undocumented sessions, and lack of a decision maker, which can all derail the discovery process and extend project timelines.

    Table of Contents

    Why discovery matters before you build

    Skipping discovery is how a straightforward app brief turns into a six-month rebuild. Teams that jump straight to development routinely discover halfway through that the “simple booking system” also needed to talk to an accounting package, or that three departments each assumed a different definition of “customer.” Industry write-ups on discovery consistently point to misaligned expectations, architectural errors, and budget overruns as the default outcome of building without it.

    Discovery fixes this by forcing decisions early, when they are cheap, rather than mid-build, when they are expensive.

    • Scope creep gets named and parked, not discovered in week nine of development.
    • Integration requirements (payment gateways, existing databases, staff logins) surface before a single line of code is written.
    • Estimates become scenario-based rather than guessed, because they are grounded in a documented workflow.

    Statistic Callout: Guides on discovery consistently recommend five concrete deliverables, problem statement, workflow maps, MVP scope, a technical feasibility snapshot, and a success scorecard, as the minimum bar for a workshop to count as “done.”

    Who should attend a discovery workshop?

    Get the wrong people in the room and discovery becomes a talking shop. Get the right ones and two days can settle what might otherwise take two months of email chains.

    The essential roster is small:

    • Product owner or decision maker — the one person who can say yes or no to scope, not “I’ll check with someone.”
    • Technical lead or architect — flags integration and feasibility issues in real time, before they become surprises.
    • Business analyst or facilitator — keeps the sessions moving and translates business language into requirements.
    • UX or design lead — sketches workflows so non-technical stakeholders can react to something concrete.

    Bring in compliance, data owners, or operations staff only when the project genuinely touches their territory, a payroll app needs a finance stakeholder; a customer booking tool usually doesn’t need one on day one.

    Pro Tip: Ask every participant to bring one page of existing documentation, a process diagram, a spreadsheet, a screenshot of the current system, before the first session. It saves an entire morning of description that could have been reading.

    What a strong discovery workshop produces

    A workshop that ends without documented deliverables was a meeting, not discovery. Here’s what a properly run one hands over:

    1. Problem statement and success scorecard — the core issue in plain language, plus the KPIs that will prove the solution worked.
    2. Current-state workflow maps and user journeys — how work actually happens today, warts included.
    3. MVP scope boundary and import-ready backlog — what ships first, with acceptance criteria attached to each item, not vague feature names.
    4. Technical feasibility snapshot — architecture notes, an integration map, and Architecture Decision Records (ADRs) capturing why key technical choices were made.
    5. Roadmap and decision log — scenario-based estimates with stated assumptions, plus a record of what was decided and what was deliberately parked.

    These five outputs are the standard discovery engagement checklist that most credible providers converge on, a vision document, prioritised backlog, technical architecture, and roadmap among them. Miss two or three of these and the workshop hasn’t earned the name.

    How to structure a discovery workshop: a practical agenda

    Discovery does not need to sprawl across a month. Guides on running these sessions for mid-market teams typically recommend a compact two-week structure broken into clear phases, and some providers now compress this further into five to ten intensive days.

    A workable ten-day plan looks like this:

    1. Days 1 to 2, business framing — stakeholder alignment session, defining the problem statement, agreeing success metrics.
    2. Days 3 to 5, workflow mapping — current-state process maps, user journey mapping, surfacing integration points and constraints.
    3. Days 6 to 8, prioritisation and MVP definition — MoSCoW or Kano prioritisation exercises, drawing the MVP scope line, drafting the backlog.
    4. Days 9 to 10, technical validation and handover — feasibility review, architecture notes, roadmap, and a decision log covering assumptions and trade-offs.

    Useful exercises to build into that structure:

    • A stakeholder alignment session on day one, so competing priorities surface before they derail week two.
    • A risk heatmap, plotting technical, budget, and adoption risks against likelihood and impact.
    • A prioritisation workshop using MoSCoW (“must have” vs “won’t have this time”) or Kano (delight versus basic expectation).

    Each session should end with a documented deliverable, not just notes. If a session ends with nothing documented, it was a discussion, not discovery.

    Discovery frameworks that make decisions stick

    Five lenses keep discovery conversations from drifting: goals, process, constraints, MVP scope, and roadmap. Run every discussion through them and you avoid the trap of designing features nobody asked for.

    For prioritisation specifically, three frameworks cover most situations:

    • MoSCoW (Must, Should, Could, Won’t) works well for time-boxed MVPs where the line between “in” and “out” needs to be visible to everyone.
    • Kano suits products where customer delight matters as much as function, useful for customer-facing apps rather than internal tools.
    • RICE (Reach, Impact, Confidence, Effort) helps when you’re comparing many competing feature requests against limited development capacity.

    Whichever model you choose, Architecture Decision Records and a decision log turn verbal agreements into a written record. Without them, “we decided not to build that yet” quietly becomes “why didn’t anyone build that?” three months later.

    Common discovery mistakes and how to avoid them

    The most common failure is treating discovery as open-ended brainstorming rather than a process with defined outputs. If a session produces ideas but no documented decision, it hasn’t done its job.

    • No named decision maker — insist one person can approve scope; committees stall discovery indefinitely.
    • Scope drift mid-workshop — lock “not now” items into the decision log rather than letting them creep back in.
    • Undocumented sessions — every session should end with a written artefact, not just verbal agreement.

    Pro Tip: End every session with a two-minute round where each attendee states, out loud, what was decided. Disagreements surface immediately, not three weeks into development.

    How to measure discovery success

    Discovery is finished when it produces something delivery teams can actually use, not when the calendar runs out. A short, measurable success rubric applied straight after the workshop tells you whether you’re ready to move on.

    • Estimate variance — how close early scenario estimates land to the final scoped plan.
    • Backlog import readiness — can the backlog go straight into a project tool, or does it need rework?
    • Stakeholder sign-off rate — did every essential participant formally approve the scope?

    Statistic Callout: Vendor guides note that discovery deliverables should be vendor-neutral, meaning they remain usable even if a different team ends up building the software.

    How Flowlab runs discovery for SMEs

    The discovery process can start with a complimentary app-fit review before recommending a ready-made product, an adapted foundation, or a custom build. Understanding the operational problem first helps avoid paying for custom development when an existing system could already provide a solution. Discovery sessions typically produce a workflow map, an MVP scope, and a plain-language cost picture, all presented without technical jargon or pressure to commit. Confidentiality is treated as standard practice, respecting the sensitivity of internal processes shared during discussions.

    How Flowlab runs discovery for SMEs — overview diagram

    Should you run discovery in-house or hire specialists?

    DIY discovery works for simple, single-department tools with no integrations and a decisive owner. Bring in an external facilitator once integrations, compliance, or multiple departments are involved, an outside party gives unbiased artefacts and technical validation your own team may lack. Check complexity, stakeholder bandwidth, and regulatory exposure before deciding.

    — Ronald

    Ready to run your own discovery workshop?

    Flowlab’s discovery process starts where the previous sections left off: a workflow map, an MVP scope, and honest numbers before anything gets built. The complimentary app-fit review exists precisely because most SMEs don’t need a full custom build, they need someone to check first, then recommend the simplest suitable solution, whether that’s an existing product foundation or something built from scratch.

    Flowlab

    To get started, bring what you’d bring to any discovery session: a rough description of the process that’s causing friction, any existing documentation, and a sense of your budget range. Flowlab reviews this confidentially and comes back with a clear scope and cost picture, no pressure, no jargon. If a workflow automation product already fits, you’ll hear that too rather than being sold a custom build you didn’t need. Start with a complimentary app-fit review or browse FlowLab’s product demos to see what a ready-made foundation looks like before committing to anything.

    For teams weighing whether to commission this work out entirely, Brainiac Media’s outsourcing case studies offer a useful look at how discovery shapes scope before external teams start building.

    Sources

  • SME UAT Test Plan: 7 Copy Ready Sections to Paste into Word or Excel

    SME UAT Test Plan: 7 Copy Ready Sections to Paste into Word or Excel

    A UAT test plan is the release-control document that defines what gets tested, who signs off, and what conditions must be met before software goes live. Every solid plan needs seven sections: project overview, entry criteria, exit criteria, roles and responsibilities, environment and data requirements, defect management, and the test schedule. If you’re starting from scratch, copy the structure below into a fresh document rather than a blank page.


    TL;DR:

    • Entry criteria must be fully met, including completed development and stable environments, before starting UAT to prevent schedule slips.
    • Exit criteria should be agreed upon with the sponsor and include a specific pass rate on priority test cases and zero critical open defects.
    • Defect triage requires clear separation of severity and priority, with immediate logging and daily assessment during active testing periods.
    • The UAT schedule should allocate at least a third of the planned duration for fixing and retesting issues, not just executing test cases.
    • Owners and sign-off procedures must be clearly defined beforehand, with a named authority responsible for final approval and documented decisions.

    Table of Contents

    What goes in each part of a UAT test plan

    A UAT test plan works best when it reads like a decision tool, not a report. Each section should answer one operational question: can we start, can we stop, and who decides? Skip that discipline and you end up with a document nobody consults once testing begins.

    Project overview (scope and objectives). This states what’s being tested, what’s explicitly out of scope, and why the release matters to the business. Keep it to a few sentences. A vague scope statement is the single biggest reason UAT drags on: testers end up covering ground nobody asked them to check, or missing the one workflow that actually matters to the sponsor.

    Entry criteria. These are the conditions that must be true before testing starts, typically: development complete, system testing passed, environment stable, test data loaded. Entry criteria exist to stop teams starting UAT prematurely, which is one of the most common ways schedules slip. If a business tester logs in on day one and finds a broken login screen, you’ve lost credibility before you’ve lost time.

    Exit criteria. These define what “done” looks like, usually a named pass rate on priority test cases and zero open critical defects. Agree these numbers with the sponsor before testing starts, not during the final sign-off meeting.

    Roles and responsibilities. Name the business tester, product owner, QA lead, and whoever has authority to defer a defect. Vague ownership is why sign-off conversations turn into arguments.

    Environment and data requirements. State which environment testers will use and how test data will be sourced or anonymised.

    Defect management process. Describe how issues get logged, triaged, and retested, plus the service levels for each severity.

    Test schedule. A dated timeline with explicit buffer time for triage and retesting, not just execution.

    Several UAT frameworks, including guidance aligned with IEEE 829 documentation practice, converge on the same structure. The reason is practical rather than bureaucratic: each section maps to a specific decision point in the release process, and traceability between test cases and business requirements keeps every decision defensible when someone asks “why did we approve this?” months later.

    Writing UAT test cases: fields, formats and a sample layout

    Test cases are where the plan meets reality. A well-built test case tells a business tester exactly what to do, what to expect, and what to record, without needing a QA background to follow it.

    Every UAT test case should carry these fields:

    • Test case ID: a unique reference for traceability
    • Requirement reference: the business requirement or user story the case validates
    • Preconditions: what must be true before the tester starts (login state, data setup)
    • Test steps: the exact sequence of actions, written plainly
    • Expected result: what should happen if the system behaves correctly
    • Actual result: what the tester observed
    • Pass/fail status: the outcome
    • Tester name and date: for accountability and audit trail
    • Comments/defect reference: a link to the logged issue if the case fails

    The requirement reference matters more than most teams realise. Templates and guidance repeatedly stress that linking every test case back to a business requirement is what makes a UAT plan auditable rather than anecdotal. Untraceable testing is, in practice, untestable testing: if a case fails and nobody can point to the requirement it was checking, you can’t decide whether the failure actually blocks release.

    A sample row might look like this: Test case ID “UAT-014”, requirement reference “REQ-08: Customer can reschedule a booking”, preconditions “logged in as returning customer with one active booking”, steps “open booking, select reschedule, choose new date, confirm”, expected result “booking updates and confirmation email sends within two minutes”, actual result and status filled in by the tester during execution.

    Artefact Recommended format Why
    Test plan Word or PDF Narrative structure, easy to circulate for approval
    Test cases Excel or Google Sheets Rows and filters suit repeated execution and tracking
    Sign-off document Word, exported to PDF Formal record, easy to archive
    Readiness checklist Excel or Word Short, checkbox-style, quick to update

    This split isn’t arbitrary. Test plans and sign-off documents suit Word or PDF, while test cases and progress tracking work far better in a spreadsheet where you can filter by status, owner, or severity without reformatting a document every time something changes.

    Who owns what during UAT, and how sign-off actually works

    Late-stage arguments about scope almost always trace back to one thing: nobody agreed who had the authority to decide in the first place. Fix that at the planning stage, not during the final review.

    A typical UAT team needs:

    • Business tester: executes test cases against real-world scenarios and reports outcomes.
    • Product owner: clarifies requirements when a test case’s expected result is ambiguous.
    • QA lead: maintains the test case library, tracks execution status, and manages the defect log.
    • Project manager: owns the schedule, chases blockers, and escalates when entry or exit criteria are at risk.
    • Triage owner: decides whether a logged defect blocks release, gets fixed post-launch, or gets deferred entirely.
    • Sponsor: gives final sign-off, informed by the QA lead’s summary and the triage owner’s recommendations.

    Triage should run on a fixed rhythm, daily during active UAT weeks, rather than whenever someone remembers to call a meeting. The HERMES project management framework treats the test concept as something that must be co-created and continually agreed by stakeholders precisely to prevent this kind of scope drift mid-testing.

    Sign-off itself should be a named person with a dated signature, not a group email thread that trails off. Record the decision, the outstanding defects at the time of sign-off, and any conditions attached to the approval.

    Pro Tip: Delegate triage authority to one named person before UAT starts. If the triage owner is also the sponsor, defect debates tend to stall because the same person is being asked to judge severity and approve release in the same breath.

    Getting the test environment and data right before testers arrive

    Nothing kills confidence in a UAT cycle faster than testers hitting a bug that turns out to be an environment problem, not a software problem. Get the staging environment right before you invite business users in.

    Start with environment parity. The UAT environment should mirror production configuration as closely as possible, same integrations, same third-party connections, same performance characteristics. Common pitfalls include running UAT against a scaled-down database that behaves differently under load, or leaving debug logging enabled in a way that masks real performance issues.

    Test data needs the same care. Anonymise any production data you reuse, stripping names, contact details, and payment information while keeping the data realistic enough to expose real edge cases. Seeding a completely synthetic dataset is often easier and lowers the audit trail requirements around data handling, particularly for anything touching customer or financial records.

    Plan for refreshes. Testers will corrupt or exhaust data during execution, that’s expected, not a failure. Build a repeatable refresh procedure so a business tester who breaks a test scenario on day three isn’t blocked until day five waiting for someone to manually reset records.

    Pro Tip: Run one full environment refresh cycle before UAT officially opens. If it takes longer than a few hours or breaks something else, you’ve found a problem worth fixing before testers, not during their first session.

    Getting the test environment and data right before testers arrive — overview diagram

    How defect triage separates real blockers from noise

    Every defect report needs the same core fields: a unique ID, the test case it came from, steps to reproduce, expected versus actual result, severity, and screenshots or logs where relevant. Skipping reproduction steps is the single most common cause of wasted developer time during UAT, because a defect that can’t be reproduced can’t be fixed.

    The distinction that matters most during triage is severity versus priority. Severity is technical: how badly does this break the system? Priority is business: how much does this matter to the release? A cosmetic bug on a rarely used screen can carry low severity and low priority. A minor calculation error on an invoice screen can carry low severity but high priority, because it touches money.

    1. Log immediately, with reproduction steps captured while the context is fresh in the tester’s mind.
    2. Triage within 24 hours during active UAT weeks, assigning severity and priority separately.
    3. Fix or defer, with the triage owner deciding whether a defect blocks sign-off or gets scheduled post-launch.
    4. Retest promptly once a fix lands, closing the loop before the tester’s context has gone cold.

    ERP implementations commonly set exit criteria around zero open critical defects and a high pass rate on priority test cases, figures the triage owner should be tracking daily rather than discovering at the sign-off meeting. Conditional approvals, where a sponsor signs off with a documented list of deferred low-priority defects, are common and legitimate, provided the list is explicit and dated.

    Building a realistic schedule and knowing when UAT is actually done

    UAT schedules fail for one predictable reason: they budget for execution but not for triage and retesting. A two-week UAT cycle needs roughly a third of that time reserved for fixing and re-checking issues, not just running through test cases once.

    A workable structure looks like this:

    • Days 1 to 2: environment verification and tester onboarding
    • Days 3 to 7: first-pass test case execution
    • Days 8 to 9: triage, fixes, and defect closure
    • Days 10 to 11: retesting of fixed defects and any blocked cases
    • Day 12: final metrics review and sign-off decision
    Metric What it tells you
    Cases executed vs planned Whether coverage is on track
    Pass rate on priority cases Readiness against the agreed exit threshold
    Open defects by severity Where remaining risk sits
    Mean time to retest (MTTR) Whether the fix and retest loop is keeping pace

    Agree exit criteria with sponsors before testing begins. A defensible standard is zero open critical defects plus a defined pass threshold, often in the region of 95%, on priority-one test cases. Set the number too early or too late and someone will dispute it at the worst possible moment, during the actual sign-off meeting.

    Four templates you can copy today

    You don’t need bespoke software to run disciplined UAT. Four documents cover almost every SME project: the test plan itself, the test case tracker, the sign-off record, and a short readiness checklist.

    A pre-UAT checklist should confirm: environment stable, test data loaded and anonymised, test cases reviewed against requirements, and named testers briefed. A close-out checklist should confirm: exit criteria met, sign-off signed and dated, and outstanding defects logged for post-launch action. Every test case in the tracker should carry a requirement reference; a case with no traceable requirement is a case nobody can defend keeping.

    How Flowlab applies this thinking on real SME projects

    On SME app projects, a complimentary app fit review can establish exactly what needs testing before a line of the test plan gets written. That review clarifies whether a client needs a ready-made product adapted to their workflow or a custom build, which changes how detailed the UAT plan needs to be.

    For a typical adaptation project, staging happens first: a mirrored environment with anonymised sample data drawn from the client’s actual workflow, whether that’s queue management, event registration, or lead tracking. Business users then run through scenarios built around their own operations rather than generic examples, with a named contact at Flowlab coordinating triage and guiding the sign-off conversation so SME owners aren’t left interpreting technical jargon alone.

    The mistakes that quietly sink UAT, and how to avoid them

    The plans that fail rarely fail on paper. They fail because someone skipped a step they assumed was obvious.

    The first trap is vague entry criteria. Teams say “development is basically done” and let testers start anyway, then spend the first three days reporting bugs that system testing should have caught. Write entry criteria as a checklist with a named approver, not a feeling.

    The second is severity and priority getting conflated in triage. A defect gets called “critical” because it’s annoying, not because it blocks the business, and the whole exit criteria conversation gets skewed. Separate the two fields on every defect report and insist triage owners score them independently.

    The third is treating the sign-off as a formality. Sponsors sign because the schedule says they should, not because the exit criteria were genuinely met. Put the actual numbers, pass rate, open defects by severity, in front of them before they sign, every time.

    — Ronald

    Book a demo or get an app fit review with Flowlab

    If you’re planning UAT for a new SME system rather than retrofitting one, the fastest route past a heavy build is trying it before you commit to it. Try the complete queue journey through a demo environment, and you’ll see a production-like staging recommended for your own test plan, no jargon, no obligation.

    Flowlab

    Flowlab also builds the right product answer, right when staff need it, for SMEs who need a specific workflow tool rather than a full custom build. Either way, the starting point is the same: a complimentary app fit review that identifies the most economical solution for your operation and clarifies costs before anything gets built. If you’re weighing up a ready-made product against a custom app, that review is the fastest way to find out which one your UAT plan should actually be written for. Book a review or explore the available demos to see the approach in action before you commit to a build.

    Sources

  • Cut Clinic Patient Waits in 4–6 Weeks with a Queue Management Pilot

    Cut Clinic Patient Waits in 4–6 Weeks with a Queue Management Pilot

    Clinic queue management works best as an integrated system that links booking, check-in and real-time patient tracking, replacing paper lists and shouted names with automated notifications and clear status updates. Clinics that adopt one typically see improved patient flow, reduced waiting times, and a lighter reception workload. The first move is simple: audit your current arrival-to-consultation touchpoints, then request a demo of a purpose-built system before committing to anything custom.


    TL;DR:

    • Automated queue management systems reduce patient waiting times by providing real-time updates and clear status communication, improving satisfaction and retention.
    • Integration with booking, check-in, and practice management systems minimizes manual data entry, staff interruptions, and administrative workload.
    • Features like self-check-in, live dashboards, and automated notifications are essential to move the needle in operational efficiency.
    • Not all clinics need advanced multi-service platforms; simple kiosk or mobile solutions suit small clinics, while more complex workflows require integrated systems.
    • Successful implementation depends on interoperability, staff training, and pilot testing, not just feature sets or hardware investments.

    Table of Contents

    Why queue management matters for clinic efficiency and patient experience

    A queue that moves predictably changes how patients feel about your clinic long before a doctor says a word. When people can see their position and get a message when they are five minutes out, frustration drops even if the actual wait stays the same. A peer-reviewed review of outpatient operations found that better patient-flow systems reduce waiting times and improve satisfaction, and also lower the number of patients who leave before being seen, which is a direct loss of revenue and continuity of care, according to research published on NCBI.

    The operational case is just as strong as the experience case. A clinic running proper patient flow management sees:

    • Fewer interruptions for clinicians, who no longer have to ask reception “who’s next” between consultations
    • Better staff allocation, because managers can see queue depth by service point in real time
    • Reduced no-shows, since automated reminders and live wait estimates keep patients engaged instead of giving up and leaving
    • Less manual admin, since check-in status updates automatically rather than requiring a staff member to update a whiteboard or call out names

    None of this needs a bigger reception team. It needs a system that removes the guesswork from the process, which is precisely where most clinics leak time.

    What features actually move the needle in a queue system

    Not every “queue app” delivers the same operational value. Before you sign anything, check that a proposed clinic appointment scheduling and queuing tool covers these categories:

    1. Booking-to-queue handoff. Online booking should feed straight into the day’s queue without a receptionist re-entering the same patient twice. Manual re-entry is where duplicate records and scheduling errors creep in.
    2. Self-check-in options. Kiosk screens, QR code scanning at the door, or mobile virtual queuing all let a patient register themselves and take a place in line without a conversation at the counter.
    3. Real-time dashboards. Reception and clinical staff need a live view of who’s waiting, who’s in a room, and where the bottleneck sits, updated automatically rather than tallied by hand.
    4. Automated notifications and signage. SMS or app alerts, paired with waiting-area display screens, tell patients when they are close to being called, which is what actually reduces the anxiety of an open-ended wait.
    5. Integration and reporting. Two-way sync with practice management or EHR systems, plus usage reports, let managers see peak hours and staff accordingly instead of guessing from memory.

    Qsome’s mobile interface, branded ‘MyTurn’, is a useful reference point here. It lets patients track their position from a phone and step outside the waiting room, a design choice that measurably reduces perceived wait time according to Qsome’s own case notes. Ricoh’s patient-workflow tools take a similar view, pairing self-registration with priority routing and analytics to cut administrative cost, as described in Ricoh’s healthcare overview.

    Pro Tip: Ask any vendor to show you their reporting dashboard before you ask about pricing. If the reports can’t tell you your average wait by hour of day, the system won’t help you fix your actual bottleneck.

    Which type of queue system fits your clinic

    Not every clinic needs the same level of sophistication, and buying more than you need wastes budget without improving anything.

    • Entry-level kiosk or field apps suit single-reception clinics with one or two consultation rooms. They’re quick to set up and cheap to run, but they tend to struggle once you add multiple departments or service points.
    • Integrated workflow platforms coordinate rooms, staff and several service points at once, decentralising services such as pharmacy pick-up or lab draws into the same patient journey. Synapxe’s 1 Queue (1Q) is a useful example of this approach, giving patients a single itinerary across stops rather than separate tickets at each counter.
    • Virtual-first or mobile-only systems work well for clinics with limited physical space, letting patients queue remotely and arrive closer to their turn.
    • Hybrid models combine waiting-room signage with mobile notifications, which suits most multi-service clinics best.

    If your workflow maps closely to an existing off-the-shelf product, adapting one is nearly always faster and cheaper than building from scratch. Custom development only earns its cost when your patient journey has a genuinely unusual step that no adapted product handles well.

    How to select, pilot and roll out a clinic queue system

    Choosing a system is less about features on a brochure and more about fit, support and what happens when something breaks. Work through this checklist before you sign anything.

    1. Check interoperability first. Confirm the system has an open API and can talk to your practice management or EHR software. Interoperability and future-proofing are what stop a queue tool becoming a siloed island of data your other systems can’t reach.
    2. Ask about data security and hosting. Where is patient data stored, and does the vendor meet your local data protection obligations?
    3. Test usability with actual reception staff, not just administrators, during a demo.
    4. Ask for reporting samples. A vendor who can’t show you a real report probably doesn’t have one worth seeing.
    5. Ask two hard questions before signing: can I export my data if I leave, and what’s your support response time during business hours? A vendor who hesitates on either is a red flag, as is one offering no pilot period at all.
    6. Set a pilot scope covering one or two service points for four to six weeks, with clear KPI targets: average wait time, percentage of patients served within a target window, and number of reception interruptions per shift.
    7. Train frontline staff before go-live, not during it, and keep a rollback plan ready in case the pilot needs to revert to the old process without disrupting patient care.

    Costs vary by clinic size and whether you’re adapting an existing product or building custom, but expect setup fees, a recurring licence or subscription cost, and separate line items for hardware such as kiosks or display screens and ongoing support. A realistic implementation timeline runs from a two to four week discovery and configuration phase, through a four to six week pilot, to a full rollout roughly two to three months after your first vendor conversation. Clinics that skip the pilot phase are the ones most likely to face staff resistance, since a system only earns buy-in when it visibly reduces manual tasks rather than adding new ones.

    How FlowLab approaches clinic queue projects

    Flowlab starts every clinic conversation by mapping the actual arrival-to-consultation workflow before recommending anything. Some clinics need nothing more than an adapted, ready-made queue product. Others have a workflow quirk, such as a shared lab and pharmacy queue, that justifies a bespoke build. Flowlab’s complimentary app fit review exists to work out which of those applies to your clinic and to give you a clear cost picture before any commitment. A short pilot on a single reception point is usually enough to show process-level gains, such as fewer reception interruptions per shift, within the first few weeks of use.

    How FlowLab approaches clinic queue projects — overview diagram

    What clinics get wrong about queue management

    Most clinics treat queue management as a signage problem: put a screen on the wall, call it solved. That misses the point entirely. The research on outpatient flow consistently ties satisfaction gains to communication and predictability, not to hardware. A patient who knows they have a fifteen minute wait complains less than one waiting the same fifteen minutes in silence.

    Communicated and silent clinic wait comparison

    The conventional advice, “buy the system with the most features,” is backwards for most clinics. A five-room clinic doesn’t need the same platform as a hospital outpatient department, and overbuying adds training overhead nobody asked for. What the reader should prioritise first is fit, not feature count: does this system match your current patient volume and number of service points, and can it integrate with what you already run?

    The other blind spot is change management. Staff resistance rarely comes from disliking new technology. It comes from a system that adds steps rather than removing them. Any pilot plan worth running measures reception interruptions before and after, because that number tells you honestly whether the system is doing its job.

    — Ronald

    Get your clinic moving with QueueFlow

    Flowlab built QueueFlow around exactly the problem this article covers: keeping every queue moving and keeping patients informed, without forcing your reception team to learn an entirely new process. It handles the booking-to-queue handoff, self-check-in, real-time dashboards and automated notifications covered above, and it adapts to clinics of different sizes rather than assuming every practice needs the same setup.

    Flowlab

    If your clinic also tracks attendance separately, PresenceFlow pairs with QueueFlow for combined attendance and queue reporting, useful if you’re consolidating multiple manual logs into one view. The most practical next step is to try the complete queue journey yourself before deciding anything, or book a complimentary app fit review so Flowlab can tell you honestly whether a ready-made setup, an adapted product, or a custom build suits your clinic, and roughly what it will cost.

    Sources

    The NCBI review on patient-flow improvements is worth reading in full if you need evidence to justify budget to clinic partners. Synapxe’s 1 Queue overview shows what an integrated, multi-service-point itinerary looks like in practice. Qsome’s case note on mobile queuing is a compact example of how virtual queuing changes patient behaviour in a live clinic setting.