Category: Uncategorized

  • 3 Copy Ready Clauses for Software Development NDAs

    3 Copy Ready Clauses for Software Development NDAs

    Yes. Before you share source code, architecture diagrams, or credentials with a freelancer, agency, or co-founder, sign a short software-focused NDA covering exactly what’s confidential. Use a tailored template, not a generic one, and get it signed before the first technical conversation.


    TL;DR:

    • Specifying clear and concrete categories such as source code, diagrams, and credentials in an NDA increases enforceability and prevents broad definitions that courts may dismiss.
    • A unilateral NDA is suitable when only one side discloses sensitive information, while a mutual NDA is necessary for joint development or two-way disclosures to ensure protection for both parties.
    • The NDA should be signed before detailed technical discussions and linked to subsequent contracts like the Master Service Agreement and Statement of Work for comprehensive IP and project governance.
    • Duration limits of two to five years and explicit return or destruction clauses are critical for NDA enforceability, while indefinite terms typically face legal challenges.
    • Pairing the NDA with technical controls such as access logs and encryption enhances legal protection by providing evidence of breaches and ensuring confidentiality compliance.

    Table of Contents

    What does an NDA for software development actually protect?

    A software development non-disclosure agreement is a binding contract that stops one party from sharing another’s sensitive technical information without permission. That sounds obvious until you try to enforce a generic NDA against someone who copied your source code, and the document never mentions “source code” anywhere in its text.

    Generic NDAs written for business plans or trade secrets often miss the details that matter in a tech project: repositories, API keys, architecture diagrams, database schemas, and staging environment access. An NDA built for software development typically names these items explicitly and sets out whether the relationship is unilateral or mutual depending on who’s disclosing what to whom.

    That distinction matters more than most founders realise before their first vendor meeting. If you’re the only one sharing sensitive material, say when briefing a freelance developer, a unilateral NDA covers you. If both sides will exchange proprietary information, such as two companies co-developing a platform, you need a mutual NDA instead. Getting this wrong doesn’t just create paperwork friction. It can leave one party’s IP unprotected while the other’s is fully covered, which is rarely what either side intended.

    The standard industry term for this document is simply a non-disclosure agreement, or NDA. “Software development confidentiality agreement” and “NDA for tech projects” describe the same thing with a narrower focus. Whichever phrase you use, the substance is what counts: a written promise, specific to your project, that the person reading your code or your product roadmap won’t repeat it elsewhere.

    Sample NDA for software development and how to apply it right away

    A usable template needs three fields edited before it’s worth sending. Skip any of them and you’ve got a document that looks official but protects nothing specific.

    1. Parties and purpose. Name both parties in full (legal entity name, not just a trading name), and state the purpose in one sentence: “for the purpose of evaluating and developing [project name], including discussion of technical architecture, source code, and product design.” Vague purpose clauses (“for business discussions”) give a court nothing to anchor a breach claim to.

    2. Protected items, listed specifically. Don’t write “all confidential information.” List what actually matters for a software project:

    • Source code, repositories, and build scripts
    • Architecture diagrams, database schemas, and technical specifications
    • API keys, credentials, and access tokens
    • User data, analytics, and product roadmaps
    • Business terms discussed during scoping (pricing, timelines, client names)

    3. Recipients and need-to-know limits. Name the individual or company receiving the information, then add a clause restricting further sharing to employees or subcontractors who need it to do the work, and only if they’re bound by equivalent confidentiality terms themselves.

    Quick edits depend on who you’re dealing with. For a solo freelancer, keep the NDA unilateral, shorten the duration to match the project length plus a reasonable tail (often 2 to 5 years), and add a clause naming you as sole owner of any resulting work. For a vendor or agency, insist on a subcontractor flow-down clause, since agencies routinely bring in contractors you’ll never meet, and each one is a potential leak point if the head contract doesn’t bind them too.

    What do the essential NDA clauses actually mean?

    Five clauses do almost all the work in a software NDA. Get these right and the surrounding legal language is mostly boilerplate.

    Definition of confidential information. This is where most NDAs fail. “All information disclosed” is too broad to enforce, and broad, catch-all definitions are frequently narrowed or struck down when a dispute reaches court, because they give the receiving party no fair notice of what they can and can’t discuss. Name concrete categories instead: specific repositories, named documents, and clearly bounded technical discussions. Precision protects you better than breadth ever will.

    Permitted use. State exactly what the recipient may do with the information, usually limited to “evaluating and performing work under this agreement.” This closes the door on a developer reusing your architecture on a competing project six months later, because that use was never permitted in the first place.

    Duration. Software NDA templates commonly set terms of 2 to 5 years, not indefinite obligations. Courts view unlimited duration clauses with suspicion, and in practice, most software confidentiality genuinely does have a shelf life once a product ships or the market moves on.

    Return or destruction. Require the recipient to delete or return all copies of protected material within a set number of days after the engagement ends, including from personal devices, cloud storage, and any AI tools they used during the project. This clause is easy to draft and constantly forgotten.

    Remedies. State that a breach entitles you to seek injunctive relief, meaning a court order to stop ongoing disclosure, in addition to damages. Financial compensation rarely undoes the damage to leaked source code; stopping the leak matters more.

    Pro Tip: List protected categories by type (code, credentials, diagrams) rather than trying to name every file. Courts and counterparties both respond better to structured specificity than to exhaustive lists that inevitably miss something.
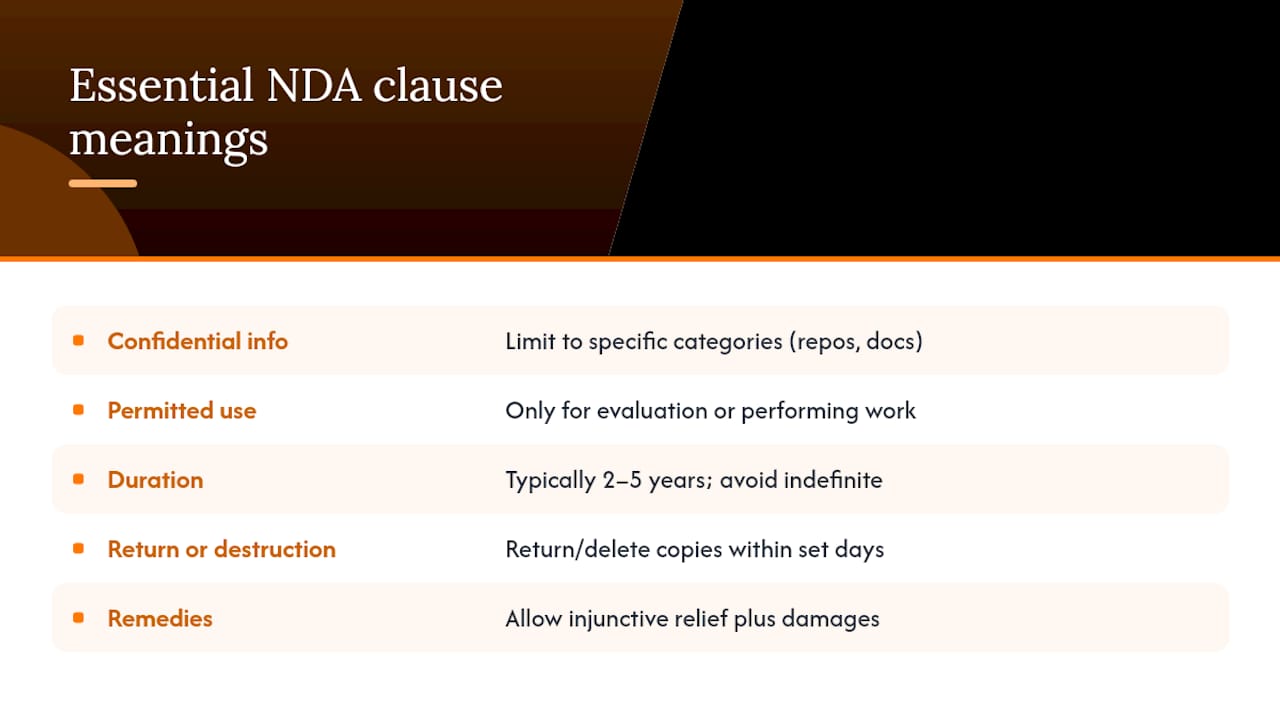
    What do the essential NDA clauses actually mean? — overview diagram

    Unilateral vs mutual NDA: which one fits your project?

    The choice comes down to a simple question: who’s disclosing sensitive information to whom?

    A unilateral NDA works when information flows one way. You’re briefing a freelance developer on your product idea, and they’re not sharing anything proprietary back. This is the right structure for most client-to-freelancer relationships, and it’s simpler to draft because only one set of obligations needs defining.

    A mutual NDA is necessary when both sides bring something to protect. Two companies exploring a joint development partnership, a startup discussing integration with an established platform, or a technical co-founder negotiating equity while revealing their own prior work, all call for mutual terms. Skipping this and using a one-way NDA in a two-way relationship typically means one party’s disclosures go unprotected.

    Practical indicators for which to choose:

    • Freelancer or contractor scoping your idea → unilateral, you’re the discloser
    • Two companies co-building a product → mutual, both sides disclose
    • Investor pitch meetings → often no NDA at all, since most investors decline to sign one; rely on limited detail instead
    • Agency subcontracting to third parties → mutual with flow-down obligations to cover the subcontractor chain

    Clauses shift slightly with type. Mutual NDAs need matched obligations, meaning both parties agree to identical return and duration terms, whereas unilateral NDAs can favour the discloser more heavily on remedies and duration.

    How does the NDA fit with your MSA, SOW, and IP terms?

    An NDA is a short-term confidentiality tool, not a substitute for the contracts that actually govern the project. Treating it as the whole agreement is one of the more common and costly mistakes founders make.

    The standard sequence works like this: sign the NDA first, before any detailed technical discussion. Then, once you’ve decided to proceed, formalise ownership, deliverables, and payment in a Master Service Agreement and a Statement of Work. The NDA protects the conversation; the MSA and SOW govern the actual build.

    This matters because NDAs typically say nothing about who owns the resulting code. That’s the MSA’s job, through an IP assignment clause stating that all work product transfers to the paying client on delivery or on payment, whichever you negotiate. Miss this step and you can end up with a fully confidential project that you don’t actually own outright.

    Three things to check for consistency across documents:

    • The definition of “confidential information” in the NDA should align with what’s licensed or assigned in the MSA, so you’re not protecting something you never actually claim ownership of.
    • Duration terms shouldn’t contradict each other; an NDA expiring before the MSA’s warranty period ends leaves a gap.
    • Sign-off order matters: NDA, then scoping discussion, then MSA and SOW once scope is agreed. Rushing a client straight to a SOW without an NDA first is how confidential roadmaps end up discussed over email with no protection at all.

    Drafting checklist: get your NDA right before you send it

    Work through these steps in order, and don’t sign until each one is answered.

    1. Name both parties correctly, using full legal entity names, not trading names or first names only.
    2. State the purpose in one specific sentence tied to your actual project, not a generic “business discussions” phrase.
    3. List protected categories explicitly, covering code, credentials, diagrams, data, and roadmap details.
    4. Set a duration between 2 and 5 years, matched to how long the information will realistically stay sensitive.
    5. Add a return or destruction clause with a specific number of days after termination.
    6. Include a subcontractor flow-down clause if the other party might bring in additional contractors.
    7. Confirm the governing jurisdiction and pick one where enforcement is realistic for both sides.
    8. Check remedies include injunctive relief, not damages alone.

    Common mistakes that weaken an NDA include defining confidential information too broadly, setting no time limit at all, and failing to control who within the recipient’s organisation gets access. An “all information disclosed” clause might feel safer, but it’s often the reason enforcement fails when it counts.

    Pro Tip: Send the NDA before the discovery call, not after. If a prospective developer hesitates to sign a reasonable, specifically-scoped NDA before hearing project details, that hesitation tells you something about how they’ll treat confidentiality later.

    Will your NDA actually hold up if you need it?

    Courts weigh two things above all else: precision and proportionality. A definition of confidential information that reads like a dictionary entry for “everything” tends to get narrowed or dismissed. A definition naming specific repositories, documents, and technical categories holds up far better, because it gives a judge something concrete to point to.

    Duration works the same way. An NDA with no end date reads as punitive rather than protective, while a defined 2 to 5 year term signals the restriction is reasonably tied to how long the information stays commercially sensitive.

    Contractual language alone rarely wins a dispute. Pairing an NDA with technical controls, such as access logs, encrypted repositories, and role-based permissions, creates the evidence trail that actually proves a breach happened and who caused it. An NDA states the rule; access logs and audit trails prove someone broke it.

    Practical steps worth taking alongside the paperwork:

    • Log who accessed which repository and when, using your version control platform’s built-in audit tools.
    • Encrypt sensitive files at rest and require multi-factor authentication on shared accounts.
    • Keep a dated record of every NDA sent and signed, so you can prove exactly when disclosure obligations began for each party.

    No public data set tracks how often software NDAs succeed in court, since most disputes settle privately before reaching a judgment. What the guidance consistently shows is that specificity and reasonable scope are what separate an enforceable NDA from one that collapses on first challenge.

    Copy-ready clauses for source code, subcontractors, and AI tools

    Three clauses come up in almost every software NDA dispute, and each is short enough to copy and adapt directly.

    Source code and credentials definition:

    Subcontractor flow-down clause:

    AI and model-training restriction:

    That last clause has become necessary fast. Guidance on secure software handling now routinely flags the risk of confidential material ending up in public AI tools, whether pasted into a chatbot for debugging help or fed into a coding assistant without checking its data retention policy. A clause that’s silent on this is a clause written for a decade that’s already passed.

    How Flowlab handles confidentiality during scoping

    We sign an NDA before any detailed scoping conversation, every time. During our complimentary app fit review, before we’ve recommended a ready-made product, an adapted solution, or a custom build, your operational details, workflows, and any existing technical documentation stay covered by a clear, plain-language agreement.

    We keep our NDAs specific rather than padded with legal filler, because a document you can’t read is a document you can’t trust. If you’re weighing up how to protect a software idea before your first developer conversation, talk to us about your project and we’ll walk you through exactly what we’d need to see and how we’d protect it.

    — Ronald

    Get a confidential app fit review before you commit to anything

    Flowlab offers a complimentary app fit review under a signed NDA, so you can discuss your workflow, your existing systems, and your rough idea before committing to anything. Where many developers ask for a technical brief upfront, we start by understanding your operational challenge and recommend the simplest suitable solution, whether that’s a ready-made product, an adapted foundation, or a custom build.

    Flowlab

    Expect three things from that first conversation: a clear scope of what you actually need, a fixed-price quote before any work starts, and unambiguous IP terms so you know exactly what you own once the project delivers. There’s no pressure to commit and no jargon you’ll need to look up afterwards.

    If you’re ready to talk through your idea confidentially, request your app fit review and we’ll take it from there.

    Sources

    The following pages informed this guide and are worth bookmarking for deeper detail:

    Templates are a starting point, not a finished legal document. Have any NDA reviewed by a qualified lawyer before you sign, especially where significant IP or funding is at stake.

  • 5 Year TCO Template for SME IT Managers with App Fit Check

    5 Year TCO Template for SME IT Managers with App Fit Check

    Total cost of ownership for software is the sum of every cost an application generates from purchase to retirement, not just its licence fee. IT managers should build this out over a multi-year horizon before signing any contract. The immediate next step is simple: open a spreadsheet and start a line‑item TCO worksheet, because that single document will catch the costs a vendor quote never mentions.


    TL;DR:

    • Vendor quotes typically exclude significant costs like integration, migration, and custom support, which can drive expenses well beyond initial estimates.
    • Building a multi-year TCO worksheet with ranges and owner validation improves accuracy and helps justify decisions to finance teams.
    • Transitioning workloads from SaaS to custom solutions only makes sense if the workflow is highly specific or valuable enough to justify higher long-term costs.
    • The biggest cost surprises often come from hidden efforts such as staff hours for data migration and integration, which are rarely invoiced but can be substantial.
    • Using external tools alongside detailed internal data, like cloud billing history and incident logs, can improve accuracy in cloud and support cost projections.

    Table of Contents

    What does total cost of ownership software actually cover?

    Gartner defines TCO as a measure that captures the full lifecycle cost of an IT asset, direct and indirect, across the time you own it. For software specifically, that means separating direct costs (licence fees, hosting, support contracts) from indirect costs (staff time spent troubleshooting, productivity lost during rollout, the internal hours nobody bills anywhere).

    A working formula makes this concrete:

    TCO = Year 1 (capital + implementation) + Σ Years 2–N (operational + maintenance + people + risk) + exit costs − residual value

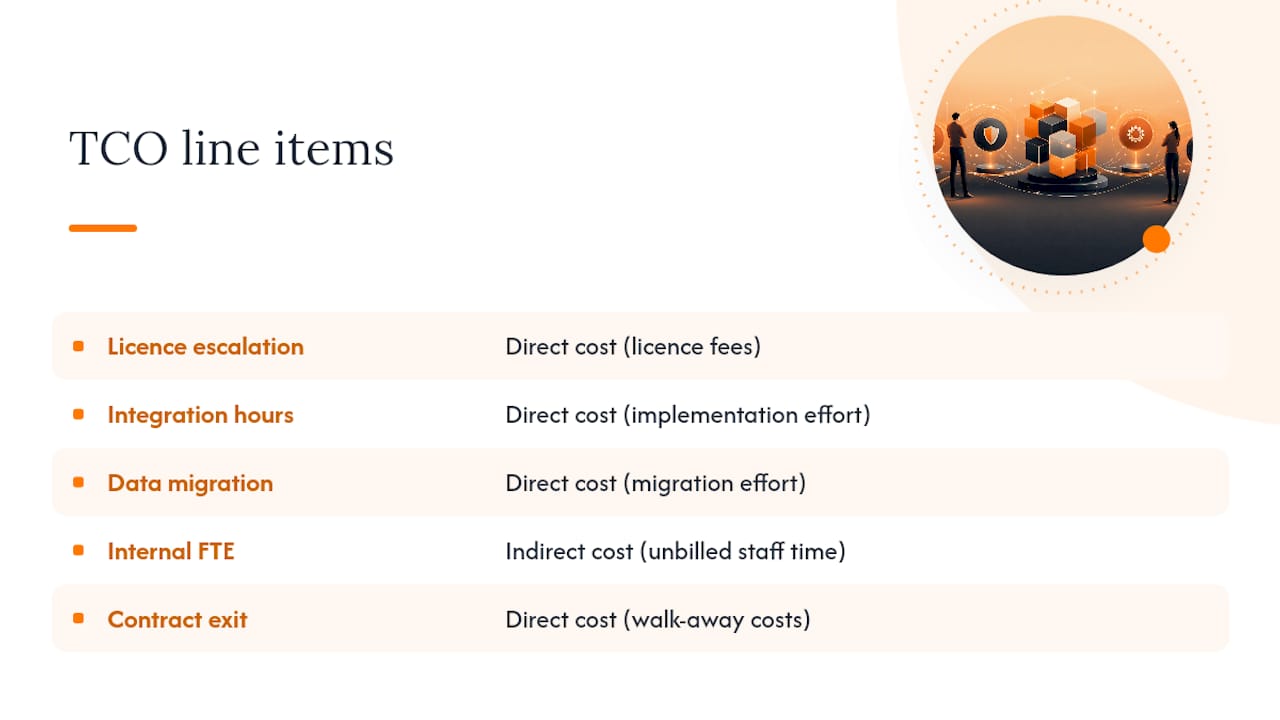
    IBM’s breakdown of TCO lists initial costs, setup, operating, maintenance, and downtime as the categories to model. Before you go further, inspect these five line items first, since they’re where most estimates go wrong: licence escalation clauses, integration hours, data migration effort, the internal FTE time nobody schedules, and what it costs to walk away from the contract.

    Five total cost ownership categories

    What are the detailed cost components you need to quantify?

    A vendor quote almost never covers the categories that end up dominating your five‑year total. CIO’s guide to enterprise software TCO lists initial purchase, configuration, monitoring, maintenance, and retirement as the core buckets evaluators must include, and each one hides sub‑costs decision-makers routinely miss.

    Initial acquisition starts with the licence model itself. Per‑seat, tiered, or usage‑based pricing all behave differently as your headcount grows, and procurement fees or one‑off hardware purchases sit alongside the sticker price.

    Implementation is where budgets usually slip first: integration work, data migration, configuration, testing, and any professional services days the vendor bills separately from the software itself.

    Operational costs run every month after go‑live: hosting or cloud consumption, third‑party API fees, monitoring tools, backups, and subscription price rises that most contracts allow annually.

    Maintenance and development cover vendor patches, any custom code you build on top, and the technical debt that accumulates when quick fixes never get revisited.

    People costs are the largest blind spot of all:

    • Internal support staff time spent fielding tickets the vendor doesn’t see
    • Vendor support tier fees (basic versus premium SLAs)
    • Training hours for new starters and refreshers for existing staff
    • Change management effort during rollout and any process redesign

    Risk, downtime, and exit costs round out the model: the cost of an outage, the compliance exposure if the software mishandles regulated data, and what it costs to extract your data and decommission the system when the contract ends.

    The common blindspot across all of this is integration and migration effort. Industry guides consistently note that organisations underestimate this because it doesn’t show up on an invoice. It shows up as staff hours spent mapping connectors, cleaning data, and rebuilding reports that broke during the switch.

    Pro Tip: Before you sign anything, ask the vendor for a written list of every fee that isn’t in the base licence, including API rate limits, storage overages, and support tier upgrades. If they hesitate, that’s your answer about how complete their quote actually is.

    How do you build a multi‑year TCO worksheet step by step?

    A reproducible worksheet beats a one‑off estimate every time, because it lets you compare options on the same basis and defend the numbers later. Follow this sequence:

    1. Define scope and horizon. Pick 3–5 years and decide whether you’re costing this at the organisation level or a single cost centre, since shared infrastructure changes the maths.
    2. Lay out the worksheet by year. Rows for each cost category from the section above, columns for Year 1 through Year 5, with capital costs amortised evenly rather than dumped entirely into Year 1.
    3. Estimate variable items as ranges. Cloud hosting and subscription escalation rarely land on a single number, so model a low, expected, and high case for each.
    4. Assign data owners. Finance validates the licence and procurement rows, IT operations validates hosting and support, HR validates training time. Nobody should be guessing at figures someone else owns.
    5. Normalise the output. Present the aggregated TCO, then divide by users or seats to get a per‑user monthly figure stakeholders can compare across proposals.

    A short, replicable spreadsheet that separates capital, implementation, and operating costs, with sensitivity ranges built in, is the most useful deliverable an IT manager can hand to a finance committee. Add a brief net present value note if your organisation discounts future cash flows. That one addition turns a spreadsheet into something a CFO will actually trust.

    Which tools and calculators should you actually trust?

    Vendor calculators are a reasonable starting point, but they’re built to sell, not to audit. The Azure TCO calculator is a solid example of comparing cloud against on‑premise hosting costs, and tools like the Scale Computing TCO calculator work similarly for infrastructure decisions. Both are useful for baseline inputs, but neither one knows your integration complexity or your internal support burden.

    Treat every vendor number as a claim to reconcile, not a figure to accept. Pull from these internal sources instead:

    • Cloud billing history for actual (not projected) hosting spend
    • Incident logs for downtime frequency and its business impact
    • Payroll burden rates for realistic internal FTE costs
    • Existing contract renewal history for how much prices actually escalated last time

    For ongoing cloud cost accuracy specifically, the FinOps Foundation’s maturity model gives a governance framework for allocating and forecasting variable spend, which matters because cloud costs rarely stay flat year over year.

    What does a compact 5‑year TCO projection look like in practice?

    Picture a small to medium enterprise rolling out a new operations platform over multiple years. Year 1 carries the heaviest load: licence fees, a data migration project, integration with an existing accounting tool, and staff training, all landing in the first twelve months alongside the capital outlay.

    Years 2 through 5 shift to a steadier rhythm of subscription fees, hosting, and periodic support tickets, but two things creep upward: subscription price escalation and the slow accumulation of custom tweaks nobody budgeted for. A Swiss ERP cost study shows this exact pattern, with recurring fees and maintenance dwarfing the original licence cost by year three.

    In most models, that single adjustment shifts the total more than any change to the headline licence price. The takeaway: implementation effort and subscription escalation, not the sticker price, are usually what decide whether your five‑year total comes in on budget or well over it.

    How FlowLab’s app fit review closes the gaps vendors leave out

    Flowlab runs a complimentary app fit review before recommending anything. This is precisely because most TCO surprises come from unmapped integration and training needs. The review collects your current workflow steps, existing systems that need to talk to each other, and the data you’ll need to migrate, then maps those against three possible paths:

    • Ready‑made products for straightforward workflows like queue management or lead tracking, where a proven foundation keeps implementation costs low
    • Adapted solutions that modify an existing product foundation to your process, splitting the difference between speed and fit
    • Custom builds for workflows specific enough that no off‑the‑shelf tool fits without heavy compromise

    Each path carries a different TCO shape, and the review is designed to surface that trade‑off before you commit to one, not after. Mapping integrations and data exports upfront is exactly where SME budgets usually go wrong.

    When does custom actually beat SaaS on total cost?

    The honest answer is that it depends on scale and how central the workflow is to your operations, not on which option sounds more impressive. A generic accounting or scheduling need almost always costs less over five years as SaaS, because the vendor spreads development and maintenance across thousands of customers. Custom software earns its higher upfront cost only when the workflow is specific enough, or valuable enough to your margins, that adapting a generic tool would mean paying for years of workarounds instead. My heuristic: if you’re modifying a SaaS product’s core logic more than twice a year just to make it fit, you’re already paying custom‑level costs without custom‑level control.

    — Ronald

    Get your TCO worksheet built with an app fit review

    Flowlab gives Singapore SME decision-makers something most vendor quotes won’t: a written breakdown of true costs before you sign anything. The complimentary app fit review maps your workflow, existing systems, and data needs against ready-made, adapted, and custom paths, so you see the real five-year cost difference between options rather than just the headline licence price.

    Flowlab

    Expect a short discovery conversation, a written summary of what each path would cost to implement and run, and a clear recommendation on which one fits your budget and operational scale. There’s no obligation attached to the review, and no pressure to commit to the most expensive option if a simpler one solves the problem. If you’re weighing up whether to adapt an existing tool or commission something built around your exact process, the app development cost guide gives you indicative ranges to sanity‑check against. Book your app fit review and get the worksheet numbers you actually need before your next budget cycle starts.

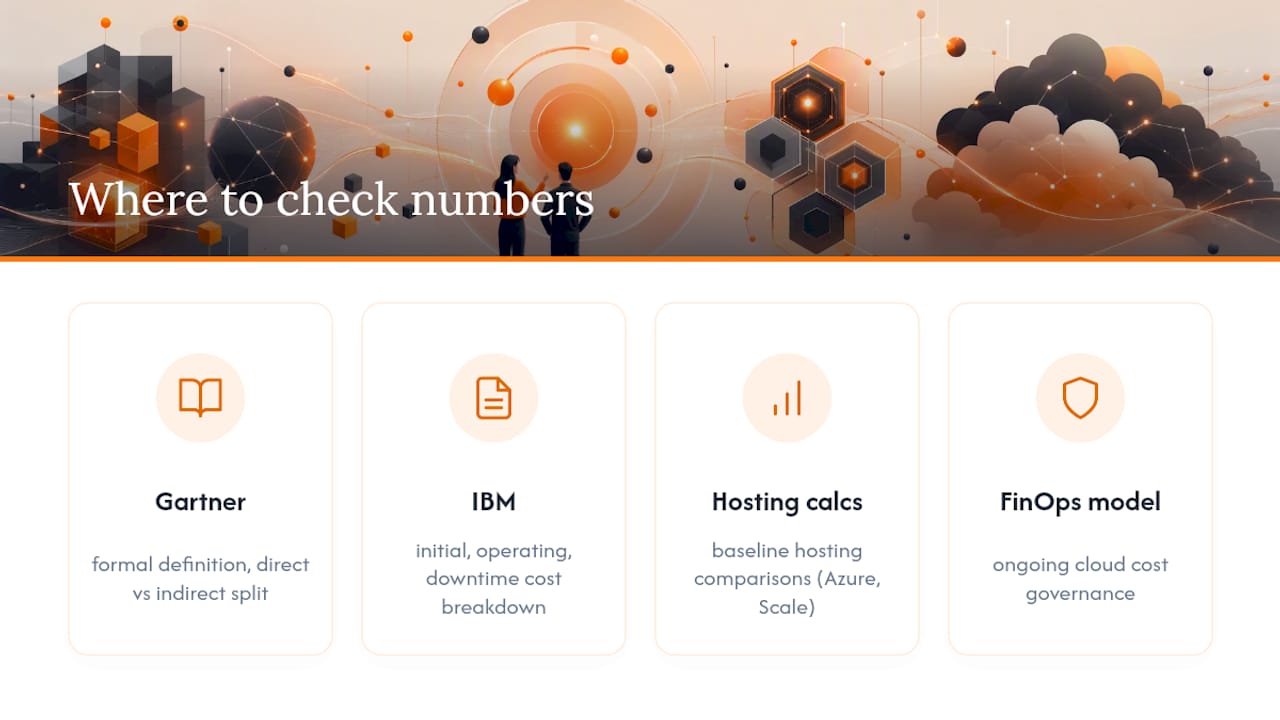
    Where to check the numbers yourself

    Where to check the numbers yourself — overview diagram

    The Gartner TCO glossary gives the formal definition and direct/indirect split used throughout this guide. IBM’s TCO explainer breaks down initial, operating, and downtime cost categories. The Azure TCO calculator and Scale Computing’s calculator offer baseline hosting comparisons, while the FinOps maturity model covers ongoing cloud cost governance.

    Sources

  • 9 Internal Portal Examples for SMEs That Actually Get Used

    9 Internal Portal Examples for SMEs That Actually Get Used

    The most useful internal portal examples fall into eight patterns: a homepage hub, HR/onboarding pages, payroll and benefits, a knowledge base, IT self-service, a learning and development hub, team spaces, and operational dashboards with a people directory. Each serves a distinct audience, from HR and IT teams to frontline operations, and together they cover most of what a small or medium-sized business actually needs from an intranet. The sections below break down what goes on each page and how to build it without overengineering the project.


    TL;DR:

    • Building distinct, purpose-specific pages linked from a central hub improves usability rather than creating a single, overly broad homepage.
    • Role-based navigation and personalized content increase portal adoption by reducing unnecessary clicks and surfacing relevant tools immediately.
    • Prioritizing mobile-first design, clear visual hierarchy, and performance optimizations ensures the portal remains accessible and efficient for all staff.
    • Content governance requires dedicated owners, regular reviews, and clear archiving policies to prevent outdated information from undermining trust.
    • SME portals should start small with validation and expand gradually, leveraging existing products and a discovery-first approach to avoid overbuilding.

    Table of Contents

    Internal portal examples by use case

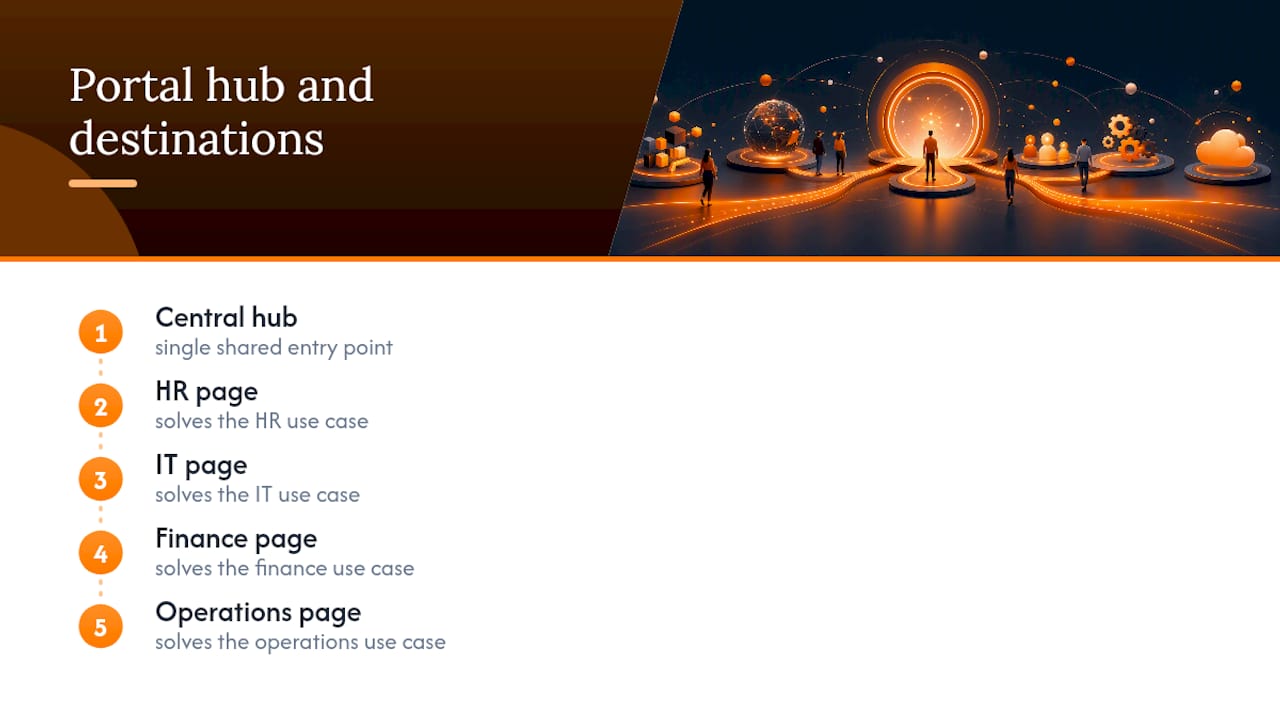
    Most internal portals fail for the same reason: someone builds a single, sprawling homepage and expects it to serve HR, IT, finance and operations equally well. It never does. The stronger approach, and the one that shows up consistently across top-ranked intranet example roundups, is to design distinct pages for distinct jobs, then link them together through one central hub.

    Central portal hub linked to specialist pages

    Here is what that looks like in practice, organised by the use case each page solves.

    1. Homepage hub

    The homepage is the front door, and it earns its place through frequency of use rather than depth of content. A strong hub combines hero news (a rotating banner for company announcements), a personalised content feed pulled from the employee’s department or role, a bank of quick actions (submit expenses, book a meeting room, request leave), and an app launcher that surfaces the five or six tools people open daily. Homepage-first designs that pair news with quick tasks consistently drive more daily return visits than content-heavy alternatives, because the page answers “what do I need right now?” instead of “what is happening across the whole company?”

    2. HR and onboarding hub

    New joiners need one place, not six emails and a shared drive folder. A well-built onboarding page includes a welcome message, a step-by-step checklist (equipment, system access, mandatory training), embedded forms for tax and banking details, links into the learning hub, and a set of tasks visible to the new hire’s manager so nothing slips. Portals that connect onboarding directly to payroll and learning management tend to cut the back-and-forth that normally eats a new starter’s first fortnight.

    3. Payroll and benefits page

    This page carries sensitive information, so structure matters as much as content. Payslip access should sit behind role-based permissions, with a short FAQ addressing the most common queries (tax codes, leave balances, benefit enrolment windows) above the fold. Benefit enrolment links should route straight into the relevant provider portal rather than forcing staff to search for a URL in an old email chain.

    4. Knowledge base

    A knowledge base only works if its taxonomy matches how people actually think about problems, not how the org chart is structured. Group articles by task (“how do I reset my VPN”) rather than by department, and pair that structure with context-aware search that surfaces the three most relevant articles as soon as someone starts typing. Flat, unindexed document dumps are the single biggest reason knowledge bases get abandoned within a year.

    5. IT self-service portal

    IT self-service is one of the clearest wins in internal portal design because the return on investment is measurable almost immediately. A functional example includes troubleshooting articles for the top 20 recurring issues, a device request form with built-in approval routing, and live ticket status so staff stop emailing “any update?” three days after logging a fault. Self-service IT portals that pair a well-structured knowledge base with automated fulfilment for routine requests measurably reduce the manual workload on IT teams, freeing them for higher-value work.

    6. Learning and development hub

    An L&D hub needs three things to be useful: a searchable course catalogue, one-click enrolment, and visible progress tracking so managers can see completion rates without chasing spreadsheets. The best examples tie directly into onboarding, so a new hire’s mandatory training appears automatically rather than needing manual assignment.

    7. Team spaces

    Team spaces are smaller, more informal pages built around a project or department rather than the whole company. A functional version includes a shared project calendar, a document library scoped to that team, and a running log of meeting notes that anyone on the team can search later without asking “does anyone remember what we decided?”

    8. Operational dashboards

    For operations-heavy SMEs, retail and F&B businesses especially, the dashboard is often the page staff open first each shift. It pulls live KPIs from connected systems and offers one-click access to the tools people use constantly, whether that is a point-of-sale system, a queue management tool, or a booking calendar. This is where an internal portal stops being a communications tool and starts being a working system.

    9. People directory and org chart

    A searchable directory with real-time availability status (in office, on leave, in a meeting) solves the small but constant friction of “who do I ask about this, and are they even in today?” Pairing the directory with a visual org chart also helps new starters understand reporting lines faster than any onboarding deck ever will.

    Between them, these nine page types cover the vast majority of what a company intranet needs to do well. The mistake most businesses make is trying to build all nine simultaneously. Start with the homepage hub and whichever single-use case page solves your most acute problem, whether that is onboarding delays or IT ticket backlog, then expand.

    What makes these portal pages actually work

    Every example above depends on decisions that happen underneath the page, not on it. Get the underlying architecture wrong and even a beautifully designed homepage will sit unused within a month.

    Personalisation and role-based navigation. A portal that shows a warehouse supervisor the same navigation as a finance manager has already failed. Role-based views cut the number of clicks needed to reach a relevant tool, and that click count is one of the strongest predictors of whether staff bother using the portal at all versus reverting to email and instant messaging.

    Search that understands context. Search needs to do more than match keywords. It should filter by document type, surface the three most likely articles before the user finishes typing, and rank recently updated content above stale pages. A knowledge base with excellent content but weak search behaves, from the user’s perspective, like a knowledge base with no content at all.

    Mobile-first layouts. Increasingly, staff check the portal from a phone between shifts or on a commute, particularly in retail and F&B operations. That means designing the mobile view first and adapting up to desktop, not the reverse. Heavy image carousels and dense multi-column layouts that look sharp on a widescreen monitor often become unusable on a five-inch screen.

    Visual hierarchy. The strongest examples follow a consistent pattern: a hero section for what matters today, a row of quick actions immediately below it, a scrolling content stream for news and updates, then supporting widgets (weather, directory, calendar) further down. Bury the quick actions under three scrolls of news and nobody will find them.

    Accessibility and performance. Colour contrast, keyboard navigation and screen-reader compatibility are not optional extras for an internal tool used daily by a diverse workforce. Performance matters just as much. A homepage that takes six seconds to load on a warehouse floor’s patchy Wi-Fi will get abandoned regardless of how good the design is.

    • Reduce clicks to the five most-used tools with role-based quick actions
    • Build search with filters and autosuggestions, not just a text box
    • Design mobile layouts first, then scale up to desktop
    • Keep the visual hierarchy consistent: hero, actions, content, widgets
    • Test load times on a real mobile connection, not just office Wi-Fi

    Pro Tip: Before choosing a layout, watch five actual employees try to find one specific piece of information, like their next training deadline or the IT ticket form. If more than one gets lost, the navigation needs work before the visual design does.

    Content and feature checklist for each page type

    Specification documents for internal portals often skip the boring detail that determines whether a build actually works day to day. Use this as a working checklist before signing off any page.

    Widget inventory by page type:

    • Homepage: news carousel, quick links, app launcher, personalised feed
    • HR/onboarding: checklist widget, forms, manager task tracker
    • Knowledge base: category tiles, search bar, related articles panel
    • IT self-service: ticket status tracker, device request form, FAQ accordion
    • People directory: search with filters, availability status, org chart view

    Essential integrations to confirm before build:

    1. Single sign-on (SSO) so staff use one login across every page
    2. HRIS and payroll systems for real-time leave balances and payslips
    3. Calendar systems for meeting room bookings and shared team schedules
    4. Learning management system for course enrolment and completion data
    5. Ticketing systems for live IT status updates

    Permission models deserve particular attention. Payroll data, disciplinary records and certain HR documents need role-based restrictions that go beyond a simple “logged in or not” toggle, and content should carry a classification tag (public, department-only, confidential) from the moment it is published, not retrofitted after a leak or complaint. Templates with built-in metadata fields, author, review date, department owner, make search results far more relevant and give governance teams an audit trail for free.

    Governance: who owns the content and how it stays current

    An intranet built well and then left unmanaged degrades within months. Content rot, outdated policy documents, dead links, a “latest news” section from eight months ago, is the fastest way to lose staff trust in the whole platform, and it is largely a staffing problem rather than a design one.

    The workable model has three roles: a central communications editor who owns the homepage and company-wide messaging, local editors within each department who keep their own pages current, and a technical owner who manages integrations, permissions and platform health. Without that split, either everything funnels through one overloaded person or nobody feels responsible for anything.

    Content needs a lifecycle, not a one-off publish date. Templates enforce consistency, a review cadence (quarterly for policy pages, monthly for news) keeps information from going stale, and clear archival rules stop the knowledge base filling up with superseded documents that outrank the current version in search. Approval flows and version history matter more for policy and HR content than almost anywhere else on the portal, since an outdated leave policy circulating unchecked creates real liability.

    • Assign a named owner to every page before launch, not after
    • Set a review date on every document at the point of publishing
    • Archive rather than delete outdated content, with clear “superseded by” links
    • Require sign-off from the relevant department before publishing HR or policy pages

    Pro Tip: Build the review cadence into the page template itself, a visible “last reviewed” date field, rather than relying on a separate spreadsheet nobody checks. Visibility drives compliance far more reliably than a policy document.

    Measuring whether the portal is actually working

    Adoption rate in the first 90 days is the clearest early signal, but it needs pairing with task completion data, whether people can actually finish what they came to do, and search success rate, the percentage of searches that lead to a click rather than a rephrase or abandonment. Short-term targets should focus on login frequency and core-task completion; medium-term targets shift towards support-ticket volume and time-to-productivity for new hires.

    Quantitative dashboards only tell half the story. A short survey after three months, plus a handful of targeted interviews with people who stopped using the portal, usually surfaces the specific friction point that analytics alone will miss. HR-portal implementations that properly centralise leave, payslips and training typically take between three and nine months depending on complexity, and the businesses that report the strongest return are the ones tracking onboarding speed and support ticket reduction from day one rather than retrofitting metrics later.

    Report on a monthly cadence for the first two quarters, then move to quarterly once usage patterns stabilise.

    How Flowlab approaches internal portals for SMEs

    Small and medium-sized businesses rarely need every feature described above on day one, and building for all of them at once usually means overpaying for capability nobody uses yet. Flowlab starts every internal portal conversation with a complimentary app-fit review, working through your actual operational bottleneck before recommending anything, rather than pitching a fixed product and hoping it fits.

    That discovery-first approach shows up in the products themselves. A retail or F&B business exploring an operational dashboard, for example, can try the complete queue journey to see how live queue data slots into a portal homepage rather than sitting in a separate, disconnected app. Teams that need a quick-access widget for pricing or product information get the right product answer, right when staff need it, without building that lookup function from scratch.

    Typical scope for an SME portal or internal-app adaptation:

    • Discovery and app-fit review: usually completed within days, at no cost
    • Adaptation of an existing product foundation: the fastest route to a working page
    • Fully custom builds: reserved for workflows no existing foundation covers

    What most portal projects get wrong

    Ronald has reviewed enough SME operations to notice the same pattern repeating: businesses buy far more platform than their team will ever touch, then wonder why adoption stalls. The three habits worth breaking are building every page category before validating one, skipping a named content owner, and choosing a platform before mapping the actual workflow it needs to support. Start narrow, prove it works, then expand. A demo or app-fit review answers most of these questions before a contract is signed.

    — Ronald

    Ready to see it working before you commit to anything

    Reading about internal portal examples only gets you so far. Flowlab’s approach is to show you a working version before asking for a decision, rather than presenting a proposal built on assumptions about your operations. Every engagement starts with the same complimentary app-fit review mentioned above, which means you find out what the simplest suitable solution actually costs before committing to anything larger.

    Flowlab

    If an operational dashboard or queue-based workflow is the piece missing from your current setup, you can try the complete queue journey directly, or explore FlowLab’s product demos to see how quick-access widgets, attendance tracking and POS integrations slot into a portal without a lengthy technical brief. For a broader view of how the review process works before any build begins, visit the app development service page and book a slot for your own app-fit review.

    Sources

    For readers who want to go deeper on specific patterns covered above, these sources are worth bookmarking:

  • No Unplanned Downtime: SME Data Migration Plan with Rehearsed Rollback

    No Unplanned Downtime: SME Data Migration Plan with Rehearsed Rollback

    A data migration plan must guarantee an auditable, accurate transfer of data with zero unplanned downtime, anchored by two controls: checksum validation at every stage and a rehearsed rollback path. Flowlab treats this as a business continuity exercise, not an IT chore. The single non-negotiable is clear data ownership paired with a rollback that has actually been tested, not just written down.


    TL;DR:

    • Data migration requires validated checksum and tested rollback plans to avoid unplanned downtime and ensure data integrity.
    • Cataloging all legacy data, classifying based on business importance, and defining success metrics prevent surprises during migration.
    • The risk-appropriate strategy includes phased or parallel migration, with clear ownership of the “truth” system to avoid silent data drift.
    • Multiple rehearsals, including full-scale mock runs and validation checks, are essential to catch errors before the final cutover.
    • Post-migration monitoring, decommissioning, and well-defined rollback procedures are crucial for ongoing system stability.

    Table of Contents

    Building the data migration plan: scope, inventory and success metrics

    Before touching a single record, write down what success looks like in numbers your leadership team will recognise: acceptable downtime, error tolerance, and a hard deadline. A data migration plan without acceptance criteria is a wish list, not a project.

    The next task is uncomfortable but essential: find everything. Most estates carry “dark data” nobody remembers exists. Spreadsheets on someone’s desktop that feed a monthly report. A legacy database still quietly powering an integration. Profiling the full inventory before you build a timeline stops nasty surprises appearing mid-project.

    Once you know what you have, sort it by what matters:

    • Business objectives: define the acceptance criteria in writing, signed off by the process owner, not just IT.
    • Source inventory: catalogue every system, file format, and data volume, including systems nobody actively maintains.
    • Sensitivity and criticality: classify records by regulatory sensitivity and operational importance so you know which waves move first and which need extra scrutiny.

    This classification step decides your entire migration sequence later. Skip it, and you risk moving trivial data early while your highest risk records wait until the deadline is already tight.

    Which migration strategy fits your risk tolerance?

    Three patterns cover almost every legacy system replacement, and the right one depends on your tolerance for downtime, not on what’s fashionable.

    1. Big-bang migration: everything cuts over in one event, usually over a weekend. Fast, but the entire business is exposed if something breaks, so it suits smaller, well-understood systems with generous downtime windows.
    2. Phased migration: data moves in scheduled waves, by business unit, geography, or data type. Slower to complete but each wave is a smaller blast radius if something goes wrong.
    3. Trickle or parallel migration: old and new systems run simultaneously, with data synchronised continuously until you’re confident enough to retire the source. Best for mission-critical systems where an outage isn’t tolerable, though it demands the most engineering discipline.

    Industry guidance consistently favours phased or parallel approaches once integrations multiply or recovery time objectives tighten. Whichever pattern you pick, write-authority mapping matters more than the pattern itself: someone must own which system holds the “truth” for each record during the transition, or you’ll get silent data drift nobody notices until a customer complains.

    Mapping, transformation and cleansing: the technical blueprint

    This is where a phased migration strategy becomes an engineering document rather than a slide deck. Every field in the source system needs a documented destination, a transformation rule, and a named approver.

    A mapping workbook should include:

    • Field-level mapping: source field, destination field, data type, and transformation logic, with a signed acceptance column.
    • Survivorship rules: when duplicate records exist across systems, define which value wins (most recent update, most complete record, or a specific system of record).
    • Deduplication logic: matching keys and thresholds, tested against real sample data before go-live.
    • Version-controlled transformation code: treat migration scripts like production code, with change history and peer review.

    Gartner’s guidance on data quality is blunt on this point: fix defects at the source wherever possible. Migrating a messy dataset just relocates the mess and often amplifies it, because downstream systems trust the new platform more than they trusted the old one.

    Pro Tip: Build the mapping workbook with a signed acceptance column per field, not just per table. A business owner approving “customer records” in bulk will miss the one field mapped incorrectly; approving field by field catches it before go-live.

    How do you keep migrated data secure and compliant?

    Security controls need to exist before the first record moves, not after an audit asks for them. Regulated data especially demands documented chain-of-custody from the moment it leaves the source system.

    • Encrypt data in transit and at rest, using proper key management rather than shared credentials that outlive the project.
    • Restrict access with segregation of duties: the person who extracts data shouldn’t be the same person who validates it landed correctly.
    • Log every touchpoint so you can reconstruct exactly who accessed what, and when, if questioned later.
    • Bring compliance officers in during planning, not at sign-off.

    Regulatory guidance from HHS makes clear that documented controls for data in transit and for decommissioned hardware aren’t optional extras. If your business handles healthcare, financial, or personal data, treat data residency requirements as a scope constraint from day one, not a footnote you address once the transfer is finished.

    How many test cycles does a migration actually need?

    One pilot run is not a testing regime. It’s a hope.

    1. Start with a small pilot on a representative sample to catch obvious mapping errors cheaply.
    2. Scale to a full mock run at production volume, because performance and edge-case defects rarely surface at small scale.
    3. Repeat the mock run at least once more before cutover, budgeting for multiple rehearsals rather than assuming the first attempt succeeds.
    4. Run automated checksum validation, record counts, and field-level reconciliation after every rehearsal, not just the final one.
    5. Get formal user acceptance testing (UAT) sign-off from the business, not just from IT.

    Practitioner guidance on migration risk is consistent on this: organisations that run several full-scale rehearsals catch cutover failures that a single pilot misses entirely. Mock runs at production scale expose the awkward record that only appears once in ten thousand, and that record is exactly the one that breaks a customer’s invoice on day one.

    Cutover runbook: rollback triggers and who decides

    A cutover runbook only works if the go/no-go gates are written down before anyone’s under pressure to hit a deadline. Vague judgement calls at 2am produce bad decisions.

    • Define explicit rollback triggers: a checksum mismatch above a set threshold, a failed reconciliation count, or a critical system failing to respond within an agreed window.
    • Name the decision authority: one person, by name, who can call rollback without needing a committee vote at 3am.
    • Test the restore procedure itself, not just the forward migration. A rollback plan nobody has actually executed is a theory, not a plan.
    • Rehearse the rollback during your mock runs, so the team has muscle memory when it matters.
    • Draft the stakeholder communications plan in advance, including who tells customers if the cutover slips.

    Pro Tip: Practice the rollback, not just the migration. Teams that rehearse rolling back discover restore scripts that were never tested, credentials that expired, or dependencies that only the original engineer understood.

    A migration cutover checklist that includes named stakeholder communication steps prevents the awkward silence that follows a delayed go-live announcement.

    Hands checking items on cutover checklist

    Execution checklist: roles, timeline and budget contingency

    Before cutover begins, verify the basics one more time:

    • Backups verified and restorable, tested within the last 24 hours, not just scheduled.
    • Final data sync completed and reconciled against the source.
    • Monitoring dashboards live before the switch, not configured afterwards.
    • Support rota staffed with clear escalation contacts for the first 48 hours.
    • Roles assigned by name: migration lead, data owner, technical approver, and communications lead, each with a phone number, not just an email address.

    Timeline and budget both stretch when data volume is high, integrations are numerous, or data quality turns out worse than expected during profiling. Several practitioner sources recommend building in a 10 to 25 percent contingency buffer, because hidden data defects surface reliably during testing, almost never before it.

    What happens after cutover: monitoring and decommissioning

    The first two to four weeks after cutover matter as much as the migration itself. This is when silent divergence, where the new system quietly drifts from what the business expects, does its damage if nobody’s watching.

    • Monitor error rates, transaction volumes and system performance daily for the first fortnight, then weekly through week four.
    • Set an incident triage and escalation path so issues route to the right person immediately, not after three failed attempts.
    • Run formal business validation and sign-off with the same stakeholders who set acceptance criteria at the start.
    • Decommission the legacy system carefully, retaining archived data per your retention policy before switching anything off permanently.

    Continuous validation through observability tooling catches the divergence that manual checks miss, particularly once daily business volumes return to normal.

    When should you run this in-house, and when do you call in a specialist?

    Small scope, familiar systems, and skills already on your team make in-house execution reasonable. Modernising a single database with well-understood integrations rarely needs outside help.

    When should you run this in-house, and when do you call in a specialist? — overview diagram

    Complex integrations, high compliance risk, or a legacy system replacement touching several business functions change that calculation quickly. That’s when the gap between “we can probably manage this” and “we have a rehearsed rollback with named ownership” gets expensive to close under pressure.

    Flowlab starts every engagement with a discovery sprint: profiling representative datasets, producing an estimated cost, and drafting a pilot plan leadership can actually approve before committing to full-scale work. It’s the deliverable that turns an unknown into a decision, and it’s built for SMEs who need certainty before signing off on budget, not after.

    — Ronald

    Get a rehearsed migration plan without the guesswork

    Flowlab runs the discovery sprint that turns an uncertain migration into a costed, testable plan, complete with mapping workbooks, rehearsed cutover steps and named ownership from day one. For SMEs replacing legacy systems or moving to the cloud, that means you see the real cost and the real risk before committing to a build, not halfway through one.

    Flowlab

    If your migration involves ERP integrations or workflow systems, Flowlab’s ERP integration work shows how mapping and governance come together in practice. For businesses replacing customer-facing systems as part of the transition, it’s worth seeing the complete queue journey in action, and where a ready-made product like PriceFlow can remove scope from your migration entirely rather than adding to it.

    Book a complimentary app fit review and get a clear view of the simplest, most cost-conscious path through your next migration, before you commit a single line of budget.

    Sources

  • 4 PSG Eligibility Checks Singapore SMEs Must Pass Before Payment

    4 PSG Eligibility Checks Singapore SMEs Must Pass Before Payment

    Most Singapore SMEs meet the baseline PSG grant eligibility rules: registered and operating locally, at least a significant portion of local shareholding at the ultimate beneficial owner level, and a group turnover within the eligibility threshold or group headcount within the eligibility threshold. The rule that trips people up isn’t eligibility itself. It’s timing: you must submit your application on the Business Grants Portal before you pay a deposit or sign anything with a vendor.


    TL;DR:

    • Applications must be submitted before making any payments, deposits, or signing contractual agreements with vendors to avoid rejection.
    • Group turnover and employment are assessed across all related entities, with ownership structures and shareholdings verified through official documentation.
    • Solutions must be listed on the PSG Solution Listing and used directly by the applicant business in Singapore, not as a reseller or for offshore operations.
    • Changes in shareholding, group size, or payment timing after application can invalidate a valid initial approval, requiring revalidation.
    • Consulting services like Flowlab help map projects against PSG categories and stage quotations to ensure compliance before formal application.

    Table of Contents

    What is the PSG grant eligibility checklist?

    Before you talk to any software vendor, run your business through four tests. Miss one, and the application gets rejected regardless of how good your case looks on paper.

    • Registration and operations: your business must be registered and actively operating in Singapore, not a dormant entity or a shell used for other purposes.
    • Local shareholding: at least 30% local shareholding, held by Singapore citizens or permanent residents, tested at the ultimate beneficial owner level rather than the name on the share register.
    • Group size: group annual turnover of S$100 million or less, OR group employment of 200 or fewer. Only one condition needs to be satisfied, not both.
    • Solution use: the solution must be used in Singapore, by your own business, and must appear on the pre-approved PSG Solution Listing.

    Some entity types sit outside PSG entirely regardless of turnover or shareholding. Charities, Institutions of a Public Character, statutory boards, and certain listed companies don’t qualify under standard PSG rules. If your structure includes a trust, a foreign parent, or a recent restructuring, don’t assume you pass. Pull your ACRA business profile, your latest shareholder register, and your group financials before you approach a vendor. That paperwork forms the backbone of your application anyway, so gathering it early saves a scramble later.

    How does the ‘group’ and local shareholding test actually work?

    EnterpriseSG doesn’t look at your standalone entity in isolation. It aggregates turnover and employment across your entire corporate group, and it traces shareholding through every layer of ownership to find the real individuals behind it. A Singapore-registered trading arm of a larger regional group can fail the size test even if the local unit itself is small, because the parent’s global headcount or revenue gets counted in.

    The shareholding test works the same way. An intermediate holding company doesn’t count as a “local shareholder” on its own. What matters is whether the people who ultimately own that holding company are Singapore citizens or PRs, and whether their combined stake clears 30%. Offshore holding structures, common among family businesses with regional operations, are where most applicants get caught out.

    To check this properly:

    • Request a full corporate structure chart from your company secretary, not just the top-level share register.
    • Calculate group turnover and headcount using the most recent audited or management accounts across all related entities.
    • If ownership runs through two or more corporate layers, get your accountant or corporate secretary to confirm the UBO breakdown in writing before you apply.

    Pro Tip: Don’t rely on memory or an old organisational chart. Ownership structures shift after funding rounds or family transfers, and EnterpriseSG tests the structure as it stands at the time of application, not what it looked like when the company was founded.

    Which solutions qualify, and why must they be used in Singapore?

    PSG only funds solutions listed on the Business Grants Portal’s Solution Listing, so vendor claims alone mean nothing. Search the listing directly, filter by sector or function, and check the solution code matches what your vendor is actually proposing. Vendor approval status can change, so it’s worth verifying on the portal rather than trusting a quote sheet, and capturing a screenshot with the date, vendor name, and solution code for your own records.

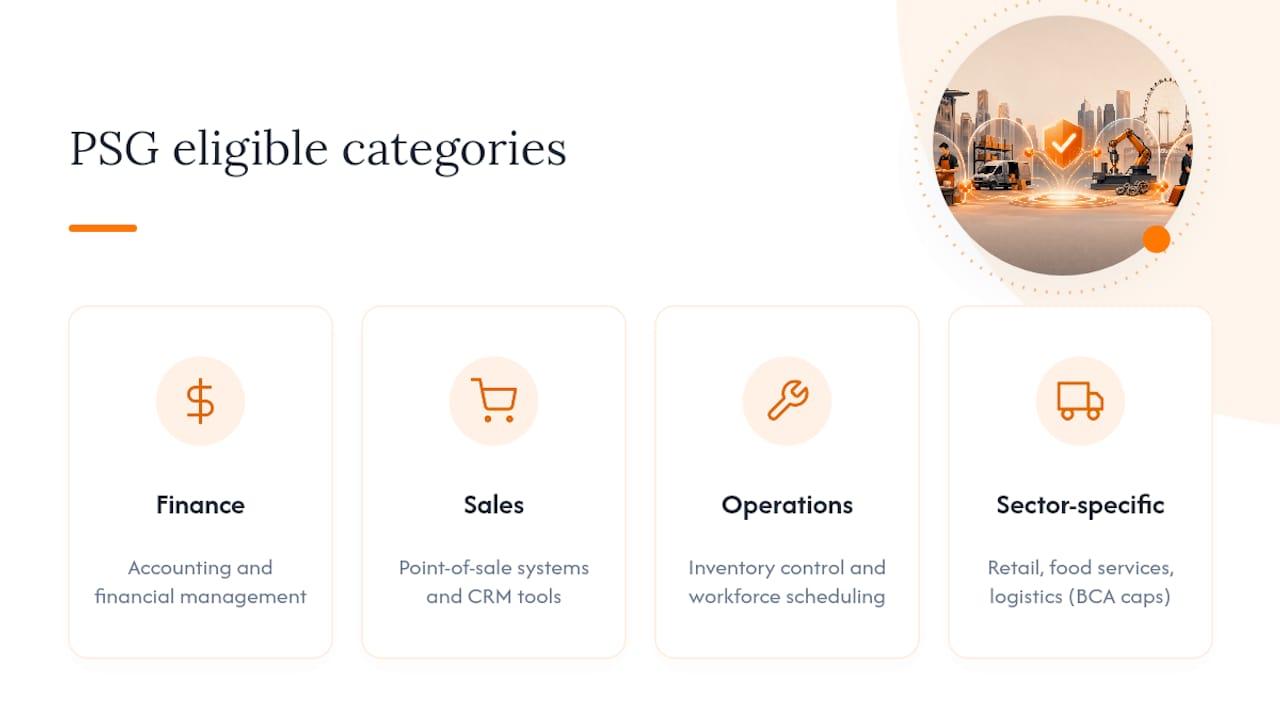
    Eligible categories span a wide spread of business functions: accounting and financial management, point-of-sale systems, inventory and stock control, workforce management and scheduling, customer relationship tools, and sector-specific solutions for retail, food services, and logistics. Sector-scoped programmes, such as the Built Environment PSG administered through BCA, carry their own caps and conditions on top of the general rules.

    Icons representing PSG eligible solution categories

    The “used in Singapore” requirement isn’t a formality. EnterpriseSG expects your business to be the actual end user of the solution, not a reseller or a local entity acquiring software primarily to serve an overseas parent or affiliate. If the tool sits on a server here but the operations it supports run offshore, that’s a red flag an assessor will catch.

    Server rack in small business environment

    What are the exact steps to apply on the Business Grants Portal?

    The sequence matters as much as the content. Get any step out of order and the whole application can be voided.

    1. Get a quotation from a vendor whose solution is confirmed on the PSG Solution Listing, marked clearly as non-chargeable and contingent on grant approval.
    2. Submit your application on the Business Grants Portal before making any payment, deposit, or signed commitment. This is the step most applicants get wrong.
    3. Accept the Letter of Offer once EnterpriseSG approves the application, which formalises the grant terms.
    4. Proceed with the vendor and submit your claim after the solution is implemented and paid for, supported by invoices and proof of payment.

    Submission requires CorpPass authentication, and the person submitting needs the correct assigned role. Check this early. A director assuming they can log in and submit, only to find their CorpPass role doesn’t cover grant applications, is a common last-minute delay.

    Why do PSG applications get rejected, and how do you avoid it?

    The single biggest cause of rejection is applying after the fact. Even a small deposit, a signed purchase order, or an informal written agreement dated before your application submission date is enough to void the entire claim. EnterpriseSG treats the application date as a hard line: anything chargeable or contractually binding must fall after it, with no exceptions for goodwill payments or “just to secure the vendor’s schedule.”

    Eligibility isn’t a one-time check either. Changes to your shareholding or group size between application and claim disbursement can invalidate a claim that was perfectly valid at the outset. A funding round, a shareholder buyout, or a merger mid-project all warrant a fresh eligibility review before you submit your claim.

    • Confirm no payments, POs, or signed agreements exist before your BGP submission date.
    • Re-check shareholding and group size figures at claim stage, not just at application.
    • Match your chosen solution’s sector code to your actual business activity to avoid mismatch rejections.

    Pro Tip: Structure vendor quotations with a “contingent on PSG approval” clause and keep all chargeable milestones scheduled after your Letter of Offer date. It’s the cleanest way to protect your application from an accidental early payment.

    FlowLab’s approach to PSG-ready app projects

    Most SMEs don’t fail PSG eligibility on paper. They fail it operationally, by moving faster than the paperwork allows. Flowlab’s complimentary app fit review starts by mapping the proposed work against pre-approved PSG solution categories before any quotation is finalised, so you know where you stand before a vendor conversation even locks in a price.

    We stage project scope deliberately: quotations are issued as non-chargeable and contingent on approval, and no chargeable milestone is scheduled until the Letter of Offer is in hand. That sequencing exists precisely because the application date has to sit before anything binding, not after. Flowlab has worked with SME clients across retail and service sectors navigating this exact staging problem.

    — Ronald

    Get a PSG-ready quotation without the guessing

    Working out which category your project falls under, and whether your quotation timing protects your eligibility, is where most SMEs lose momentum. Flowlab handles that mapping directly: a free app fit review checks your proposed solution against pre-approved PSG categories, structures the quotation as non-chargeable and contingent on approval, and stages any development work so nothing chargeable happens before your Business Grants Portal submission clears.

    Flowlab

    If you’re weighing a queue management system, a staff-facing operational tool, or a fully custom build, it’s worth seeing what a PSG-aligned project actually looks like before committing to anything. Try the complete queue journey demo or look at Flowlab’s app development service for SMEs to see how a scoped, staged project gets structured from quotation through to claim. Book a free app fit review and get a written mapping of your project against PSG categories before you sign anything with anyone.

    Sources

  • When to Hire a Developer: Zapier Alternatives for SMEs with 20+ Users

    When to Hire a Developer: Zapier Alternatives for SMEs with 20+ Users

    The best Zapier alternative for most SMEs with differentiating workflows is not another SaaS platform but a developer-built integration or internal app, commissioned once and owned outright. This route suits businesses whose per-seat automation costs are climbing, whose data needs stay in-house, or whose processes are too specific for generic connectors. Flowlab builds these through a discovery-first process that clarifies scope and cost before anything is committed.


    TL;DR:

    • Custom developer-built solutions are more cost-effective over time for stable, growing workflows with many users, especially when SaaS costs are increasing.
    • Building integrations involves multiple stages, including discovery, scoping, proof of concept, phased rollout, and ongoing maintenance, requiring clear agreements and documentation.
    • Cost and time for custom integration projects depend on the number of systems, complexity, legacy data, and industry-specific security needs, with ongoing support typically costing 15 to 25 percent of the initial build annually.
    • Common pitfalls include under-scoping, poor documentation, and vendor lock-in, which can be mitigated through staged development, acceptance testing, and clear ownership clauses.
    • SMEs should reserve custom builds for processes that define their business niche and use SaaS platforms for generic tasks, ensuring scalable and flexible automation as operations expand.

    Table of Contents

    What are developer-built alternatives to Zapier?

    A developer-built alternative is software written specifically for your business rather than rented from a platform. Instead of chaining together pre-built “triggers” and “actions” inside a SaaS dashboard, you commission a developer or agency to write code that does exactly what your workflow needs, and nothing else. That distinction matters because it changes who owns the logic, where your data sits, and what happens when your process changes next year.

    These solutions generally fall into four recognisable categories:

    • Single-purpose internal apps – a dedicated tool built for one job, such as a queue management screen for front-of-house staff or a lead-routing dashboard for a sales team.
    • Custom API connectors – code that links two specific systems directly (your e-commerce platform to your accounting software, for instance) without a general-purpose middle layer.
    • Central integration layers – a middleware service that sits between several systems (ERP, warehouse, webshop, accounting) and manages data flow between all of them, which becomes valuable once you are juggling more than two or three connected platforms.
    • Scheduled jobs or cron-based synchronisers – lightweight background processes that run on a timer to reconcile invoices, sync inventory counts, or pull reports, useful where real-time triggers aren’t necessary.

    Integration with existing SaaS tools typically happens through their published APIs, which is straightforward when the software is modern and well-documented. Legacy databases or on-premise systems are a different matter. They often need a bespoke adapter written specifically to talk to them, which is one of the clearest signals that a generic automation platform has reached its limit.

    When does building beat buying a subscription?

    Six factors decide whether commissioning a build makes financial sense: how much the workflow differentiates your business, how complex the integration actually is, your current per-seat or per-task SaaS spend, how many people will use the tool, how stable the process is, and whether you have compliance or data-control requirements that a third-party platform can’t satisfy.

    1. Differentiation value. A workflow that’s identical to every other business in your sector is a poor candidate for custom work. A workflow that gives you a genuine operational edge is a strong one.
    2. Integration complexity. Two systems talking to each other via clean APIs rarely justifies a build. Five systems with inconsistent data formats usually does.
    3. Run-rate trajectory. If your automation subscription cost rises every time you add a user or a task, that curve eventually crosses the cost of a one-off build.
    4. User count and stability. More users on a stable, unchanging process strengthens the case for ownership rather than rental.
    5. Data control and compliance. Some SMEs simply cannot let customer or financial data pass through a third-party platform’s servers.

    Custom builds tend to become cost-competitive with SaaS within roughly two to three years once a workflow is stable and the user base is growing, because subscription fees compound while a one-off build doesn’t. The comparison only holds up, though, if you count the full cost of the SaaS route. Buyer guides consistently flag hidden migration, integration, and workaround hours that rarely appear in a subscription’s advertised price.

    A workable rule of thumb: if your workflow is stable, you have twenty or more regular users, and your per-seat costs are climbing rather than flattening, custom starts to look like the economical choice. Most SMEs land somewhere between the two extremes, which is why a hybrid architecture (buying the commodity functions, building only the differentiators) tends to be the pragmatic default rather than an all-or-nothing bet.

    How do you commission a developer or agency for this?

    Commissioning a build well comes down to sequencing. Rush straight to a full build and you risk paying for scope nobody agreed to. The steps below keep risk contained at each stage.

    1. Quick discovery (1 to 2 weeks). A good developer spends this time mapping your actual workflow, not just taking a feature list. A rigorous discovery phase reduces the three biggest causes of failed custom projects: underestimated scope, missing end-user input, and integration surprises discovered too late.
    2. Scoped proposal. You should receive a written scope, not a verbal estimate, before any code is written.
    3. Small proof of concept or pilot. Test the riskiest integration point first, on a small scale, before committing to the full build.
    4. Staged production rollout. Ship in phases with agreed acceptance points, rather than one large release.
    5. Handover and maintenance setup. Confirm who monitors the system once it’s live and how issues get fixed.

    Before you sign anything, run through this checklist with a shortlist of agencies:

    • Have they built similar integrations before, and can they show it?
    • What’s their approach to data migration and testing?
    • Who owns the code and the intellectual property once the project ends?
    • Do they offer a maintenance service level agreement, and what does it cover?
    • What security practices do they follow for data in transit and at rest?

    Demand these deliverables in writing: documented acceptance tests, an exportable data format (so you’re never locked into their system to get your own data back), a runbook and monitoring setup, a rollback plan, and clear pricing for ongoing support.

    Pro Tip: Ask for the proof of concept to be built against your messiest real data, not a clean sample set. That’s where integration problems actually surface.

    What do custom integrations cost and how long do they take?

    Costs and timelines scale with the number of systems involved, not just the size of the business commissioning the work. A basic connector linking two SaaS tools with clean APIs might land at the lower end of a project quote and take one to three weeks. A medium-sized integration or a single-purpose internal app, such as a queue management tool or a lead-routing system, typically runs several weeks to a few months. A larger, fully integrated internal system spanning multiple departments can stretch to three to six months or beyond.

    Rather than fixed prices, think in terms of what pushes a project toward the higher end:

    • Number of systems that need to talk to each other.
    • Complexity of authentication (a single sign-on flow is simpler than five separate API keys with different permission models).
    • Legacy data migration, which is almost always underestimated.
    • Security and compliance requirements specific to your industry.
    • Monitoring and scaling needs if usage is expected to grow quickly.

    Maintenance is the recurring cost people forget to plan for. A sensible planning figure is 15 to 25% of the initial build cost per year, covering hosting, security patches, and small enhancements. Some agencies offer this as a fixed retainer; others work pay-as-you-go. Either can work, but agree the model upfront rather than discovering it when something breaks.

    What can go wrong, and how do you prevent it?

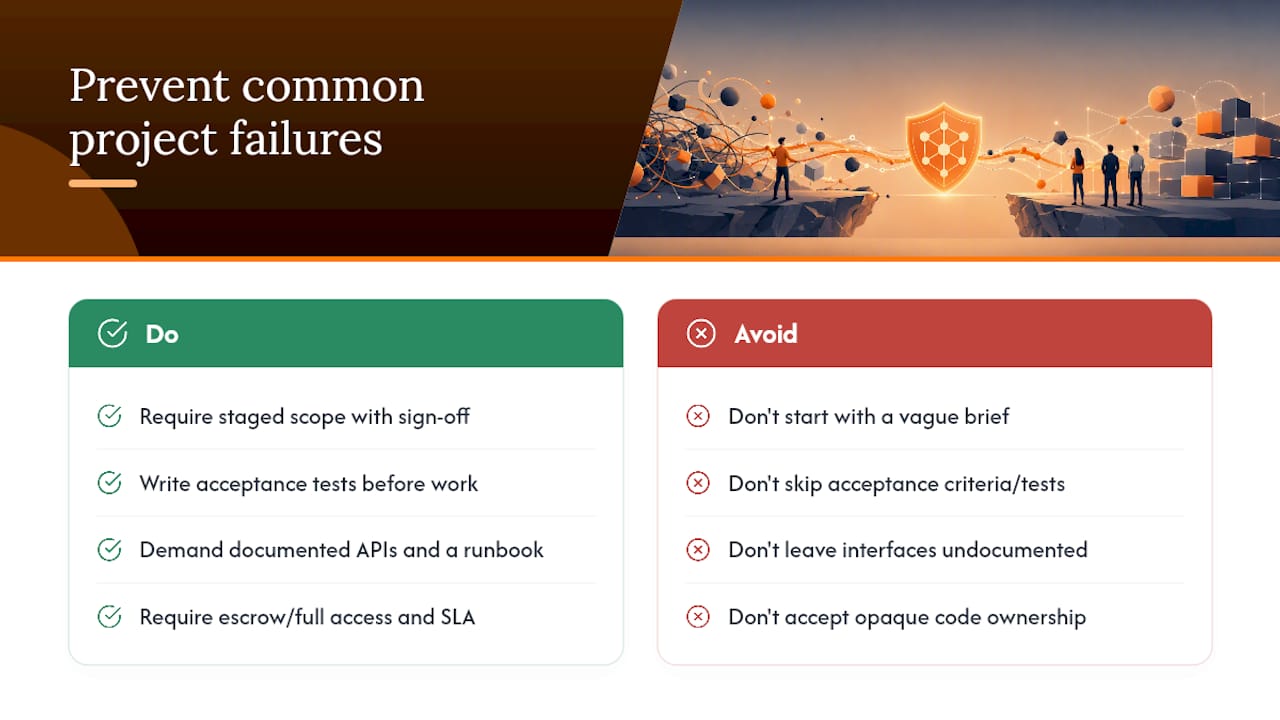
    Most failed custom projects fail for predictable, avoidable reasons. Under-scoping is the most common: a project starts with a vague brief and grows sideways as edge cases surface mid-build. Missing acceptance tests is a close second. Without a written definition of “done,” you and the developer can end up disagreeing about whether the project is finished. Undocumented interfaces, thin monitoring, and vendor lock-in caused by opaque code ownership round out the usual list.

    The mitigations are equally concrete. Insist on staged scope with sign-off at each stage, written acceptance tests, and a rollback plan if something goes live badly. Demand documented APIs and a runbook, not just working code. For code ownership, ask about escrow or full access clauses so you’re never dependent on one developer’s goodwill. A maintenance service level agreement closes the loop.

    On data security, four checks are worth insisting on regardless of project size: encrypted transport for any data moving between systems, limited retention of anything you don’t need long-term, role-based access so staff only see what their job requires, and a documented export procedure so you can retrieve your own data on demand.

    Pro Tip: Ask a prospective developer what happens to your data and your code if you stop working with them. Their answer tells you more about the engagement than their portfolio does.

    What can go wrong, and how do you prevent it? — overview diagram

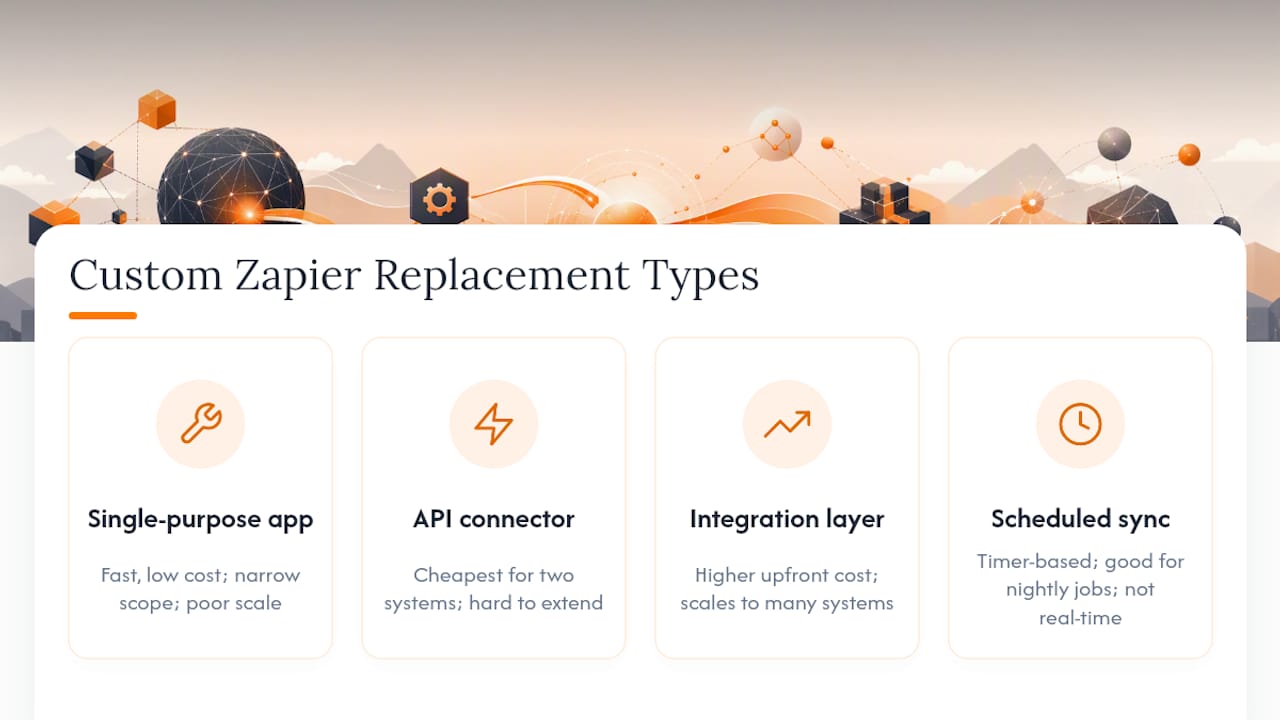
    What are the common types of custom Zapier replacements?

    Four patterns come up repeatedly when SMEs replace generic automation platforms with bespoke work, each with a distinct trade-off.

    Comparison diagram of custom Zapier replacement types

    Single-purpose internal apps replace one specific automation, such as a queue management screen or an attendance tracker. They’re quick to build and easy to maintain because the scope stays narrow, but they don’t scale well if you need to add unrelated functions later.

    Custom API connectors link two systems directly without a general middleware layer. They’re the cheapest and fastest option when you only have two systems to connect, but adding a third system usually means starting over rather than extending what exists.

    Central integration layers sit between multiple platforms and manage data flow across all of them. They cost more upfront and take longer to build, but they scale far better once you’re connecting four or five systems, and they avoid the tangle of point-to-point connectors that becomes unmanageable over time.

    Scheduled synchronisers run on a timer rather than reacting to events in real time. They’re inexpensive and reliable for tasks like nightly inventory reconciliation, but unsuitable where a customer or staff member needs an instant response.

    Choosing between them comes down to how many systems you’re connecting today and how many you expect to be connecting in two years. Building a single connector when you actually need an integration layer is one of the most common and expensive planning mistakes SMEs make.

    Do custom replacements actually work in practice?

    The pattern that shows up across SME case examples is consolidation: a business running three or four separate subscriptions to stitch its workflow together replaces all of them with one custom system and sees both cost and operational complexity drop. Case notes describing this kind of shift point to meaningfully reduced recurring spend once the subscriptions are gone and the logic sits in owned software instead.

    The common thread in successful replacements isn’t the size of the business or the sophistication of the code. It’s that the workflow being replaced was stable and well understood before the build started. Businesses that tried to replace an automation while still actively redesigning the underlying process tended to spend longer in revision cycles, because the developer was chasing a moving target. The lesson translates directly into a commissioning principle: document your current workflow properly before you brief anyone, even if that documentation feels unnecessary at the time.

    Retail and food service operators replacing queue or order-routing automations report a similar pattern: the win isn’t a single dramatic feature, it’s removing the friction of multiple disconnected tools that all needed separate logins, separate billing, and manual reconciliation between them.

    How do you keep a custom integration running well?

    A custom integration is not a one-off purchase; it needs the same ongoing attention as any piece of business infrastructure. The single most important habit is monitoring: knowing within minutes, not days, when a sync fails or an API connection breaks, rather than finding out when a customer complains.

    Beyond monitoring, a few practices separate integrations that age well from ones that quietly rot:

    • Keep documentation current every time the workflow changes, not just at launch.
    • Review API dependencies periodically, since third-party platforms change their interfaces without much warning.
    • Schedule small maintenance windows rather than letting issues pile up until a larger rebuild is needed.
    • Keep a named point of contact for support, whether that’s a retainer arrangement with your original developer or an in-house owner.

    Treat your maintenance retainer as an investment in stability, not a cost to minimise. The businesses that skip this step tend to be the ones back in the market for a full rebuild within two years, having spent as much on emergency fixes as they would have on a proper support arrangement.

    Is a custom build more scalable than Zapier?

    Generic automation platforms scale in one dimension well: adding more triggers and actions within their existing framework. Where they scale poorly is complexity and volume. Task limits, per-zap pricing, and rate limits on connected apps all start to bite as a business grows, and workarounds for anything outside the platform’s supported connectors get increasingly awkward.

    Custom integrations invert that trade-off. They take longer and cost more to build in the first place, but once built, there’s no per-task ceiling imposed by a third party and no pricing tier to renegotiate as volume grows. Flexibility works the same way in reverse: a generic platform is flexible for common use cases and rigid for anything unusual, while custom software is rigid to build initially but flexible to extend exactly where your business actually needs it to flex.

    The practical implication for most SMEs is architectural, not ideological. Use commodity platforms for genuinely generic tasks, and reserve custom development for the processes that define how your business actually operates.

    FlowLab’s perspective: how we approach replacing automations for SMEs

    Most automation problems we see at Flowlab don’t start with a technology decision. They start with a business owner who’s outgrown what their current tools can do and isn’t sure whether the answer is another subscription or something built for them specifically. We start every engagement with a discovery conversation and a complimentary app fit review, because recommending a solution before understanding the actual workflow is how SMEs end up with expensive software that doesn’t fit.

    That process has led us to build things as different as a queue management journey for a business struggling with front-of-house bottlenecks (you can try the complete queue journey to see how it handles real customer flow) and a pricing tool that gives staff the right product answer, right when they need it, rather than making them hunt through spreadsheets mid-conversation with a customer.

    If you’re weighing up whether your workflow warrants a custom build or a subscription renewal, the most useful next step is a scoped discovery session rather than a guess. It costs you nothing to find out where you actually stand.

    — Ronald

    Ready to move beyond subscription automation?

    If your business has outgrown what a generic automation platform can do, you have options beyond another monthly plan. Flowlab is the alternative to renting software indefinitely: a Singapore-based developer that scopes your actual workflow first, tells you honestly whether a ready-made product, an adapted solution, or a full custom build fits best, and gives you a clear cost picture before any commitment.

    Flowlab

    That discovery-first approach is deliberate. Rather than selling you a platform subscription that half-fits your process, we identify the most economical route for your specific operation, whether that’s adapting an existing product foundation or building something from scratch. Businesses already using our tools include those running the queue management journey and the staff-facing pricing tool mentioned earlier.

    If subscription costs are climbing and your workflow feels bigger than what a generic platform can handle, request a complimentary app fit review and find out what a bespoke alternative would actually cost for your business.

    Sources

    Further reading on build-versus-buy decisions and hybrid architecture informed the cost guidance above. For an app fit review, visit Flowlab.

  • Automating WhatsApp for your business: a practical guide for SMEs

    Automating WhatsApp for your business: a practical guide for SMEs

    Yes, you can automate WhatsApp for your business, and most SMEs should start with one high-frequency workflow, such as appointment reminders or order updates, rather than trying to automate everything at once. Meta Business Agent adds an AI layer for routine replies and bookings, but it only works safely with clear handover rules to a human. Get one workflow right first.


    TL;DR:

    • Automating WhatsApp for small businesses is most effective when starting with high-frequency workflows like appointment reminders or order updates.
    • The WhatsApp Business Platform supports multiple agents, templates, and integrations, but requires a Business Solution Provider and proper compliance measures.
    • A phased approach involving selecting a use case, testing on a small scale, and measuring KPIs ensures quick, measurable ROI, often within a few months.
    • Costs include BSP fees, message charges, and possible development, with significant ROI often achieved through reducing no-shows and saving staff hours.
    • Proper setup requires clear escalation rules, consent documentation, and avoiding automation excess or unplanned chatbot complexity to prevent customer frustration.

    Table of Contents

    What is WhatsApp business automation and how does it differ from the app?

    WhatsApp Business Automation means using rules, bots, or AI to send and answer messages without a person typing each reply. Whether you can do this properly depends on which WhatsApp product you’re using, and this is where most SMEs get confused.

    The free WhatsApp Business App works for solo operators or very small teams. It gives you quick replies, away messages, and basic greeting automations, but it’s limited to one device and can’t scale to multiple agents working the same inbox.

    The WhatsApp Business Platform, accessed through a Business Solution Provider (BSP), is built for volume. It supports:

    • Multiple agents working from shared conversations
    • Pre-approved message templates for outbound notifications
    • Chatbot and CRM integrations
    • A data processing agreement (AVV) with your provider, covering how customer data is stored and handled

    One detail catches people out: any reply sent within 24 hours of a customer’s last message counts as a “service” conversation and costs far less than an outbound marketing template, as BSP guides for regulated markets explain. If you’re sending many messages a month or need several staff in one inbox, it’s time to look at the Platform via a BSP.

    Which WhatsApp workflows should you automate first?

    Not every message deserves automation. Some workflows pay for themselves within weeks; others just add complexity for no real gain. Here’s the order Flowlab typically recommends to SME clients, ranked by how fast they show measurable return:

    1. Appointment confirmations and reminders. This is usually the highest-value starting point. Automated reminders sent a day or a few hours before a booking are widely reported to cut no-shows and free up five to ten hours a week of admin time in small teams.
    2. Order confirmations and delivery updates. Customers expect a receipt and a status update without having to ask, and these fall neatly into the low-cost “service” message window.
    3. A tier-one FAQ chatbot. Handles the same five or six questions your team answers daily, such as opening hours, pricing, or returns policy.
    4. Lead qualification and CRM routing. Incoming enquiries get tagged and pushed straight into your sales pipeline instead of sitting unread.
    5. Consent-aware marketing and cart recovery. This comes last, and only once you’ve documented explicit opt-in, because unsolicited marketing messages carry real reputational and compliance risk.

    Pro Tip: Pick the workflow your staff complain about most, not the one that sounds most impressive in a pitch deck. The boring, repetitive task is usually the one worth automating first.

    How does WhatsApp automation actually work behind the scenes?

    The stack sits on a handful of moving parts, and understanding them helps you brief a supplier properly rather than nodding along to jargon.

    At the base sits the WhatsApp Business Platform (Cloud API), accessed through a BSP that handles the technical connection and billing. Sitting on top of that is either a no-code orchestrator such as n8n or Make, or a custom-built integration layer, which routes messages, triggers actions, and connects to your other systems. On top again sits your chatbot or LLM layer, which handles the actual conversation logic.

    Practical building blocks include:

    • Webhooks that trigger a workflow the moment a customer messages or a booking is made
    • Approved templates for anything sent outside the 24-hour service window
    • CRM and calendar integrations, so a booking or enquiry updates your existing systems automatically
    • Observability, meaning logs and alerts so you know when a bot fails to understand a message

    Meta’s own Business Agent can handle routine replies, recommend catalogue items, and book appointments, but Meta is explicit that it needs clear handover rules between AI/chatbots and human agents so it escalates anything complex, or anything a frustrated customer sends, straight to a human. Get that escalation logic wrong and you’ll find out from a one-star review, not a support ticket. Tools like n8n or Make let SMEs wire this together without a large development team.

    What privacy and compliance checks matter before you automate?

    Get this wrong and the fallout costs far more than the automation saves. A few checks are non-negotiable before you switch anything on.

    • Avoid App-based contact sync where possible. The free Business App can prompt for address book access in ways that create data protection headaches; the API-based Platform doesn’t automatically upload contacts, which is one reason serious SMEs migrate.
    • Sign an AVV (data processing agreement) with your BSP, and ask exactly where messages are stored and processed. Providers offering hosting closer to your own jurisdiction tend to simplify audits and reduce friction, which is why practitioners often favour them.
    • Document opt-in for every marketing message. Verbal consent isn’t enough; keep a timestamped record.
    • Tell customers when they’re talking to AI. A short disclosure line at the start of an automated chat avoids the awkward moment someone realises they’ve been venting to a bot.

    How do you actually pilot WhatsApp automation step by step?

    Skipping steps here is how “quick automation projects” turn into six-month messes. Follow this order and you’ll have something measurable within weeks.

    1. Pick one use case and set KPIs. Appointment reminders, order updates, or FAQ deflection all work. Decide upfront what success looks like, such as a percentage drop in no-shows or hours saved per week.
    2. Decide App or API. If you’re a single-location business with light volume, the free app may hold you for now. Multi-agent teams or CRM needs mean going via a BSP.
    3. Vet your BSP. Check hosting location, whether they offer an AVV, integration options, and what support looks like when something breaks at 11pm on a Friday.
    4. Draft and submit message templates for Meta approval, and set up consent logging from day one.
    5. Run a small internal pilot with one team or one location before rolling out company-wide.
    6. Measure, iterate, scale. Review weekly for the first month, then monthly.

    Pro Tip: Run your pilot for at least two full billing cycles before judging it. The first fortnight almost always looks messy while templates get approved and staff adjust.

    What does WhatsApp automation cost and when does it pay off?

    Budgets typically split into four buckets: BSP fees and per-message costs, any no-code subscription (n8n or Make, for example), development or consulting fees for setup, and ongoing support once it’s live.

    • Pilot phase: a few weeks, covering template approval, BSP setup, and initial testing
    • Early ROI: within a few months, depending on how frequently the automated workflow runs
    • Simplest ROI formula: (staff hours saved + reduced no-shows + converted leads) measured against total setup and running cost

    Reminder automation alone is commonly linked to meaningful drops in no-shows and several hours of admin time reclaimed weekly, which for a small clinic or salon often covers the entire setup cost within the first quarter. Costs vary by scope, and getting a straight answer before committing matters more than any headline figure. Flowlab’s cost guidance for Singapore SMEs breaks down what typically drives the final number up or down.

    How Flowlab helps SMEs get WhatsApp automation right

    Flowlab’s method starts with discovery, not a sales pitch. We look at what your team actually does all day before recommending anything, then run a contained pilot, then iterate based on what the data shows.

    Hands connecting device accessories in workspace

    For some businesses, a ready-made product like PriceFlow answers the question outright without custom build costs. For others, a no-code path such as n8n handles the job perfectly well on its own. Where the workflow touches multiple systems, existing CRM data, or needs judgement calls a bot can’t make, that’s when a tailored automation build earns its cost. Our complimentary app fit review exists precisely to work out which category you’re in before either of us spends a cent.

    What I’d tell any SME owner before they automate WhatsApp

    The businesses that get this right in thirty days follow a similar rhythm: pick one workflow in week one, get templates approved and consent logging live by week two, pilot with a small group by week three, and review the numbers properly in week four.

    Four-week timeline for WhatsApp automation rollout

    Three mistakes undo most of the value. Skipping consent logging is the one that bites hardest later, since retroactive proof of opt-in doesn’t exist. Automating too much too soon confuses customers and buries the genuinely useful replies in noise. And building a chatbot with no escalation path means the first angry customer becomes a public complaint instead of a five-minute fix.

    Try a demo before committing to a build. It tells you more in twenty minutes than any spec document will.

    — Ronald

    Get WhatsApp automation built properly, not bolted together

    Plenty of SMEs cobble together a no-code workflow and it holds up fine, right until volume grows or a customer query needs judgement a bot can’t make. Flowlab exists for exactly that gap. We map your actual operations first, free of charge, then tell you honestly whether a ready-made product, an adapted existing tool, or a custom build makes sense, without pushing you toward the most expensive option by default.

    Flowlab

    If you want a working example before deciding anything, try a Flowlab product demo to see how automated messaging, booking flows, and CRM handoffs behave in practice. If you’re still working out which route fits your operation, book a complimentary app fit review and we’ll tell you plainly what the simplest suitable solution actually looks like for your team.

    Where to read the official documentation

    For template approval rules and API specifics, go straight to the WhatsApp Business Platform documentation. Meta’s own Business Agent FAQ covers AI handover rules and rollout limits. For no-code orchestration examples, Zapier’s automation guide is a solid practical starting point.

    Sources

  • POS Customization: A Practical Guide for SME Owners

    POS Customization: A Practical Guide for SME Owners

    Choose one of three routes to customize your POS: configure built-in features for speed, extend with apps and APIs for moderate control at a moderate price, or commission bespoke development when your workflow genuinely won’t bend to off-the-shelf software. Most small and mid-sized businesses overspend by skipping straight to bespoke when configuration or a well-chosen extension would have solved the problem in a fraction of the time. Point-of-sale spending in Singapore is substantial enough that getting this decision wrong isn’t a rounding error. It’s a budget line that follows you for years.

    Before you talk to any vendor, run an operations discovery, or request a complimentary app fit review, so the customization scope reflects what your staff actually do at the counter, not what a sales deck assumes.

    • Configure: fastest and cheapest, works when your needs fit within existing settings.
    • Extend: apps, plugins, or API modules add features without a full rebuild.
    • Bespoke: built from scratch for workflows no packaged system supports.

    Key Takeaways

    Most SMEs solve their POS customization problem with configuration or a targeted extension, and reserve bespoke development for workflows no packaged system supports.

    Point Details
    Start with discovery Map your actual workflow before choosing configuration, extension, or bespoke development.
    Match approach to complexity Configuration suits simple settings changes; bespoke suits workflows no app handles.
    Watch integration risk Payment certification, inventory sync, and offline mode cause most rollout failures.
    Demand clear quotes Require deliverables, acceptance tests, and a defined support SLA before signing.
    Consider Flowlab’s app fit review Flowlab maps your workflow first and offers POSFlow or PriceFlow when they fit.

    Table of Contents

    What Can You Actually Customize on a POS System?

    “Customization” sounds abstract until you see the actual levers. On most modern systems, you can rework the checkout interface, build custom modifiers for variable pricing, redesign receipt templates, set loyalty triggers, restrict staff permissions by role, script bespoke order flows, and reshape reporting dashboards to match how you actually track performance.

    A retail example: a boutique selling made-to-order jewelry needs custom modifiers so staff can add engraving fees or stone upgrades at checkout without creating a new SKU for every combination. A service example: a nail salon needs a booking-linked POS screen that pulls the technician’s schedule and applies a different price tier depending on service length. Both are configuration or light extension work, not bespoke builds.

    Loyalty triggers are another common ask. Retailers want points awarded automatically above a spend threshold; service businesses want a free session unlocked after a set number of visits. Staff permission tiers matter more than most owners expect. One bad refund approval from an untrained cashier can cost more than the entire customization project.

    Watch for restrictions from your payment provider. Many processors require re-certification if you change how transactions are captured or displayed, and that step can add real weeks to a timeline. Shopify’s POS customization documentation shows how UI extensions and APIs let merchants add these features without touching certified payment code.

    Configure vs. Extend vs. Bespoke: Which Fits Your Business?

    Every POS customization project falls into one of three buckets, and each carries a different cost shape, skill requirement, and long-term maintenance burden.

    1. Configuration means adjusting settings already built into your POS software, things like tax rules, receipt fields, discount logic, and user roles. No code, no developer, just admin access and a clear list of what you need.
    2. Extension means adding apps, plugins, or API-based modules to a POS platform that already supports third-party additions. This is where most SMEs land when configuration falls short.
    3. Bespoke development means commissioning software built around your exact workflow when nothing off-the-shelf comes close.

    The trade-offs stack up predictably:

    • Configuration costs the least, takes days to weeks, and requires zero technical hires, but you’re limited to what the platform’s settings allow.
    • Extensions add a recurring subscription cost (often modest, sometimes tiered by feature), take a few weeks to implement, and carry moderate vendor lock-in since you depend on that app staying supported.
    • Bespoke builds carry the highest upfront cost, often stretching into months rather than weeks, but give you full ownership and no dependency on someone else’s roadmap. Corexta’s overview of custom POS development points to exact-fit workflow and omnichannel integration as the main payoff, with cost bands that shift heavily based on scope.

    A café chain adding a loyalty punch card usually needs configuration or a small extension. A distributor running split fulfillment across three warehouses with different tax rules usually needs bespoke work. Match the approach to the problem’s actual complexity, not to what sounds impressive in a pitch meeting.

    Which Integrations and Hardware Choices Add Complexity?

    The customization itself is often the easy part. What actually drives cost and risk is everything the POS has to talk to. Integration endpoints, inventory systems, e-commerce platforms, payment processors, accounting or ERP software, and loyalty or CRM tools each add their own data mapping challenges.

    Hands plugging hardware cables at POS station

    Hardware matters just as much. Kiosks, handheld terminals, barcode scanners, and receipt printers all interact with your customization differently, and a UI tweak that looks fine on a desktop terminal can break on a smaller kiosk screen.

    Common pitfalls worth flagging before you sign anything:

    • Payment certification delays when a customization touches how transactions display or process.
    • Data mapping errors between your POS and accounting software, especially around tax codes and SKU structures.
    • Inventory sync lag that shows stock as available when it’s already sold at another location.
    • Offline mode gaps, where a customization works perfectly online but fails the moment connectivity drops.

    Pro Tip: Test your exact hardware combination, scanner, printer, and terminal together, under real store conditions before rollout. A scanner and printer that each work fine alone can still conflict once they’re both firing through the same customized checkout screen.

    What Should You Budget, and What Should You Ask Vendors?

    Costs scale with the approach you picked. Configuration work typically runs low, often completed within a few weeks using existing admin tools. Extensions usually carry a monthly subscription fee layered on top of your base POS cost. Bespoke builds require a higher upfront investment and typically span multiple months from kickoff to launch.

    The milestone sequence looks similar across all three approaches, just compressed or stretched depending on scope: discovery, prototype, build, test, staff training, rollout.

    Ongoing costs don’t stop at launch. Budget for subscription renewals, periodic maintenance, and a retainer if you expect to keep adding features after go-live.

    Before accepting any quote, demand clarity on:

    • Exact deliverables, listed feature by feature, not described in vague terms.
    • Acceptance tests that define what “done” actually means.
    • A support SLA that states response times, not just “ongoing support.”
    • What happens to your data and configuration if you switch vendors later.

    How Do You Decide Which Approach Fits Your Business?

    Six factors should drive the decision: workflow complexity, number of required integrations, transaction scale, in-house technical skill, available budget, and how fast you need results.

    Run through this diagnostic before choosing a direction:

    1. Can our current POS settings solve this with configuration alone?
    2. Does an existing app or extension already cover 80% of what we need?
    3. Do we have workflows (multi-location pricing, custom fulfillment, unusual tax rules) that no packaged app handles well?
    4. What’s our real timeline, weeks or months, and does our budget match that?
    5. Who maintains this after launch, us or the vendor?

    If the answers point toward genuine workflow gaps rather than missing settings, that’s when bespoke development or a tailored product adaptation earns its cost.

    This is exactly where an operations-first conversation pays off before you commit to a build. A complimentary app fit review maps your actual workflow against configuration, extension, and bespoke options, so you’re not guessing which bucket you fall into. For businesses that fit a ready-made structure, POSFlow and PriceFlow often solve the problem faster than a custom build would.

    • Avoid choosing bespoke just because it sounds more “professional.” Match spend to actual need.
    • Avoid choosing configuration when your workflow genuinely can’t bend to fit it.

    How Do You Implement a POS Customization Project?

    A tight, ordered process keeps a customization project from drifting in scope or budget.

    1. Map operations and prioritize features. List every workflow step your current POS mishandles, then rank by business impact.
    2. Build a prototype or proof of concept. Set clear acceptance criteria before development starts, not after.
    3. Test rigorously. Cover every device combination, all payment flows, and offline mode specifically, since that’s where most failures surface.
    4. Train staff on a schedule, not the night before launch. Give cashiers hands-on time with the actual customized screens.
    5. Roll out in phases. Launch at one location or with one team first, track performance metrics, then expand once the kinks are worked out.

    How Flowlab Supports POS Customization for SMEs

    Flowlab works through operational challenges with you before recommending anything, whether that lands on a ready-made product, an adapted solution, or a fully custom build. The starting point is always a complimentary app fit review, which clarifies costs and identifies the most economical path before any development begins.

    For businesses that need a working POS without a lengthy build cycle, POSFlow gives you a system that keeps checkout, inventory, and reporting connected, and PriceFlow handles price lookups so staff get the right answer at the counter without digging through menus.

    • Clearer costs upfront, before commitment.
    • Faster delivery than a from-scratch build in most cases.
    • Less operational disruption during rollout.

    What Actually Matters in a POS Customization Decision

    The conventional advice treats POS customization like a shopping decision: compare features, pick the platform with the longest list, done. That framing misses the real cost driver, which isn’t the software. It’s the operational mapping work nobody wants to do first.

    What Actually Matters in a POS Customization Decision — overview diagram

    Most failed customization projects I’ve seen described in vendor case studies didn’t fail because the technology was wrong. They failed because the business jumped to a build before anyone wrote down exactly how staff process a return, apply a discount, or handle a split payment. Configuration and extension work look unglamorous next to a fully custom system, and that’s precisely why businesses skip past them and overspend.

    The discovery step isn’t a formality. It’s the entire decision. A business that skips it can’t tell whether their real need is a $200 monthly app or a five figure bespoke build, and that gap is where budgets get blown. Get the operational picture right first, then let the approach follow from what you actually found.

    — Ronald

    Get a Clear Path to Your Customized POS

    Flowlab gives you a faster, lower-risk route to a working POS than hiring a freelance developer or negotiating with a large software vendor for custom features you may never fully use. Instead of guessing at scope, you start with a complimentary app fit review that tells you plainly whether configuration, an extension, or a bespoke build fits your operation, along with a realistic cost picture before you commit to anything.

    Flowlab

    If your checkout process, pricing rules, or staff workflows don’t fit neatly into a generic POS, that review is the fastest way to find out what will actually work. You can also run a sample sale through POSFlow’s demo to see how a connected checkout, inventory, and reporting system behaves before you decide on anything. Request your app fit review today and get a clear scope, not a sales pitch.

  • Barcode inventory tracking for SMEs: what to do first

    Barcode inventory tracking for SMEs: what to do first

    Yes, barcode inventory tracking is worth implementing if your stock count is growing or more than one person touches inventory. The fastest fix isn’t a scanner purchase. It’s choosing barcode-first inventory software before you buy any hardware at all. FlowLab’s complimentary app-fit review is a low-commitment way to confirm the right fit before you spend anything.


    TL;DR:

    • Choosing barcode-first inventory software is crucial, as it determines label data structure, workflows, and scanner compatibility before hardware purchase.
    • Internal codes suit small businesses initially, but retail or online sales require GS1-issued GTINs to meet marketplace standards and prevent relabeling.
    • Label quality and location labeling are vital; using durable labels and scanning all storage spots prevent future errors and system breakdowns.
    • Scaling across multiple sites requires proper API integration and staged rollouts to avoid disruptions and ensure inventory data consistency.
    • The main mistake in barcode systems is prioritizing hardware over software, leading to delays; sequencing software first ensures smoother implementation.

    Table of Contents

    What is barcode inventory tracking, exactly?

    A barcode inventory tracking system rests on four working parts, and understanding each one before you buy anything saves you from expensive rework later. According to Camcode’s breakdown of barcode inventory systems, those four components are:

    • Barcodes, the unique labels attached to items, shelves, or bins.
    • Scanners, the input devices that read those labels (phones, handheld imagers, or fixed-mount readers).
    • Inventory software, the system that turns a scan into a stock movement.
    • Workflows, the rules that dictate when and how staff scan.

    Miss any one of these and the system falls apart. A brilliant scanner with no defined workflow just produces noise.

    Barcode format matters more than most SME owners expect. 1D barcodes (like Code 128) store less data but scan reliably at speed and cost less to print. They suit internal stock control where you’re not selling through retail. 2D barcodes (QR codes, Data Matrix) pack in far more information, including batch numbers or expiry dates, and read even when partially damaged. If you plan to sell through organised retail or online marketplaces, you’ll eventually need GS1-issued GTINs rather than internal codes. GS1 is the global body that issues these identifiers and provides tools to check barcode readability before you print a single label.

    How does barcode tracking work day to day?

    A barcode inventory tracking system earns its keep in the everyday churn of receiving, picking, and counting stock, not in the initial setup. Every scan is really a small database transaction: it tells the software what moved, where, and when.

    Here’s how that plays out across the core movements:

    1. Receiving and put-away. Staff scan the incoming item against the purchase order, then scan the shelf or bin label as they place it. The system now knows both what you have and precisely where it sits.
    2. Picking and dispatch. A scan-at-pick step confirms the correct item left the correct location; a scan-at-pack step confirms it’s leaving the building. Skip either step and you lose the audit trail exactly where errors are most costly.
    3. Transfers and returns. Moving stock between sites or shelves gets logged the same way, scan out, scan in, so nothing disappears into an unlabelled corner. Returns work in reverse, with the scan reinstating stock and flagging condition if needed.
    4. Counting. Cycle counts (small, rolling counts of specific zones) and full stocktakes both run faster and more accurately when every count is a scan rather than a written tally.

    Scandit’s research on barcode scanning points out that a scan does more than confirm a price. It can surface stock levels at other sites, shipment status, or a full movement history for that item, which is exactly the kind of visibility a manual system can’t give you.

    Pro Tip: Make scan-at-pick mandatory before scan-at-pack. If you only enforce one checkpoint, put it at picking, that’s where wrong-item errors happen, and it’s far cheaper to catch them before the parcel is sealed.

    What ROI can SMEs expect from barcode systems?

    The return on a barcode rollout shows up first in fewer errors, then in the hours you stop spending on manual reconciliation. Picking and dispatch accuracy improves almost immediately once a scan, rather than a person’s memory, confirms every item leaving the warehouse.

    The main benefits SME owners report tend to cluster around four areas:

    • Fewer pick and dispatch errors, because the system rejects a scan that doesn’t match the order.
    • Less staff time on counts, since a scanned count replaces a written tally and a separate data-entry step.
    • Lower carrying costs and fewer stockouts, because real-time stock visibility catches shortages before they become a customer-facing problem.
    • Better traceability for recalls and audits, since every scan leaves a timestamped record of where an item has been.

    Barcode scanning is widely credited with reducing manual entry errors and speeding up inventory counts, according to Scandit’s implementation guide, which is precisely why it tends to pay for itself through labour savings before it pays for itself through hardware efficiency.

    For a small manufacturer or retailer, the real cost driver isn’t the scanner. It’s the staff hours needed to map SKUs properly and run the first count, according to Tecma’s setup guide. Budget for that time as carefully as you budget for the equipment.

    How do you set up barcode inventory tracking step by step?

    Getting this right is less about hardware and more about sequencing. Buy the wrong software first and every label, printer, and scanner decision that follows has to bend around its limitations. Buy hardware first and you risk owning devices your eventual software doesn’t support.

    Diagram of barcode inventory setup steps

    Step 1: Choose barcode-first inventory software

    Pick software built to run receiving, picking, and counting by scan natively, not a generic spreadsheet tool with a barcode feature bolted on. Camcode’s guidance on barcode inventory systems is blunt about this: the software decision should come before any hardware decision, because it determines your label data structure, your workflow rules, and which scanners will actually talk to it. Look for native support for multi-site stock visibility and lot or serial tracking if you’ll need either down the line, even if you don’t need them on day one.

    Step 2: Map your SKUs and decide on barcode type

    Work out which items get an internal Code 128 label and which need a GS1 GTIN because they’re heading to retail shelves or marketplaces. Kladana’s guidance for small businesses notes that most small operations start with internal codes and only move to GS1/GTIN once organised retail enters the picture. Decide this early. Retrofitting GTINs onto items already coded internally means relabelling everything.

    Step 3: Label your storage locations first

    This is the step SMEs skip, and it’s the one that causes the most frustration later. Every shelf, bin, and rack needs its own scannable label before you label a single product. If “where” isn’t a scan, your system only ever knows “what,” never “where,” and that gap defeats half the point of going digital.

    Hands placing barcode label on storage rack

    Step 4: Generate and test your barcodes

    Print a small test batch before committing to a full run. Check readability under your actual lighting and at the distance staff will realistically scan from, not just on a desk under good light. GS1’s Digital Link standard and its barcode checking tools are worth using here if you’re producing retail-facing codes.

    Step 5: Choose your label material and printer

    Direct thermal printers are cheaper and fine for labels that won’t face heat, sunlight, or heavy handling. Thermal transfer printers cost more but produce labels that survive warehouse conditions, chemical exposure, and long shelf life. Tecma’s implementation guide flags this as one of the most common cost miscalculations in SME rollouts: cheap labels that fade within weeks end up costing more in relabelling than the thermal transfer option would have.

    Step 6: Start scanning, scale hardware as you grow

    You don’t need dedicated scanners on day one. A smartphone camera scanning through your chosen software is enough to validate the workflow. As transaction volume and warehouse conditions demand it, move to dedicated 1D or 2D imagers, which read faster and more reliably in poor lighting or at awkward angles.

    Hands scanning barcode with smartphone in warehouse

    Step 7: Integrate and test the full cycle

    Connect the system to your POS or ERP and run a complete receive, pick, and dispatch cycle before going live. Fix any mismatches in this test phase, not once real orders depend on it.

    Step 8: Run your opening count and enforce the rule

    Your first labelled, scanned count becomes the authoritative baseline for everything after it. Reconcile any discrepancies against your previous records, then commit to one non-negotiable rule: no stock moves without a scan. That single rule, enforced consistently, is what keeps the system accurate six months in rather than just on launch day.

    Train staff with short, specific SOPs rather than long manuals, run a few supervised shifts to catch bad habits early, and check compliance weekly for the first month.

    Pro Tip: Print five test labels and physically walk your warehouse floor with them before ordering a full batch. Lighting, shelf height, and label angle all affect scan reliability in ways a desk test never reveals.

    What mistakes break barcode systems, and how do you avoid them?

    Most barcode rollouts don’t fail because of the software. They fail because of small, avoidable habits that erode accuracy month after month.

    The recurring culprits are:

    • Cheap label stock that fades or peels, making scans fail exactly when you need speed most.
    • Skipping location labels, which leaves “where” permanently unanswered even after “what” is solved.
    • Mixing barcode formats on the same SKU, which confuses staff and breaks reporting consistency.
    • Letting label maintenance slide, so damaged or missing labels pile up unnoticed until a stocktake reveals the mess.

    Test readability on the actual warehouse floor, not just at a desk, before you commit to a print run. One SKU should map to exactly one barcode, permanently. If you rebrand or repack, retire the old code rather than reusing it for something new.

    Pro Tip: Schedule a five-minute label check into every weekly stock review. Catching a peeling label on Tuesday costs nothing. Discovering it during a full stocktake costs hours.

    Build in a routine reconciliation cycle, weekly for high-turnover SKUs, monthly for slower stock, so small discrepancies get caught before they compound into a confidence problem with the whole system.

    How do you scale barcode tracking across sites and systems?

    Expanding beyond a single site changes the technical requirements, even if the daily scanning habits stay the same. Your inventory software needs proper API connectors to your POS, ERP, or e-commerce platform so stock levels sync without manual re-entry at each end.

    Multi-site operations also force a data model decision early: how you handle locations, lot numbers, and serial numbers inside the same system. Get this wrong at site two and you’ll be restructuring data while also running daily operations, which is a painful combination.

    Key considerations as you scale:

    • Permissions and visibility: decide which staff see stock across all sites versus only their own.
    • Offline scanning modes: warehouses with patchy connectivity need software that queues scans locally and syncs once a connection returns.
    • Staged rollouts: introduce barcode tracking zone by zone or site by site rather than switching everything over in one weekend.

    A phased rollout limits disruption and gives you a working reference site to troubleshoot against when problems surface elsewhere.

    What do SMEs get wrong about barcode tracking most often?

    Most guidance on this topic treats barcode tracking as a hardware decision: buy a scanner, print some labels, and you’re done. That’s backwards, and it’s the single biggest reason rollouts stall six weeks in. The software decision shapes everything downstream, including which labels you print and which scanners actually work with your setup.

    The trade-off we see argued about most often is phones versus dedicated scanners. Phones are fine to start, and plenty of small operations never need to move past them. But once volume climbs or staff work in poor lighting, dedicated imagers pay for themselves in fewer failed scans and less staff frustration. The other recurring debate, internal codes versus GS1 GTINs, isn’t really a technical question. It’s a question about where you’re selling. If retail or marketplace listings are on the horizon, plan for GTINs now rather than relabelling later.

    What we’d push back on is the assumption that getting this right requires a large technical team. It doesn’t. It requires getting the sequence right: software, then workflow, then hardware.

    — Ronald

    How can Flowlab help you set up barcode tracking?

    Flowlab’s complimentary app-fit review exists precisely for the sequencing problem above: working out which software, integration, or custom build actually fits your stock volume and staff setup before you spend a dollar on hardware.

    Flowlab

    If you already run a POS system, Flowlab can build the connectors that let barcode scans flow straight into your existing ERP or point-of-sale setup, covered in more detail on the ERP integration and retail app development pages. For retailers who need instant, accurate stock and pricing lookups at the till or on the floor, PriceFlow gives staff the right product answer right when they need it, without waiting on a separate stock check. If you’re comparing point-of-sale options alongside your barcode rollout, POSFlow is worth a look too.

    None of this requires a lengthy commitment upfront. You can try a FlowLab demo to see how the workflow feels in practice, or book the free app-fit review to get a clear, no-pressure answer on what fits your operation and what it would cost.

    Where can you learn more about barcode standards?

    For barcode standards and GTIN registration, GS1 remains the authoritative source globally, alongside its Digital Link standard for readability checks. For a broader look at inventory management tools generally, Yakho Telecoms’ inventory resource is a useful starting point.

    Sources

  • Spreadsheet to Web App: A Hiring Guide for SME Owners

    Spreadsheet to Web App: A Hiring Guide for SME Owners

    If your operational spreadsheet blocks collaboration, creates audit gaps, or can’t talk to your other systems, converting it into a custom web app is the right next step. Spreadsheets are fine for a single owner tracking a simple list. They become a liability once three people need to edit the same file, once a customer’s data lives in a cell with no access log, or once your team spends an hour each week copying numbers between tools that should just talk to each other.

    The single most practical action is not to sign a contract. It’s to book a short discovery session, often called an app-fit review, that validates the real scope and a realistic budget before anyone commits to anything.

    • If your spreadsheet has one person who “just knows” how it works, that’s a risk, not a workflow.
    • If two people editing at once causes overwritten data, that’s a concurrency problem code solves and formulas don’t.
    • If you can’t say who changed what and when, you have no audit trail, and that matters more than most owners realize until an investor, auditor, or regulator asks.

    Flowlab offers a complimentary app fit review built for exactly this moment: before budget, before a signed scope, while you’re still deciding if custom development is worth it.

    Key Takeaways

    A custom web app solves the collaboration, security, and integration failures that spreadsheets create only once a business outgrows single-user, single-file operations.

    Point Details
    Know your trigger Move to custom development once concurrency conflicts, missing audit trails, or single-person knowledge become operational risks.
    Insist on staged deliverables Demand a scope document, clickable prototype, and staging demo at each phase before accepting a milestone.
    Budget in realistic bands Expect roughly $25,000 to $75,000 for an MVP and $75,000 to $200,000 for a standard production platform.
    Vet vendors on process, not price Ask about named delivery roles, IP ownership, and documentation storage before comparing quotes.
    Start with discovery Flowlab’s complimentary app fit review clarifies scope and budget before any commitment is made.

    Table of Contents

    Why a Spreadsheet to Web App Move Solves Real Operational Problems

    Spreadsheets fail SMEs in predictable ways; common spreadsheet design mistakes and challenges in spreadsheet analysis are well-documented by tools like ExpressSheet. They usually work fine until the business grows past what one file and one person can hold together, and by then the failure modes are baked into daily operations.

    • Single-wizard knowledge. One employee built the master sheet, and if they leave, the formulas become a black box nobody else can safely touch.
    • Concurrency conflicts. Two people editing the same file at once means someone’s changes silently disappear.
    • Weak security. A password-protected Excel file shared over email is not access control. Anyone with the file has the same permissions as the owner.
    • No audit trail. You can’t reconstruct who changed a price, a quantity, or a customer record, or when.
    • Fragile formulas. One dragged cell reference or deleted row can quietly corrupt a calculation for months before anyone notices.

    A custom web app replaces all of that with role-based access (your warehouse staff sees inventory, not payroll), audit logs tied to individual logins, integrations that pull data automatically instead of requiring manual copy-paste, and a data model built to scale past a few hundred rows without slowing to a crawl.

    This is worth stating plainly: this guide is not about no-code, DIY spreadsheet-import tools that generate a basic app from an uploaded file. Those tools exist, but they solve a different problem for a different buyer. For an SME running real operations, that route tends to leave you with the same underlying data structure and the same fragility, just with a different interface glued on top.

    Pro Tip: Before any development conversation, ask your team to list every manual workaround they use to make the current spreadsheet behave. That list becomes your real feature spec.

    What Deliverables Should You Expect at Each Development Stage?

    A properly run project ties every stage to something you can actually see and test. If a vendor can’t produce it, that stage likely didn’t happen in any meaningful sense.

    1. Discovery, or app-fit review. The developer maps your actual workflow, not just your spreadsheet’s columns. This includes an integration inventory (what systems need to connect) and a prioritized feature list, ranked by impact rather than by what sounds impressive.
    2. Design and prototype. You should receive wireframes, a clickable prototype you can click through yourself, and written acceptance criteria defining what “done” means for each feature.
    3. Development, in sprints. Look for regular demos on a real staging URL, not screenshots in a slide deck, along with test reports and a QA pass before you’re asked to sign off on any milestone.
    4. Handover. This means a clear policy on code repository access, deployment instructions, API documentation, operational runbooks, and a stated answer to “where does all of this documentation live once the project ends?”
    5. Post-launch support. A defined warranty period, optional service-level agreements, and a clear scope for ongoing maintenance versus new feature requests.

    Moburst’s guidance on choosing a web development partner points to the same pattern: agencies that run discovery first and stay fluent in current frameworks tend to outperform ad hoc arrangements, particularly once a build gets complex enough to need more than one specialist.

    Stage What proves it happened
    Discovery Written scope document and prioritized feature list
    Design Clickable prototype with acceptance criteria
    Development Staging demo, updated each sprint
    Handover Repository access, API docs, runbook location
    Support Written warranty period and maintenance terms

    What Do Cost and Timeline Ranges Actually Look Like?

    Costs vary by scope, but there are useful industry anchors. RaftLabs’s guide to custom software development puts a minimum viable version of a custom build at roughly $25,000 to $75,000, typically delivered in 8 to 12 weeks. A standard production platform, with more integrations and refined workflows, tends to run $75,000 to $200,000 and take 16 to 24 weeks. Enterprise-scale builds with heavier compliance or data requirements run higher and longer still.

    What actually pushes a project from one band to the next?

    • The number of system integrations (accounting software, POS, CRM) you need working on day one.
    • How many distinct user roles and permission levels the app has to support.
    • Whether you’re migrating years of historical data out of old spreadsheets, and how messy that data is.
    • Regulatory or compliance requirements specific to your industry.
    • The complexity of automation and reporting you want built in versus bolted on later.

    Starting with an MVP and iterating afterward, rather than trying to build the “final” version on day one, reduces financial risk considerably. It also lets you confirm the app is actually solving the problem before you spend on the features that were nice-to-haves rather than must-haves.

    How Do You Evaluate a Developer or Agency Proposal?

    Not every proposal that looks polished is built on a solid process. Forbes Communications Council recommends asking targeted, specific questions before signing anything, rather than relying on a general sense of trust.

    Ask every prospective partner:

    1. What does your discovery process actually involve, and what will you show me at the end of it?
    2. Who, by name and role, will be building this? Not “our team,” but specific people.
    3. Can you show me a comparable project you’ve delivered for another SME?
    4. How does design hand off to development, and what happens if requirements change mid-build?
    5. Where is this hosted, and what does your deployment and testing process look like?
    6. Who owns the intellectual property and source code once the project is complete?
    7. Where will documentation live, and who has access to it after handover?

    Demand evidence, not promises: a written scope document, a clickable prototype you can test yourself, a live staging demo (not a slideshow), named delivery personnel, and a sample sprint schedule showing how work is actually paced.

    Watch for red flags. A vendor who won’t name who’s building your app, who has no staging URL or demo cadence to show progress, who gives vague answers on IP ownership or documentation storage, or who pushes a fixed price before running any discovery, is asking you to buy blind.

    Pro Tip: A vendor willing to give you staging access mid-project is showing you working code, not a mockup. That single request tells you more about their process than an hour of sales talk.

    Moburst notes that agencies generally handle multidisciplinary, complex builds better than coordinating several independent freelancers, largely because accountability sits with one team rather than scattered across contractors. For a tightly scoped, low-complexity task, a freelancer can be the more economical choice. For a workflow with multiple integrations and user roles, an agency’s structure tends to matter more.

    How Do You Get Your Team to Actually Use the New App?

    A technically flawless app that nobody uses is a wasted budget. Adoption fails most often not because the software is bad, but because the rollout ignores how people actually change habits.

    Start training before launch day, not after. Walk your team through the staging demo during development, not just the finished product, so the interface feels familiar rather than sudden. Identify one or two internal champions per department, people who are already comfortable with the old spreadsheet, and get them using the new app first so they can answer their colleagues’ questions instead of routing everything back to the developer.

    Run the old spreadsheet and the new app in parallel for a short, defined window rather than switching overnight. This gives your team a safety net and gives you a way to catch discrepancies before the spreadsheet is retired for good. Set a hard cutoff date, though. An indefinite parallel period just means half your staff keeps using the old habit forever.

    Hands placing smartphone next to laptop on desk

    Finally, build feedback into the first month deliberately. Short, scheduled check-ins where staff can flag friction points catch small usability problems before they calcify into workarounds, which is exactly the trap that made the original spreadsheet unmanageable in the first place.

    What Goes Wrong Most Often in These Conversions?

    The most common failure isn’t a coding mistake. It’s replicating the spreadsheet’s logic in code without rethinking the underlying workflow, which just moves the same inefficiency into a more expensive format. A good developer maps how work actually flows through your business before writing anything.

    Other recurring pitfalls include underestimating data migration. Years of inconsistent entries, merged cells, and inconsistent naming conventions in the old spreadsheet don’t clean themselves up automatically when you move to a database, and migration often takes longer than either side expects.

    Scope creep is another common trap. Once people see a working prototype, requests multiply. That’s not inherently bad, but it needs to be managed through a clear change process rather than absorbed silently into the original budget and timeline.

    And continuity risk deserves more attention than it usually gets. The real risk in most projects isn’t the code itself. It’s missing documentation and undefined delivery roles, meaning if your main point of contact leaves the vendor’s team, you’re left with a system nobody on either side fully understands. Insisting on named personnel and a clear answer to where documentation lives protects you long after launch.

    What Goes Wrong Most Often in These Conversions? — overview diagram

    An Editorial Note on Getting This Right

    Watching SME app projects unfold, the pattern is consistent: the businesses that spend real time in discovery spend less money overall, because they catch mismatched expectations before a single line of code exists.

    Skipping that step to save a week almost always costs more later, in rework or in a system that solves the wrong problem. A no-pressure, demo-first process, backed by a complimentary app fit review, exists precisely because a client who can see and test something makes better decisions than one working from a proposal document alone.

    — Ronald

    Start With Flowlab’s App Fit Review Before You Commit to Anything

    Flowlab builds custom web apps for SMEs from the ground up, but it also offers ready-made products and adapted solutions when a full custom build isn’t what the situation actually calls for. That range matters here: you’re not locked into the most expensive option before you know if you need it.

    Flowlab

    The complimentary app fit review is where this starts. It’s a working session that maps your actual workflow, flags what genuinely needs custom development versus what an existing product can handle, and gives you a realistic cost and timeline range before you sign anything. No vague proposal, no pressure to commit on the spot.

    If you want to see what a finished product looks and feels like first, Flowlab’s product demos let you try ready-made solutions like queue management or lead tracking before deciding whether your case needs a custom build at all. Either way, the next step is the same: book the review, get a clear scope, and decide from there with real numbers in hand.

    Sources